T..D90.. Placa de cocción Hob Βάση...
44
[es] Instrucciones de uso ......... 3 [en] Instruction manual ............17 [el] Οδηγíες χρήσεως ..............30 T..D90.. Placa de cocción Hob Βάση εστιών
Transcript of T..D90.. Placa de cocción Hob Βάση...
[es] Instrucciones de uso .........3[en] Instruction manual ............17[el] Οδηγíες χρήσεως ..............30
T..D90..Placa de cocción Hob Βάση εστιών

T..D90..
2 Ø = cm
Û Índice[es]Instrucciones de uso
Consejos y advertencias de seguridad....................................3Causas de los daños .........................................................................5Protección del medio ambiente ................................................5Eliminación de residuos respetuosa con el medio ambiente....5Consejos para ahorrar energía ........................................................5La Cocción por Inducción .........................................................6Ventajas de la Cocción por Inducción ...........................................6Recipientes ..........................................................................................6Presentación del aparato...........................................................7El panel de mando .............................................................................7Las zonas de cocción........................................................................7Indicador de calor residual ...............................................................7Programar la placa de cocción .................................................8Encender y apagar la placa de cocción ........................................8Ajustar la zona de cocción ...............................................................8Tabla de cocción ................................................................................8Seguro para niños....................................................................10Activar y desactivar el seguro para niños................................... 10Seguro automático para niños...................................................... 10Función Powerboost ................................................................10Limitaciones de uso ........................................................................ 10Así se activa......................................................................................10Así se desactiva ............................................................................... 10Función programación del tiempo..........................................10
Apagar automáticamente una zona de cocción........................ 10El reloj avisador................................................................................ 11Función mantener caliente ......................................................11Activar ................................................................................................11Desactivar..........................................................................................11Función protección para limpieza ..........................................11Limitación automática de tiempo ...........................................11Visualizar el consumo de energía...........................................12Ajustes básicos ........................................................................12Acceder a los ajustes básicos ...................................................... 13Cuidados y limpieza.................................................................13Placa de cocción ............................................................................. 13Marco de la placa de cocción ...................................................... 13Reparar averías.........................................................................14Ruido normal durante el funcionamiento del aparato .............. 14Servicio de Asistencia Técnica...............................................15Platos testados.........................................................................15
Produktinfo
Encontrará más información sobre productos, accesorios, piezas de repuesto y servicios en internet: www.neff-international.com y también en la tienda online: www.neff-eshop.com
: Consejos y advertencias de seguridadLeer con atención las siguientes instrucciones. Conservar las instrucciones de uso y montaje, así como la tarjeta del aparato para un uso posterior o para posibles compradores en un futuro.Comprobar el aparato tras sacarlo del embalaje. En caso de que haya sufrido daños durante el transporte, no conectar el aparato, ponerse en contacto con el Servicio Técnico y dejar constancia por escrito de los daños ocasionados, de lo contrario se perderá el derecho a cualquier tipo de indemnización.Este aparato tiene que ser instalado según las instrucciones de montaje incluidas.Este aparato ha sido diseñado para uso doméstico. Utilizar el aparato exclusivamente para preparar alimentos y bebidas.Vigilarlo mientras está funcionando y emplearlo exclusivamente en espacios cerrados.No usar cubiertas. Estas pueden provocar accidentes, p. ej. debido al sobrecalentamiento, ignición o desprendimiento de fragmentos de materiales.
No usar protectores inadecuados de seguridad para niños o guardas. Estos pueden causar accidentes.Este aparato no está previsto para el funcionamiento con un reloj temporizador externo o un mando a distancia.Este aparato puede ser utilizado por niños a partir de 8 años y por personas con limitaciones físicas, sensoriales o psíquicas, o que carezcan de experiencia y conocimientos, siempre y cuando sea bajo la supervisión de una persona responsable de su seguridad o que le haya instruido en el uso correcto del aparato siendo consciente de los daños que se pudieran ocasionar.No dejar que los niños jueguen con el aparato. La limpieza y el mantenimiento rutinario no deben encomendarse a los niños a menos que sean mayores de 8 años y lo hagan bajo supervisión.Mantener los niños menores de 8 años alejados del aparato y del cable de conexión.
3

En el caso de llevar implantado un marcapasos o dispositivo médico similar deberá tener especial precaución al utilizar o acercarse a las placas de cocción de inducción cuando estén en funcionamiento. Consulte a su médico o al fabricante del dispositivo para asegurarse de que cumpla la normativa vigente e informarse de las posibles incompatibilidades.¡Peligro de incendio!■ El aceite caliente y la grasa se inflaman con facilidad. Estar siempre pendiente del aceite caliente y de la grasa. No apagar nunca con agua un fuego. Apagar la zona de cocción. Sofocar con cuidado las llamas con una tapa, una tapa extintora u otro medio similar.
¡Peligro de incendio!
■ Las zonas de cocción se calientan mucho. No colocar objetos inflamables sobre la placa de cocción. No almacenar objetos sobre la placa de cocción.
¡Peligro de incendio!
■ El aparato se calienta mucho. No guardar objetos inflamables o aerosoles en los cajones directamente debajo de la placa de cocción.
¡Peligro de incendio!
■ La placa de cocción se desconecta de forma automática y no se puede seguir utilizando. Se puede conectar posteriormente de forma involuntaria. Desconectar el fusible de la caja de fusibles. Avisar al Servicio de Asistencia Técnica.
¡Peligro de quemaduras!■ Las zonas de cocción y adyacentes, en especial el marco de la placa de cocción (si lo hay), se calientan mucho. No tocar nunca las superficies calientes. No dejar que los niños que acerquen.
¡Peligro de quemaduras!
■ La zona de cocción calienta, pero el indicador no funciona. Desconectar el fusible de la caja de fusibles. Avisar al Servicio de Asistencia Técnica.
¡Peligro de quemaduras!
■ Los objetos de metal se calientan rápidamente al entrar en contacto con la placa de cocción. No depositar nunca sobre la placa de cocción objetos metálicos como cuchillos, tenedores, cucharas o tapas.
¡Peligro de incendio!
■ Después de cada uso, apagar siempre la placa de cocción con el interruptor principal. No esperar a que la placa de cocción se apague automáticamente por falta de recipiente.
¡Peligro de descarga eléctrica!■ Las reparaciones inadecuadas son peligrosas. Las reparaciones y la sustitución de cables de conexión defectuosos solo pueden ser efectuadas por personal del Servicio de Asistencia Técnica debidamente instruido. Si el aparato está averiado, desenchufarlo de la red o desconectar el fusible de la caja de fusibles. Avisar al Servicio de Asistencia Técnica.
¡Peligro de descarga eléctrica!
■ La humedad interior puede provocar una descarga eléctrica. No utilizar ni limpiadores de alta presión ni por chorro de vapor.
¡Peligro de descarga eléctrica!
■ Un aparato defectuoso puede ocasionar una descarga eléctrica. No conectar nunca un aparato defectuoso. Desenchufar el aparato de la red o desconectar el fusible de la caja de fusibles. Avisar al Servicio de Asistencia Técnica.
¡Peligro de descarga eléctrica!
■ Las fisuras o roturas en la vitrocerámica conllevan riesgo de electrocución. Desconectar el fusible de la caja de fusibles. Avisar al Servicio de Asistencia Técnica.
¡Peligro de avería!Esta placa está dotada de un ventilador situado en la parte inferior. En caso de encontrarse un cajón debajo de la placa de cocción no deberán guardarse objetos pequeños o papeles, al ser absorbidos, podrían estropear el ventilador o perjudicar la refrigeración.Entre el contenido del cajón y la entrada del ventilador debe dejarse una distancia mínima de 2 cm.¡Peligro de lesiones!■ Al cocer al baño María, la placa de cocción y el recipiente para cocinar podrían fragmentarse debido al sobrecalentamiento. El recipiente para cocer al baño María no debe tocar directamente la base del cazo que contiene agua. Utilizar exclusivamente recipientes para cocinar resistentes al calor.
¡Peligro de lesiones!
■ Las ollas pueden saltar hacia arriba de forma repentina por la presencia de líquido entre la base del recipiente y la zona de cocción. Mantener siempre secas la zona de cocción y la base del recipiente.
4

Causas de los daños¡Atención!■ Las bases ásperas de los recipientes pueden rayar la placa
de cocción.
■ No colocar nunca recipientes vacíos en las zonas de cocción. Pueden provocar daños.
■ No colocar recipientes calientes sobre el panel de mando, las zonas de indicadores o el marco de la placa. Pueden provocar daños.
■ La caída de objetos duros o puntiagudos sobre la placa de cocción puede originar daños.
■ El papel de aluminio y los recipientes de plástico se derriten sobre las zonas de cocción calientes. No se recomienda el uso de láminas protectoras en la placa de cocción.
Vista generalEn la siguiente tabla presentamos los daños más frecuentes:
Protección del medio ambienteEliminación de residuos respetuosa con el medio ambiente
Consejos para ahorrar energía■ Utilizar siempre la tapa correspondiente para cada olla.
Cuando se cocina sin tapa, se necesita bastante más energía. Utilizar una tapa de cristal para poder tener visibilidad sin necesidad de levantarla.
■ Utilizar recipientes con bases planas. Las bases que no son planas necesitan un consumo mayor de energía.
■ El diámetro de la base de los recipientes debe corresponderse con el tamaño de la zona de cocción. Atención: los fabricantes de recipientes suelen indicar el diámetro superior del recipiente, que por lo general es mayor que el diámetro de la base del recipiente.
■ Utilizar un recipiente pequeño para cantidades pequeñas. Un recipiente grande y poco lleno requiere mucha energía.
■ Al cocer, utilizar poca agua. De este modo se ahorra energía y se conservan las vitaminas y minerales de las verduras.
■ Seleccionar el nivel de potencia más bajo que mantenga la cocción. Con uno demasiado alto, se desperdicia energía.
Daños Causa Medida
Manchas Alimentos derramados Eliminar inmediatamente los alimentos que se derramen con un rascador para vidrio.
Productos de limpieza inadecuados Utilizar productos de limpieza adecuados para la placa de cocción.
Rayaduras Sal, azúcar y arena No utilizar la placa de cocción como bandeja o encimera.
Las bases rugosas de recipientes rayan la placa de cocción
Comprobar los recipientes.
Decoloraciones Productos de limpieza inadecuados Utilizar productos de limpieza adecuados para la placa de cocción.
Roce de los recipientes Levantar las ollas y sartenes para cambiarlas de lugar.
Desconchaduras Azúcar, sustancias con un alto conte-nido de azúcar
Eliminar inmediatamente los alimentos que se derramen con un rascador para vidrio.
Eliminar el embalaje de forma ecológica.
Este aparato está marcado con el símbolo de cumplimiento con la Directiva Europea 2012/19/UE relativa a los aparatos eléctricos y electrónicos usados (Residuos de aparatos eléctricos y electrónicos RAEE).
La directiva proporciona el marco general válido en todo el ámbito de la Unión Europea para la retirada y la reutilización de los residuos de los aparatos eléctricos y electrónicos.
5

La Cocción por InducciónVentajas de la Cocción por InducciónLa Cocción por Inducción supone un cambio radical en la forma tradicional de calentamiento, el calor se genera directamente en el recipiente. Por este motivo, presenta una serie de ventajas:
■ Ahorro de tiempo al cocinar y freír; al calentar directamente el recipiente.
■ Se ahorra energía.
■ Cuidados y limpieza más sencillos. Los alimentos que hayan rebosado no se queman con tanta rapidez.
■ Control de calor y seguridad; la placa suministra o corta energía inmediatamente al actuar sobre el mando de control. La zona de cocción por inducción deja de suministrar potencia si se retira el recipiente sin haberlo desconectado previamente.
RecipientesSólo son recipientes adecuados para cocinar por inducción los recipientes ferromagnéticos, pueden ser de:
■ acero esmaltado
■ hierro fundido
■ vajilla especial para inducción de acero inoxidable.
Para saber si los recipientes son adecuados comprobar que la base del recipiente es atraída por un imán.
Existe otro tipo de recipientes para inducción, cuya base no es ferromagnética en su totalidad.
Recipientes no apropiadosNo utilizar nunca placas difusoras ni recipientes de:
■ acero fino normal
■ vidrio
■ barro
■ cobre
■ aluminio
Características de la base del recipienteLas características de la base de los recipientes pueden influir en la homogeneidad del resultado de la cocción. Recipientes fabricados con materiales que ayudan a difundir el calor, como recipientes "sandwich" de acero inoxidable, reparten el calor uniformemente, ahorrando tiempo y energía.
Ausencia de recipiente o tamaño no adecuadoSi no se coloca un recipiente sobre la zona de cocción seleccionada, o éste no es del material o tamaño adecuado, el nivel de cocción que se visualiza en el indicador de la zona de cocción, parpadeará. Colocar el recipiente adecuado para que deje de parpadear. Si se tarda más de 90 segundos, la zona de cocción se apaga automáticamente.
Recipientes vacíos o con base finaNo calentar recipientes vacíos, ni utilizar recipientes con base fina. La placa de cocción está dotada de un sistema interno de seguridad, pero un recipiente vacío puede calentarse tan rápidamente que la función “desactivación automática" no tenga tiempo de reaccionar y pueda alcanzar una temperatura muy elevada. La base del recipiente podría llegar a derretirse y dañar el cristal de la placa. En este caso, no tocar el recipiente y apagar la zona de cocción. Si después de enfriarse no funciona, ponerse en contacto con el servicio de asistencia técnica.
Detección de recipienteCada zona de cocción tiene un límite mínimo de detección de recipiente, que varía en función del material del recipiente que se está utilizando. Por este motivo, se debe utilizar la zona de cocción que más se adecue al diámetro de su recipiente.
Al utilizar recipientes grandes con un área ferromagnética de diámetro más pequeño, se calienta únicamente la zona ferromagnética, de manera que la distribución de calor puede no ser homogénea.
Los recipientes con zonas de aluminio insertadas en la base, reducen el área ferromagnética, por lo tanto, la potencia suminis-trada puede ser menor, puede haber problemas de detección del recipiente o incluso no ser detectado.
Para obtener buenos resultados de cocción, es recomendable que el diámetro del área ferro-magnética del recipiente se ajuste al tamaño de la zona de cocción. Si el recipiente no es detectado en una zona de coc-ción, pruébelo en la zona de diá-metro inmediatamente inferior.
6

Presentación del aparatoEn la página 2 encontrará información sobre las medidas y potencias de las zonas de cocción.
El panel de mando
Superficies de mandoAl pulsar un símbolo se activa la función correspondiente.
Nota: Mantener las superficies de mando siempre secas. La humedad puede afectar al funcionamiento.
Las zonas de cocción
Indicador de calor residualLa placa de cocción cuenta con un indicador de calor residual en cada zona de cocción que muestra cuáles están aún calientes. Evitar tocar la zona de cocción que muestre esta indicación.
Aunque la placa esté apagada, el indicador œ o •, se mantendrá iluminado mientras la zona de cocción esté caliente.
Al retirar el recipiente antes de haber apagado la zona de cocción, aparecerán alternativamente el indicador œ o • y el nivel de potencia seleccionado.
Superficies de mando
# Interruptor principal
$ Seleccionar la zona de cocción
A/@ Seleccionar ajustes
" Función protección para limpieza
‚ Seguro para niños
˜ Función Powerboost
– Función mantener caliente
3 Función programación del tiempo
Indicadores
‹ Operatividad
‚-Š Niveles de potencia
˜ Función Powerboost
•/œ Calor residual
‹‹ Función programación del tiempo
‚ Seguro para niños
– Función mantener caliente
x Desconexión automática
S Reloj avisador
Zona de cocción
$ Zona de cocción simple Utilizar un recipiente del tamaño adecuado.
Utilizar sólo recipientes aptos para la cocción por inducción, ver apartado “Recipientes apropiados".
7

Programar la placa de cocciónEn este capítulo se muestra cómo ajustar una zona de cocción. En la tabla figuran los niveles de potencia y tiempos de cocción para distintos platos.
Encender y apagar la placa de cocciónLa placa de cocción se enciende y se apaga con el interruptor principal.
Encender: pulsar el símbolo #. Suena una señal acústica. El indicador situado junto al interruptor principal y los indicadores ‹ de las zonas de cocción se iluminan. La placa de cocción está lista para su funcionamiento.
Apagar: pulsar el símbolo # hasta que los indicadores se apaguen. Todas las zonas de cocción están apagadas. El indicador de calor residual permanece iluminado hasta que las zonas de cocción se hayan enfriado lo suficiente.
Notas■ La placa de cocción se apaga de forma automática cuando
todas las zonas de cocción permanecen más de 20 segundos apagadas.
■ Los ajustes seleccionados permanecen memorizados durante los primeros 4 segundos después de apagar la placa. Si se vuelve a encender la placa de cocción en este periodo de tiempo se aplican los ajustes anteriores.
Ajustar la zona de cocciónSeleccionar el nivel de potencia deseado con los símbolos + y -. Nivel de potencia 1 = potencia mínima.
Nivel de potencia 9 = potencia máxima.
Cada nivel de potencia dispone de un ajuste intermedio. Está señalado con un punto.
Seleccionar la zona de cocción y el nivel de potenciaLa placa de cocción debe estar encendida.
1. Seleccionar la zona de cocción con el símbolo $.
2. En los 10 segundos siguientes, pulsar el símbolo + ó -. Se muestra el ajuste básico:Símbolo + nivel de potencia 9Símbolo - nivel de potencia 4
El nivel de potencia se ha ajustado.
Modificar el nivel de potenciaSeleccionar la zona de cocción y pulsar el símbolo + ó - hasta que aparezca el nivel de potencia deseada.
Apagar la zona de cocciónSeleccionar la zona de cocción y a continuación pulsar el símbolo + ó - hasta que aparezca ‹.
La zona de cocción se apaga y aparece el indicador de calor residual.
Notas■ Si no se ha colocado un recipiente en la zona de cocción, el
nivel de potencia seleccionado parpadea. Transcurrido un tiempo la zona de cocción se apaga.
■ Si se ha colocado un recipiente en la zona de cocción antes de encender la placa, este será detectado en los 20 segundos siguientes tras pulsar el interruptor principal y la zona de cocción se seleccionará automáticamente. Una vez detectado seleccionar el nivel de potencia en los 20 segundos siguientes, de lo contrario la zona de cocción se apaga.Aunque se coloque más de un recipiente, al encender la placa de cocción, sólo será detectado uno de ellos.
Tabla de cocciónEn la tabla siguiente se presentan algunos ejemplos.
Los tiempos de cocción dependen del nivel de potencia, tipo, peso y calidad de los alimentos. Por este motivo, existen variaciones.
Remover de vez en cuando si se calientan purés, cremas y salsas espesas.
Utilizar el nivel de potencia 9 para el inicio de cocción.
Nivel de potencia Duración de cocción
Derretir
Chocolate, cobertura de chocolate 1-1. -
Mantequilla, miel, gelatina 1-2 -
Calentar y mantener caliente
Potaje (p.ej. lentejas) 1.-2 -
Leche** 1.-2. -
Salchichas calentadas en agua** 3-4 -
* Cocción sin tapa** Sin tapa*** Dar la vuelta con frecuencia
8
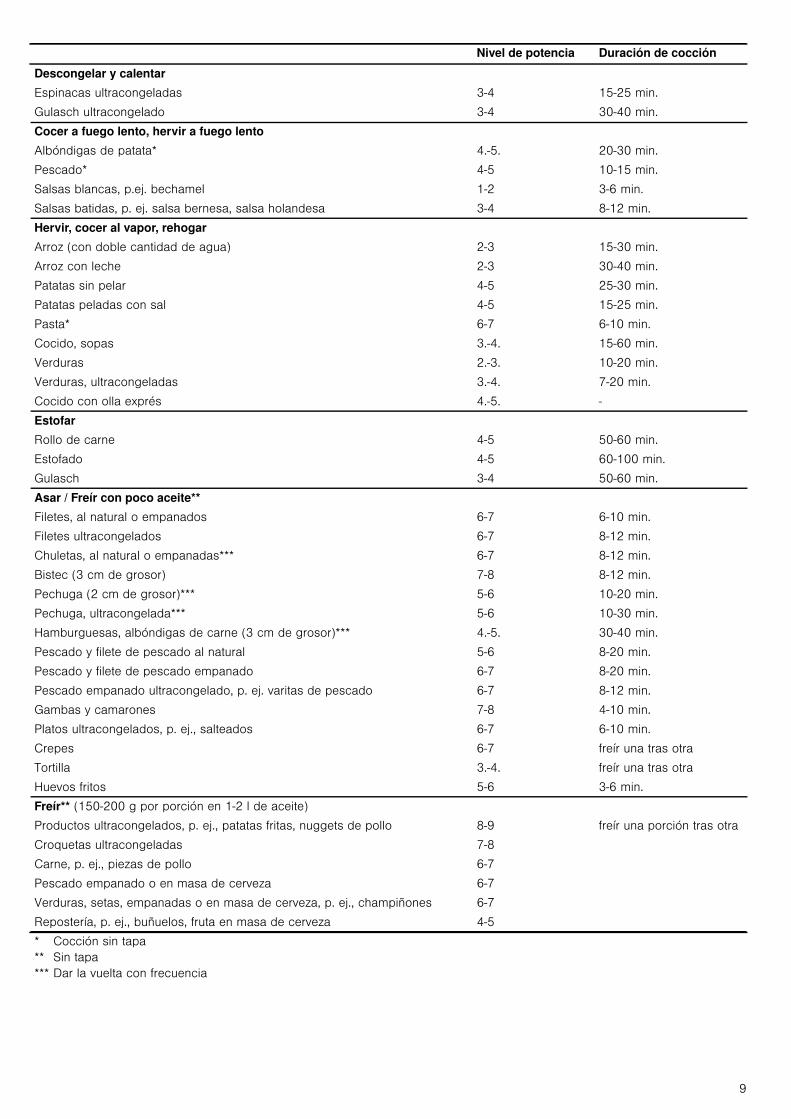
Descongelar y calentar
Espinacas ultracongeladas 3-4 15-25 min.
Gulasch ultracongelado 3-4 30-40 min.
Cocer a fuego lento, hervir a fuego lento
Albóndigas de patata* 4.-5. 20-30 min.
Pescado* 4-5 10-15 min.
Salsas blancas, p.ej. bechamel 1-2 3-6 min.
Salsas batidas, p. ej. salsa bernesa, salsa holandesa 3-4 8-12 min.
Hervir, cocer al vapor, rehogar
Arroz (con doble cantidad de agua) 2-3 15-30 min.
Arroz con leche 2-3 30-40 min.
Patatas sin pelar 4-5 25-30 min.
Patatas peladas con sal 4-5 15-25 min.
Pasta* 6-7 6-10 min.
Cocido, sopas 3.-4. 15-60 min.
Verduras 2.-3. 10-20 min.
Verduras, ultracongeladas 3.-4. 7-20 min.
Cocido con olla exprés 4.-5. -
Estofar
Rollo de carne 4-5 50-60 min.
Estofado 4-5 60-100 min.
Gulasch 3-4 50-60 min.
Asar / Freír con poco aceite**
Filetes, al natural o empanados 6-7 6-10 min.
Filetes ultracongelados 6-7 8-12 min.
Chuletas, al natural o empanadas*** 6-7 8-12 min.
Bistec (3 cm de grosor) 7-8 8-12 min.
Pechuga (2 cm de grosor)*** 5-6 10-20 min.
Pechuga, ultracongelada*** 5-6 10-30 min.
Hamburguesas, albóndigas de carne (3 cm de grosor)*** 4.-5. 30-40 min.
Pescado y filete de pescado al natural 5-6 8-20 min.
Pescado y filete de pescado empanado 6-7 8-20 min.
Pescado empanado ultracongelado, p. ej. varitas de pescado 6-7 8-12 min.
Gambas y camarones 7-8 4-10 min.
Platos ultracongelados, p. ej., salteados 6-7 6-10 min.
Crepes 6-7 freír una tras otra
Tortilla 3.-4. freír una tras otra
Huevos fritos 5-6 3-6 min.
Freír** (150-200 g por porción en 1-2 l de aceite)
Productos ultracongelados, p. ej., patatas fritas, nuggets de pollo 8-9 freír una porción tras otra
Croquetas ultracongeladas 7-8
Carne, p. ej., piezas de pollo 6-7
Pescado empanado o en masa de cerveza 6-7
Verduras, setas, empanadas o en masa de cerveza, p. ej., champiñones 6-7
Repostería, p. ej., buñuelos, fruta en masa de cerveza 4-5
Nivel de potencia Duración de cocción
* Cocción sin tapa** Sin tapa*** Dar la vuelta con frecuencia
9

Seguro para niñosLa placa de cocción se puede asegurar contra una conexión involuntaria para impedir que los niños enciendan las zonas de cocción.
Activar y desactivar el seguro para niñosLa placa de cocción debe estar apagada.
Activar: pulsar el símbolo ‚ durante 4 segundos aproximadamente. El indicador ‚ se ilumina durante 10 segundos. La placa de cocción queda bloqueada.
Desactivar: pulsar el símbolo ‚ durante 4 segundos aproximadamente. Se ha desactivado el bloqueo.
Seguro automático para niñosCon esta función, el seguro para niños se activa automáticamente siempre que se apaga la placa de cocción.
Activar y desactivarEn el capítulo Ajustes básicos se presenta la información relativa a la conexión del seguro automático para niños.
Función PowerboostCon la función Powerboost se pueden calentar grandes cantidades de agua más rápidamente que utilizando el nivel de potencia Š.
Limitaciones de usoEsta función está disponible en todas las zonas de cocción, siempre que la otra zona del mismo grupo no esté en funcionamiento, (ver imagen). De lo contrario, en la indicación visual de la zona de cocción seleccionada parpadearán ˜ y Š; a continuación se ajustará automáticamente el nivel de potencia Š.
Así se activa1. Seleccionar una zona de cocción.
2. Pulsar el símbolo ˜. El indicador ˜ se ilumina.
La función Powerboost se habrá activado.
Así se desactiva1. Seleccionar una zona de cocción.
2. Pulsar el símbolo ˜.El indicador ˜ deja de visualizarse y la zona de cocción volverá al nivel de potencia Š.
La función Powerboost se habrá desactivado.
Nota: En determinadas circunstancias, la función Powerboost se puede desactivar automáticamente para proteger los componentes electrónicos del interior de la placa.
Función programación del tiempoEsta función se puede utilizar de dos formas diferentes:
■ para apagar automáticamente una zona de cocción.
■ como reloj avisador.
Apagar automáticamente una zona de cocciónLa zona se apaga automáticamente una vez transcurrido el tiempo seleccionado.
Programar el tiempo de cocción.La placa de cocción debe estar encendida:
1. Seleccionar la zona de cocción y el nivel de potencia deseado.
2. Pulsar el símbolo 3. El indicador x de la zona de cocción se ilumina. En la indicación visual de la función programación del tiempo se muestra ‹‹.
3. Pulsar el símbolo + ó -. Se muestra el ajuste básico:Símbolo +: 30 minutos.Símbolo -: 10 minutos.
4. Pulsar los símbolo + ó - hasta que aparezca el tiempo de cocción deseado.
Al cabo de unos segundos, el tiempo de cocción comienza a transcurrir.
10

Nota: Se puede programar automáticamente el mismo tiempo de cocción para todas las zonas. El tiempo programado transcurrirá de forma independiente para cada una de las zonas de cocción.En el capítulo Ajustes básicos se encuentra la información relativa a la programación automática del tiempo de cocción.
Modificar o cancelar el tiempoSeleccionar la zona de cocción. Pulsar el símbolo 3 y modificar el tiempo de cocción con los símbolos + ó -, o ajustar a ‹‹.
Una vez transcurrido el tiempoLa zona de cocción se apaga. Suena una señal de aviso y en la indicación visual de la función programación del tiempo se muestra ‹‹ durante 10 segundos. El indicador x de la zona de cocción se ilumina. Pulsar el símbolo 3, los indicadores se apagan y la señal acústica finaliza.
Notas■ Si se ha programado un tiempo de cocción para varias
zonas, en la indicación visual de la función programación del tiempo se muestra siempre el tiempo de la zona de cocción seleccionada.
■ Se puede ajustar un tiempo de cocción de hasta 99 minutos.
El reloj avisadorEl reloj avisador de cocina permite programar un tiempo de hasta 99 minutos. No depende de los otros ajustes. Esta función no apaga automáticamente una zona de cocción.
Así se programaNinguna zona de cocción debe estar seleccionada.
1. Pulsar el símbolo 3. En la indicación visual de la función programación del tiempo se muestra ‹‹ y el símbolo W
2. Pulsar los símbolos + ó -. Se muestra el ajuste básico. Símbolo +: 10 minutos.Símbolo -: 05 minutos.
3. Ajustar el tiempo deseado con los símbolos + ó -. Al cabo de unos segundos, el tiempo comienza a transcurrir.
Modificar o cancelar el tiempoPulsar varias veces el símbolo 3 hasta que el indicador W se ilumine. Modificar el tiempo o ajustar a ‹‹ con los símbolos + ó -.
Una vez transcurrido el tiempoSuena una señal de aviso. En la indicación visual de la función programación del tiempo se muestra ‹‹. Tras 10 segundos los indicadores se apagan.
Al pulsar el símbolo 3, los indicadores se apagan y la señal acústica finaliza.
Función mantener calienteEsta función es apropiada para derretir chocolate o mantequilla y para mantener calientes los alimentos.
Activar1. Seleccionar la zona de cocción.
2. En los siguientes 10 segundos, pulsar el símbolo –.El indicador –se ilumina.
La función mantener caliente se habrá activado.
Desactivar1. Seleccionar la zona de cocción deseada.
2. Pulsar el símbolo –.El indicador –desaparece.
La zona de cocción se apaga y aparece el indicador de calor residual.
Función protección para limpiezaSi se limpia el panel de mando mientras la placa de cocción está encendida, los ajustes se pueden modificar.
Para evitarlo, la placa de cocción dispone de la función protección para limpieza. Pulsar el símbolo ". Suena una señal. Se ilumina el indicador Ú situado junto al símbolo ". El panel de mando queda bloqueado durante 35 segundos.
Ahora se puede limpiar la superficie del panel de mando sin riesgo a modificar los ajustes.
Nota: El bloqueo no afecta al interruptor principal. Se puede apagar la placa de cocción cuando se desee.
Limitación automática de tiempoCuando una zona de cocción está en funcionamiento durante un período de tiempo prolongado y no se lleva a cabo ninguna modificación en el ajuste, se activa la limitación automática de tiempo.
La zona de cocción deja de calentar. En la indicación visual de la zona de cocción parpadea alternadamente ”, ‰ y el indicador de calor residual œ/•.
Al pulsar cualquier símbolo, se apaga el indicador. Ahora se puede volver a ajustar la zona de cocción.
Cuando se activa la limitación automática, ésta se rige en función del nivel de potencia seleccionado (de 1 a 10 horas).
11

Visualizar el consumo de energíaCon esta función se puede visualizar el consumo total de energía durante el tiempo que ha estado encendida la placa de cocción.
Tras apagar la placa de cocción, el consumo en kwh se visualizará durante 10 segundos.
En la imagen se muestra un ejemplo con un consumo de ‚.‹‰ kwh.
En el capítulo Ajustes básicos se encuentra la información relativa a la activación de esta función.
Ajustes básicosEl aparato presenta diversos ajustes básicos. Estos ajustes pueden adaptarse a las necesidades propias del usuario.
Indicador Función
™‚ Seguro automático para niños
‹ Desactivado.*
‚ Activado.
™ƒ Señales acústicas
‹ Señal de confirmación y señal de error desactivadas.
‚ Sólo señal de error activada.
ƒ Sólo señal de confirmación activada.
„ Todas las señales activadas.*
™„ Visualizar el consumo de energía
‹ Desactivada.*
‚ Activada.
™† Programación automática del tiempo de cocción.
‹ Apagado.*
‚-ŠŠ Tiempo de desconexión automática.
™‡ Duración de la señal de aviso de la función programación del tiempo
‚ 10 segundos.
ƒ 30 segundos.
„ 1 minuto*.
™ˆ Función Power-Management
‹ = Desactivada.*
‚ = 1000 W. potencia mínima.
‚. = 1500 W.
ƒ = 2000 W.
...
Š ó Š. = potencia máxima de la placa.
*Ajuste de fábrica
12
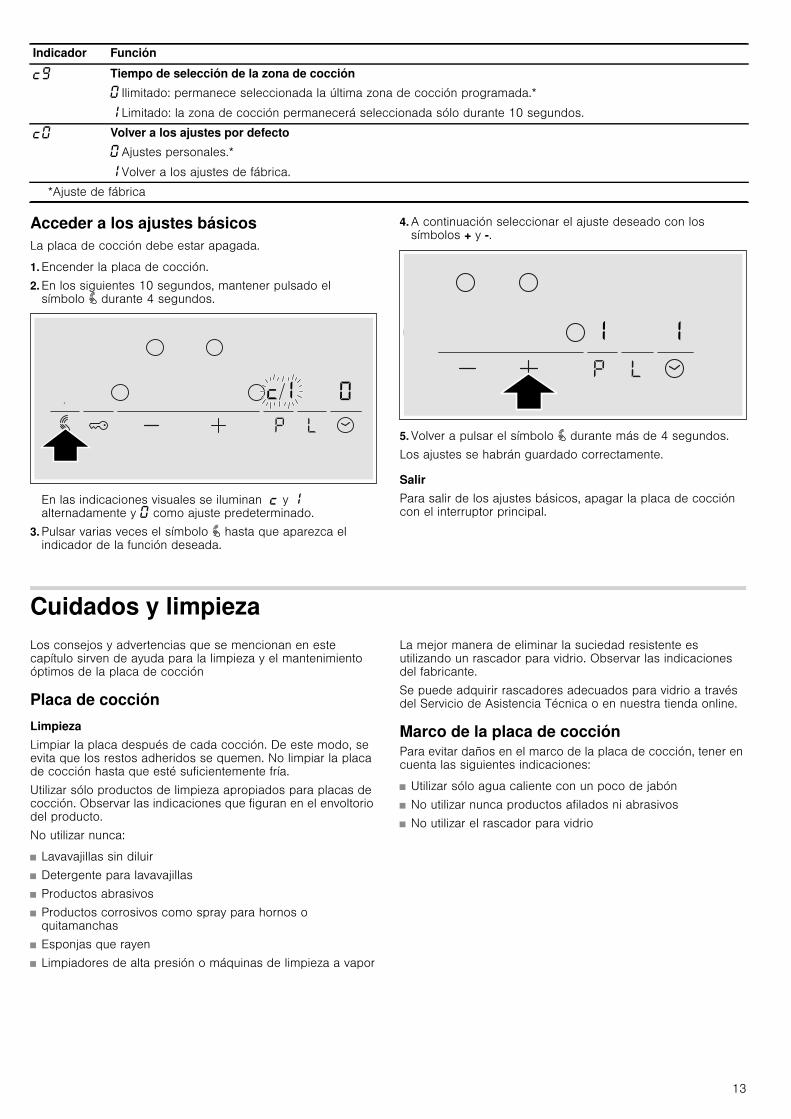
Acceder a los ajustes básicosLa placa de cocción debe estar apagada.
1. Encender la placa de cocción.
2. En los siguientes 10 segundos, mantener pulsado el símbolo " durante 4 segundos.
En las indicaciones visuales se iluminan ™ y ‚ alternadamente y ‹ como ajuste predeterminado.
3. Pulsar varias veces el símbolo " hasta que aparezca el indicador de la función deseada.
4. A continuación seleccionar el ajuste deseado con los símbolos + y -.
5. Volver a pulsar el símbolo " durante más de 4 segundos.
Los ajustes se habrán guardado correctamente.
SalirPara salir de los ajustes básicos, apagar la placa de cocción con el interruptor principal.
Cuidados y limpiezaLos consejos y advertencias que se mencionan en este capítulo sirven de ayuda para la limpieza y el mantenimiento óptimos de la placa de cocción
Placa de cocciónLimpiezaLimpiar la placa después de cada cocción. De este modo, se evita que los restos adheridos se quemen. No limpiar la placa de cocción hasta que esté suficientemente fría.
Utilizar sólo productos de limpieza apropiados para placas de cocción. Observar las indicaciones que figuran en el envoltorio del producto.
No utilizar nunca:
■ Lavavajillas sin diluir
■ Detergente para lavavajillas
■ Productos abrasivos
■ Productos corrosivos como spray para hornos o quitamanchas
■ Esponjas que rayen
■ Limpiadores de alta presión o máquinas de limpieza a vapor
La mejor manera de eliminar la suciedad resistente es utilizando un rascador para vidrio. Observar las indicaciones del fabricante.
Se puede adquirir rascadores adecuados para vidrio a través del Servicio de Asistencia Técnica o en nuestra tienda online.
Marco de la placa de cocciónPara evitar daños en el marco de la placa de cocción, tener en cuenta las siguientes indicaciones:
■ Utilizar sólo agua caliente con un poco de jabón
■ No utilizar nunca productos afilados ni abrasivos
■ No utilizar el rascador para vidrio
™Š Tiempo de selección de la zona de cocción
‹ Ilimitado: permanece seleccionada la última zona de cocción programada.*
‚ Limitado: la zona de cocción permanecerá seleccionada sólo durante 10 segundos.
™‹ Volver a los ajustes por defecto
‹ Ajustes personales.*
‚ Volver a los ajustes de fábrica.
Indicador Función
*Ajuste de fábrica
13

Reparar averíasNormalmente las averías se deben a pequeños detalles. Antes de avisar al Servicio de Asistencia Técnica, deben tenerse en cuenta los siguientes consejos y advertencias.
Ruido normal durante el funcionamiento del aparatoLa tecnología de calentamiento por inducción se basa en la creación de campos electromagnéticos que hacen que el calor se genere directamente en la base del recipiente. Éstos, dependiendo de la construcción del recipiente, pueden originar ciertos ruidos o vibraciones como los que se describen a continuación:
Un zumbido profundo como en un transformadorEste ruido se produce al cocinar con un nivel de potencia elevado. La causa de ello es la cantidad de energía que se transmite de la placa de cocción al recipiente. Este ruido desaparece o se debilita, en cuanto disminuye el nivel de potencia.
Un silbido bajoDicho ruido se produce cuando el recipiente se encuentra vacío. Este ruido desaparece en cuanto se introduce agua o alimentos en el recipiente.
CrepitarEste ruido se presenta en los recipientes que están compuestos de diferentes materiales superpuestos. El ruido es debido a las vibraciones que se producen en las superficies de unión de las diferentes superposiciones de materiales. Este ruido procede del recipiente. La cantidad y la manera de cocinar los alimentos pueden hacer variar la intensidad del ruido.
Unos silbidos elevadosLos ruidos se producen sobre todo en los recipientes compuestos de diferentes superposiciones de materiales, tan pronto como estos se ponen en marcha a la máxima potencia de calentamiento y al mismo tiempo en dos zonas de cocción. Estos silbidos desaparecen o son más escasos tan pronto como se disminuye la potencia.
Indicador Avería Medida
ninguno Se ha interrumpido el suministro de corriente eléctrica.
Comprobar con ayuda de otros aparatos eléctricos, si se ha producido un corte en el suministro de corriente eléctrica.
La conexión del aparato no se ha hecho con-forme al esquema de conexiones.
Comprobar que el aparato se ha conectado conforme al esquema de conexiones.
Avería en el sistema electrónico. Si las comprobaciones anteriores no solucionan la avería avisar al Servicio de Asistencia Técnica.
Los indicadores parpa-dean
El panel de mando está húmedo o se ha depositado algún objeto encima.
Secar la zona del panel de mando o retirar el objeto.
El indicador - parpadea en los indicadores de las zonas de cocción
Se ha producido un fallo en el sistema elec-trónico.
Cubrir brevemente la superficie de mando con la mano para confirmar la avería.
“§ + número / š + número /¡ + número
Avería en el sistema electrónico. Desconectar la placa de cocción de la red eléctrica. Esperar unos 30 segundos y volver a conectarla de nuevo.*
”‹ / ”Š Se ha producido un error interno en el funcio-namiento.
Desconectar la placa de cocción de la red eléctrica. Esperar unos 30 segundos y volver a conectarla de nuevo.*
”ƒ El sistema electrónico se ha sobrecalentado y ha apagado la zona de cocción correspon-diente.
Esperar a que el sistema electrónico se haya enfriado lo suficiente. Pulsar, a continuación, un símbolo cual-quiera de la placa de cocción.*
”… El sistema electrónico se ha sobrecalentado y han apagado todas las zonas de cocción.
Ӡ + nivel de potencia y tono de aviso
Hay un recipiente caliente en la zona del panel de mando. Es muy probable que se sobrecaliente el sistema electrónico.
Retirar dicho recipiente. El indicador de avería se apaga poco después. Se puede seguir cocinando.
”† y tono de aviso Hay un recipiente caliente en la zona del panel de mando. La zona de cocción se ha apagado para proteger el sistema electró-nico.
Retirar dicho recipiente. Esperar unos segundos. Pul-sar cualquier superficie de mando. Cuando se apague el indicador de avería, se puede seguir cocinando.
—‚ Tensión de alimentación incorrecta, fuera de los límites normales de funcionamiento.
Ponerse en contacto con el distribuidor de energía eléctrica.
—ƒ / —„ La zona de cocción se ha sobrecalentado y se ha apagado para proteger su encimera.
Esperar a que el sistema electrónico se haya enfriado lo suficiente y volver a encenderla de nuevo.
* Si la indicación persiste avisar al Servicio de Asistencia Técnica.No colocar ningún recipiente caliente sobre el panel de mando.
14

Ruido del ventiladorPara un uso adecuado del sistema electrónico, la placa de cocción debe funcionar a una temperatura controlada. Para esto, la placa de cocción está provista de un ventilador que se activa cuando la temperatura detectada es elevada. El ventilador también puede funcionar por inercia, después de que se haya apagado la placa de cocción, si la temperatura detectada es todavía demasiado elevada.
Los ruidos que se han descrito son normales, forman parte de la tecnología de inducción y no indican que se trate de una avería.
Servicio de Asistencia TécnicaNuestro Servicio de Asistencia Técnica se encuentra a su disposición siempre que necesite la reparación de su aparato.
Número de producto (E) y número de fabricación (FD)Siempre que se contacte con nuestro Servicio de Asistencia Técnica se debe facilitar el número de producto (E-Nr.) y el número de fabricación (FD-Nr.) del aparato. La etiqueta de características con los correspondientes números se encuentra en la tarjeta del aparato.
Recuerde que, en caso de manejo incorrecto, la asistencia del personal del Servicio de Asistencia Técnica no es gratuita, incluso si todavía está dentro del período de garantía.
Las señas de las delegaciones internacionales figuran en la lista adjunta de centros y delegaciones del Servicio de Asistencia Técnica Oficial.
Solicitud de reparación y asesoramiento en caso de averías
Confíe en la profesionalidad de su distribuidor. De este modo se garantiza que la reparación sea realizada por personal técnico especializado y debidamente instruido que, además, dispone de los repuestos originales del fabricante para su aparato doméstico.
Platos testadosEsta tabla ha sido elaborada para institutos de evaluación con el fin de facilitar las pruebas en nuestros aparatos.
Los datos de la tabla hacen referencia a nuestros recipientes accesorios de Schulte-Ufer (batería de cocina de 4 piezas para placa de inducción Z9442X0) con las siguientes dimensiones:
■ Cazo Ø 16 cm, 1,2 l para zonas de cocción de Ø 14,5 cm
■ Olla Ø 16 cm, 1,7 l para zonas de cocción de Ø 14,5 cm
■ Olla Ø 22 cm, 4,2 l para zonas de cocción de Ø 18 cm
■ Sartén Ø 24 cm, para zonas de cocción de Ø 18 cm
E 902 406 416
Precalentamiento Cocción
Platos testados Zona de cocción
Nivel de potencia
Duración (Min:Seg)
Tapa Nivel de potencia
Tapa
Derretir chocolate
Recipiente: cazoØ 14,5 cm - - - 1 - 1. NoCobertura de chocolate (p. ej. marca Dr. Oetker
negro 55%, 150 g.)
Calentar y conservar caliente potaje de lentejas
Recipiente: Olla
Temperatura inicial 20 °C
Potaje de lentejas*
Cantidad 450 g. Ø 14,5 cm 9 1:30 sin remover Sí 1. Sí
Cantidad: 800 g. Ø 18 cm 9 2:30 sin remover Sí 1. Sí
Potaje de lentejas en conserva, p. ej. lentejas con chorizo de Erasco
Cantidad 500 g. Ø 14,5 cm 9 1:30 remover tras aprox. 1:00 Sí 1. Sí
Cantidad 1 kg. Ø 18 cm 9 2:30 remover tras aprox. 1:00 Sí 1. Sí
*Receta según DIN 44550**Receta según DIN EN 60350-2
15

Preparar salsa bechamel
Recipiente: Cazo
Temperatura de la leche: 7 °C
Ingredientes: 40 g de mantequilla, 40 g de harina, 0,5 l de leche (3,5% materia grasa) y una piza de sal
Ø 14,5 cm
1. Derretir la mantequilla, mezclar la harina y la sal y calentar todo 1 aprox. 3:00 No
2. Añadir la leche y llevar la salsa a ebullición, sin dejar de remover 7 aprox. 5:20 No
3. Cuando la salsa bechamel rompa a hervir, mantenerla otros 2 minutos sin dejar de remover 1 No
Cocer arroz con leche
Recipiente: Olla
Temperatura de la leche: 7 °C
Calentar la leche hasta que empiece a subir. Cam-biar el nivel de cocción recomendado y agregar el arroz, el azúcar y la sal a la leche
Ingredientes: 190 g. de arroz de grano redondo, 23 g. de azúcar, 750 ml. leche (3,5% materia grasa) y una pizca de sal
Ø 14,5 cm
8. aprox. 6:30 No2 remover tras aprox.
10:00Sí
Ingredientes: 250 g. de arroz de grano redondo, 30 g. de azúcar, 1 l. leche (3,5% materia grasa) y una pizca de sal
Ø 18 cm
Cocer arroz*
Recipiente: Olla
Temperatura del agua 20 °C
Ingredientes: 125 g de arroz de grano redondo, 300 g de agua y una pizca de sal Ø 14,5 cm 9 aprox. 2:30 Sí 2 Sí
Ingredientes: 250 g de arroz de grano redondo, 600 g de agua y una pizca de sal Ø 18 cm 9 aprox. 2:30 Sí 2. Sí
Freír solomillo de cerdo
Recipiente: Sartén
Ø 18 cm 9 1:30 No 7 NoTemperatura inicial del solomillo: 7 °C
2 filetes de solomillo (peso total aprox. 200 g, 1 cm de grosor)
Freír crepes**
Recipiente: SarténØ 18 cm 9 1:30 No 7 No
55 ml de masa por crepe
Freír patatas ultracongeladas
Recipiente: Olla
Ø 18 cm 9Hasta que la tem-peratura del aceite
sea de 180 °C No 9 NoIngredientes: 1,8 kg de aceite de girasol, por
cocción: 200 g de patatas fritas ultracongeladas (p. ej. McCain 123 Frites Original)
Precalentamiento Cocción
Platos testados Zona de cocción
Nivel de potencia
Duración (Min:Seg)
Tapa Nivel de potencia
Tapa
*Receta según DIN 44550**Receta según DIN EN 60350-2
16

Ú Table of contents[en]Instruction manual
Safety precautions ...................................................................17Elements that may damage the appliance ................................. 18Protecting the environment.....................................................19Environmentally-friendly disposal.................................................. 19Energy-saving advice ...................................................................... 19Induction cooking ....................................................................19Advantages of induction cooking ................................................. 19Cookware ..........................................................................................19Getting to know your appliance ..............................................20The control panel ............................................................................. 20The hotplates .................................................................................... 21Residual heat indicator ................................................................... 21Programming the hob ..............................................................21Turning the hob on and off ............................................................ 21Set the hotplate ................................................................................ 21Cooking guidelines table................................................................ 22Childproof lock .........................................................................23Activating and deactivating the childproof lock ......................... 23Childproof lock ................................................................................. 23Powerboost function................................................................23Usage restrictions............................................................................ 23How to activate................................................................................. 23To deactivate .................................................................................... 23Time programming function....................................................24
Turning off a hotplate automatically ............................................. 24The timer............................................................................................24Keep warm function .................................................................24To activate.........................................................................................24To deactivate ....................................................................................24Cleaning lock function.............................................................24Automatic time limitation.........................................................25Displaying energy consumption.............................................25Basic settings ...........................................................................25Accessing the basic settings......................................................... 26Care and cleaning ....................................................................26Hob.....................................................................................................26Hob frame .........................................................................................26Fixing malfunctions .................................................................27Normal noise while the appliance is working............................. 27After-sales service ...................................................................28Tested dishes............................................................................28
Produktinfo
Additional information on products, accessories, replacement parts and services can be found at www.neff-international.com and in the online shop www.neff-eshop.com
: Safety precautionsPlease read this manual carefully. Please keep the instruction and installation manual as well as the appliance certificate in a safe place for later use or for subsequent owners.Check the appliance after removing it from the packaging. If it has suffered any damage in transport, do not connect the appliance, contact the Technical Assistance Service and provide written notification of the damage caused, otherwise you will lose your right to any type of compensation.This appliance must be installed according to the installation instructions included.This appliance is intended for domestic use only. The appliance must only be used for the preparation of food and drink. The appliance must be supervised during operation. Only use this appliance indoors.Do not use covers. These can cause accidents, due to overheating, catching fire or materials shattering, for example. Do not use inappropriate child safety shields or hob guards. These can cause accidents.
This appliance is not intended for operation with an external clock timer or a remote control.This appliance may be used by children over the age of 8 years old and by persons with reduced physical, sensory or mental capabilities or by persons with a lack of experience or knowledge if they are supervised or are instructed by a person responsible for their safety how to use the appliance safely and have understood the associated hazards.Children must not play with, on, or around the appliance. Children must not clean the appliance or carry out general maintenance unless they are at least 8 years old and are being supervised.Keep children below the age of 8 years old at a safe distance from the appliance and power cable.We advise that you exercise caution using or standing near an induction hob while it is in operation, if you wear a pacemaker or a similar medical device. Consult your doctor or the device manufacturer concenring its conformity or any possible incompatibilities,
17

Risk of fire!■ Hot oil and fat can ignite very quickly. Never leave hot fat or oil unattended. Never use water to put out burning oil or fat. Switch off the hotplate. Extinguish flames carefully using a lid, fire blanket or something similar.
Risk of fire!
■ The hotplates become very hot. Never place combustible items on the hob. Never place objects on the hob.
Risk of fire!
■ The appliance gets hot. Do not keep combustible objects or aerosol cans in drawers directly underneath the hob.
Risk of fire!
■ The hob switches off automatically and can no longer be operated. It may switch on unintentionally at a later point. Switch off the circuit breaker in the fuse box. Contact the after-sales service.
Risk of burns!■ The hotplates and surrounding area (particularly the hob surround, if fitted) become very hot. Never touch the hot surfaces. Keep children at a safe distance.
Risk of burns!
■ The hotplate heats up but the display does not work. Switch off the circuit breaker in the fuse box. Contact the after-sales service.
Risk of burns!
■ Metal objects on the hob quickly become very hot. Never place metal objects (such as knives, forks, spoons and lids) on the hob.
Risk of fire!!
■ After each use, always turn off the hob at the main switch. Do not wait until the hob turns off automatically after the pan is removed.
Risk of electric shock!■ Incorrect repairs are dangerous. Repairs may only be carried out and damaged power cables replaced by one of our trained after-sales technicians. If the appliance is defective, unplug the appliance from the mains or switch off the circuit breaker in the fuse box. Contact the after-sales service.
Risk of electric shock!
■ Do not use any high-pressure cleaners or steam cleaners, which can result in an electric shock.
Risk of electric shock!
■ A defective appliance may cause electric shock. Never switch on a defective appliance. Unplug the appliance from the mains or switch off the circuit breaker in the fuse box. Contact the after-sales service.
Risk of electric shock!
■ Cracks or fractures in the glass ceramic may cause electric shocks. Switch off the circuit breaker in the fuse box. Contact the after-sales service.
Malfunction risk!The hob is equipped with a fan in the lower section. If there is a drawer under the hob it should not be used to store small objects or paper, since they could damage the fan or interfere with the cooling if they are sucked into it.There should be a minimum of 2 cm between the contents of the drawer and fan intake.Risk of injury!■ When cooking in a bain marie, the hob and cooking container could shatter due to overheating. The cooking container in the bain marie must not directly touch the bottom of the water-filled pot. Only use heat-resistant cookware.
Risk of injury!
■ Saucepans may suddenly jump due to liquid between the pan base and the hotplate. Always keep the hotplate and saucepan bases dry.
Elements that may damage the applianceCaution!■ Rough pan bases may scratch the hob.
■ Avoid leaving empty pots and pans on the hotplate. Doing so may cause damage.
■ Do not place hot pans on the control panel, the indicator area, or the hob frame. Doing so may cause damage.
■ Hard or pointed objects dropped on the hob may damage it.
■ Aluminium foil and plastic containers will melt if placed on the hotplate while it is hot. The use of laminated sheeting is not recommended on the hob.
18

OverviewThe following table presents the most common damage caused:
Protecting the environmentEnvironmentally-friendly disposalDispose of packaging in an environmentally-friendly manner.
Energy-saving advice■ Always use the correct lid for each pan. Cooking without a lid
uses a lot more energy. Use a glass lid to provide visibility and avoid having to lift the lid.
■ Use pans with flat bases. Bases that are not flat use a lot more energy.
■ The diameter of the pan base must match the size of the hotplate. Please note: pan manufacturers usually provide the diameter for the top of the pan, which is usually larger than the diameter of the pan base.
■ Use a small pan for small amounts of food. A large pan which is not full uses a lot of energy.
■ Use little water when cooking. This saves energy and preserves all the vitamins and minerals in vegetables.
■ Select the lowest power level to maintain cooking. If the power level is too high, energy is wasted.
Induction cookingAdvantages of induction cookingInduction cooking represents a radical change from the traditional method of heating; the heat is generated directly in the pan. It therefore offers a number of advantages:
■ Time savings for cooking and frying; since the pan is heated directly.
■ Energy is saved.
■ Care and cleaning are simpler. Foods that have spilt do not burn as quickly.
■ Heat and safety control; the hob supplies or cuts off power as soon as the control knob is turned on. The induction hotplate stops supplying heat if the pan is removed without having previously switched it off.
CookwareOnly ferromagnetic pans are suitable for induction cooking; these may be made from:
■ enamelled steel
■ cast iron
■ special stainless steel induction pans.
To determine whether a pan is suitable, check to see if a magnet will stick to its base.
There are other types of cookware for induction whose base is not entirely ferromagnetic.
Damage Cause Measure
Stains Food spillage Immediately remove spilt food using a glass scraper.
Unsuitable cleaning products Only use cleaning products specifically designed for glass-ceramic hobs.
Scratches Salt, sugar and sand Do not use the hob as a tray or working surface.
Pans with rough bottoms may scratch the glass ceramic
Check pans.
Fading Unsuitable cleaning products Only use cleaning products specifically produced for glass-ceramic hobs.
Contact with pans Lift pots and pans before moving them around.
Chips Sugar, substances with a high sugar content
Immediately remove spilt food using a glass scraper.
This appliance is labelled in accordance with European Directive 2012/19/EU concerning used electrical and electronic appliances (waste electrical and electronic equipment - WEEE). The guideline determines the framework for the return and recycling of used appliances as applicable throughout the EU.
When using large cookware on a smaller ferromagnetic area, only the ferromagnetic zone heats up, so heat might not be uniformly distributed.
Pans with aluminium areas inserted in the base reduce the ferromagnetic area, so less heat may be supplied and the pan may be difficult to detect or not be detected at all.
For good cooking results, the diameter of the cookware's ferro-magnetic area should match the size of the hotplate. If cookware is not detected on a hotplate, try it on the next smaller hotplate down.
19

Unsuitable pansNever use diffuser hobs or pans made from:
■ common thin steel
■ glass
■ earthenware
■ copper
■ aluminium
Characteristics of the pan baseThe characteristics of the pan base may affect the uniformity of the cooking results. Pans made from materials which help diffuse heat, such as stainless steel sandwich pans, distribute heat uniformly, saving time and energy.
Absence of pan or unsuitable sizeIf no pan is placed on the selected hotplate, or if it is made of unsuitable material or is not the correct size, the power level displayed on the hotplate indicator will flash. Place a suitable pan on the hotplate to stop the flashing. If this takes more than 90 seconds, the hotplate will switch off automatically.
Empty pans or those with a thin baseDo not heat empty pans, nor use pans with a thin base. The hob is equipped with an internal safety system. However, an empty pan may heat up so quickly that the "automatic switch off" function may not have time to react and the pan may reach very high temperatures. The base of the pan could melt and damage the glass on the hob. In this case, do not touch the pan and switch the hotplate off. If it fails to work after it has cooled down, please contact the Technical Assistance Service.
Pan detectionEach hotplate has a minimum limit for detecting pans, which varies depending on the material of the pan being used. You should therefore use the hotplate that is most suitable for the diameter of your pan.
Getting to know your applianceOn page 2, you will find information on the dimensions and power of the hotplates.
The control panel
Control panelsPressing a symbol activates its corresponding function.
Note: Always keep the control surfaces dry. Moisture can affect proper working.
Control panels
# Main switch
$ Select the hotplate
A/@ Select settings
" Cleaning lock function
‚ Childproof lock
˜ Powerboost Function
– "Keep warm" function
3 Time program function
Indicators
‹ Functionality
‚-Š Power levels
˜ Powerboost Function
•/œ Residual heat
‹‹ Time program function
‚ Childproof lock
– "Keep warm" function
x Automatic shut-off
S Timer
20

The hotplates
Residual heat indicatorThe hob has a residual heat indicator for each hotplate to show those which are still hot. Avoid touching them when this indicator is lit.
Although the hob is switched off, the indicator œ or • will remain on for as long as the hotplate is hot.
If the pan is removed before the hotplate is turned off, the indicator œ or • and the selected power level will appear alternately.
Programming the hobThis section will show you how to program the hotplates. The table contains power levels and cooking times for several dishes.
Turning the hob on and offThe hob is turned on and off using the main switch.
To turn on: Press the # symbol. A beep sounds. The indicator located next to the main switch and the ‹ indicators of the hotplates light up. The hob is ready for use.
To turn off: press the # symbol until the indicators go out. All hotplates are turned off. The residual heat indicator will remain lit until the hotplates have cooled down sufficiently.
Notes■ The hob switches off automatically when all the hotplates are
switched off for more than 20 seconds.
■ The settings are memorised for 4 seconds after the hob has been turned off. If the hotplate is switched back on within this time then the previous settings will be applied.
Set the hotplateSelect the required power level with the + and - symbols.
Power level 1 = minimum power.
Power level 9 = maximum power.
Each power level has an intermediate setting. This is marked with a dot.
Select the hotplate and the power levelThe hob must be switched on.
1. Select the hotplate with the $ symbol.
2. In the following 10 seconds, press the + or - symbolThe basic setting appears: + symbol = power level 9 - symbol = power level 4
The power level has been set.
Changing the power levelSelect the hotplate and press the + or - symbol until the required power level comes on.
To switch off the hotplateSelect the hotplate and then press the + or - symbol until ‹ symbol appears.
The hotplate turns off and the residual heat indicator appears.
Notes■ If no pan has been placed on the hotplate, the selected
power level flashes. After a certain time has elapsed, the hotplate switches off.
■ If a pan has been placed on the hotplate before switching on the hob, it will be detected within 20 seconds of pressing the main switch and the hotplate will be selected automatically. Once detected, select the power level within the next 20 seconds or the hotplate will switch off.If more than one pan is placed on the hob, only one will be detected when switching it on.
Hotplate
$ Single hotplate Always use cookware of a suitable size.
Use only cookware suitable for induction cooking; see the section on suitable cookware.
21

Cooking guidelines tableThe table below contains some examples.
Cooking times depend on the power level, type, weight and quality of the food. As such they are approximate.
When heating purées, creams and thick sauces, stir occasionally.
Use power level 9 to begin cooking.
Power level Cooking time
Melting
Chocolate, chocolate coating 1-1. -
Butter, honey, gelatin 1-2 -
Heating and keeping warm
Stew (e.g., lentils) 1.-2 -
Milk** 1.-2. -
Sausages heated in water** 3-4 -
Defrosting and heating
Frozen spinach 3-4 15-25 min.
Frozen goulash 3-4 30-40 min.
Slow cooking, simmering
Potato dumplings* 4.-5. 20-30 min.
Fish* 4-5 10-15 min.
White sauces (e.g., bechamel) 1-2 3-6 min.
Whipped sauces (e.g., Bearnaise, Hollandaise) 3-4 8-12 min.
Boiling, steaming, sautéing
Rice (with a double amount of water) 2-3 15-30 min.
Rice pudding 2-3 30-40 min.
Unpeeled potatoes 4-5 25-30 min.
Peeled potatoes with salt 4-5 15-25 min.
Pasta* 6-7 6-10 min.
Soups 3.-4. 15-60 min.
Vegetables 2.-3. 10-20 min.
Greens, frozen foods 3.-4. 7-20 min.
Cooked in a pressure cooker 4.-5. -
Stewing
Meat roll 4-5 50-60 min.
Stew 4-5 60-100 min.
Goulash 3-4 50-60 min.
Bake / Fry with a little oil**
Steaks, plain or breaded 6-7 6-10 min.
Frozen steaks 6-7 8-12 min.
Chops, plain or breaded*** 6-7 8-12 min.
Beefsteak (3 cm thick) 7-8 8-12 min.
Chicken breast (2 cm thick)*** 5-6 10-20 min.
Frozen chicken breast*** 5-6 10-30 min.
Hamburgers, meatballs (3 cm thick)*** 4.-5. 30-40 min.
Plain fish and fish fillet 5-6 8-20 min.
Breaded fish and fish fillet 6-7 8-20 min.
Frozen breaded fish (e.g., fish fingers) 6-7 8-12 min.
Prawns and shrimps 7-8 4-10 min.
Frozen meals (e.g., stir-fries) 6-7 6-10 min.
Pancakes 6-7 fry individually
Omelette 3.-4. fry individually
Fried eggs 5-6 3-6 min.
* Uncovered cooking** Uncovered*** Turn frequently
22
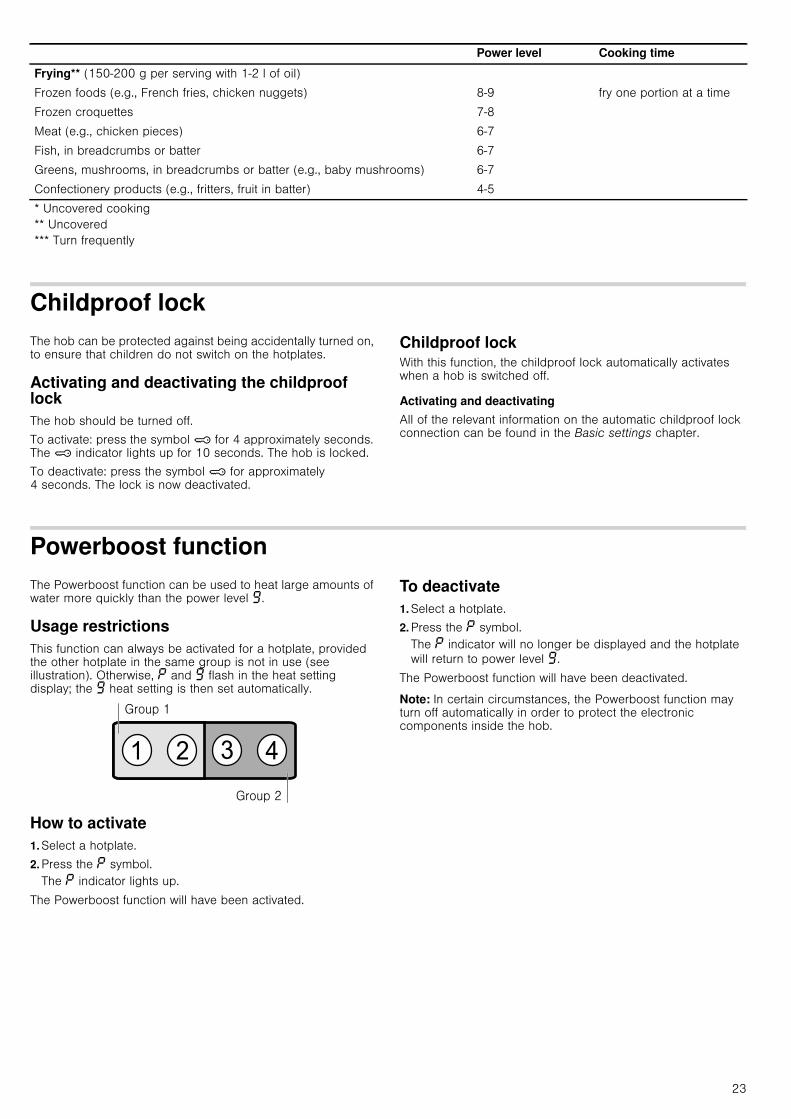
Childproof lockThe hob can be protected against being accidentally turned on, to ensure that children do not switch on the hotplates.
Activating and deactivating the childproof lockThe hob should be turned off.
To activate: press the symbol ‚ for 4 approximately seconds. The ‚ indicator lights up for 10 seconds. The hob is locked.
To deactivate: press the symbol ‚ for approximately 4 seconds. The lock is now deactivated.
Childproof lockWith this function, the childproof lock automatically activates when a hob is switched off.
Activating and deactivatingAll of the relevant information on the automatic childproof lock connection can be found in the Basic settings chapter.
Powerboost functionThe Powerboost function can be used to heat large amounts of water more quickly than the power level Š.
Usage restrictionsThis function can always be activated for a hotplate, provided the other hotplate in the same group is not in use (see illustration). Otherwise, ˜ and Š flash in the heat setting display; the Š heat setting is then set automatically.
How to activate1. Select a hotplate.
2. Press the ˜ symbol. The ˜ indicator lights up.
The Powerboost function will have been activated.
To deactivate1. Select a hotplate.
2. Press the ˜ symbol.The ˜ indicator will no longer be displayed and the hotplate will return to power level Š.
The Powerboost function will have been deactivated.
Note: In certain circumstances, the Powerboost function may turn off automatically in order to protect the electronic components inside the hob.
Frying** (150-200 g per serving with 1-2 l of oil)
Frozen foods (e.g., French fries, chicken nuggets) 8-9 fry one portion at a time
Frozen croquettes 7-8
Meat (e.g., chicken pieces) 6-7
Fish, in breadcrumbs or batter 6-7
Greens, mushrooms, in breadcrumbs or batter (e.g., baby mushrooms) 6-7
Confectionery products (e.g., fritters, fruit in batter) 4-5
Power level Cooking time
* Uncovered cooking** Uncovered*** Turn frequently
23

Time programming functionThis function may be used in two different ways:
■ to automatically switch off a hotplate.
■ as a timer.
Turning off a hotplate automaticallyThe zone turns off automatically once the selected time has elapsed.
Programming the cooking time.The hob must be switched on:
1. Select the hotplate and the desired power level.
2. Press the 3 symbol. The x indicator on the hotplate lights up. ‹‹ is displayed on the time program function display.
3. Press the + or - symbol. The basic setting appears: + symbol: 30 minutes. - symbol: 10 minutes.
4. Press the + or - symbol until the desired cooking time appears.
After a few seconds, the cooking time begins to elapse.
Note: The same cooking time can be automatically programmed for the all the hotplates. The programmed time passes independently for each of the hotplates.The Basic settings chapter provides information on automatically programming the cooking time.
Changing or cancelling the timeSelecting the hotplate . Press the 3 symbol and change the cooking time with the + or - symbols, or set to ‹‹.
Once the time has elapsedThe hotplate switches off. A warning signal sounds and ‹‹ appears for 10 seconds in the time program function display. The x indicator on the hotplate lights up. Pressing the 3 symbol turns off the indicators and stops the beeping.
Notes■ If cooking times have been programmed for various
hotplates, the time programming function always displays the time for the selected hotplate.
■ Any cooking time can be programmed for up to 99 minutes.
The timerThe timer can be set for periods of up to 99 minutes. It is independent of the other settings. This function does not automatically switch off a hotplate.
How to programNo hotplate should be selected.
1. Press the 3 symbol. ‹‹ and the symbol are shown in the time program function display W
2. Press the + or - symbols. The basic setting appears. + symbol: 10 minutes. - symbol: 5 minutes.
3. Set the desired time using the + or - symbols.
After a few seconds, the time will start to elapse.
Changing or cancelling the timePress the 3 symbol several times until the W indicator lights up. Change the time or set it to ‹‹ with the + or - symbols.
Once the time has elapsedA warning signal sounds. ‹‹ is displayed on the time program function display. After 10 seconds the indicators turn off.
Pressing the 3 symbol turns off the indicators and stops the beeping.
Keep warm functionThis function is used for melting chocolate or butter and for keeping food warm.
To activate1. Select the hotplate.
2. Within the next 10 seconds, press the – symbol.The indicator –lights up.
The "keep warm" function will have been activated.
To deactivate1. Select the desired hotplate.
2. Press the – symbol.The –indicator disappears.
The hotplate turns off and the residual heat indicator appears.
Cleaning lock functionCleaning the control panel while the hob is switched on may change the settings.
In order to avoid this, the hob has a cleaning lock function. Press the " symbol. A signal sounds. The Ú indicator lights up along with the " symbol. The control panel is locked for
35 seconds. The control panel surface can now be cleaned without the risk of changing the settings.
Note: The lock does not affect the main switch. The hob may be switched off when desired.
24
Automatic time limitationIf the hotplate remains in use for a long time and no changes are made in the settings, the automatic time limitation function is triggered.
The hotplate stops heating. The ”, ‰ symbol and the residual heat indicator œ/• flash alternately in the display.
The indicator goes out when any symbol is pressed. The hotplate can now be reset.
When the automatic time function is used, it is governed by the selected power level (from 1 to 10 hours).
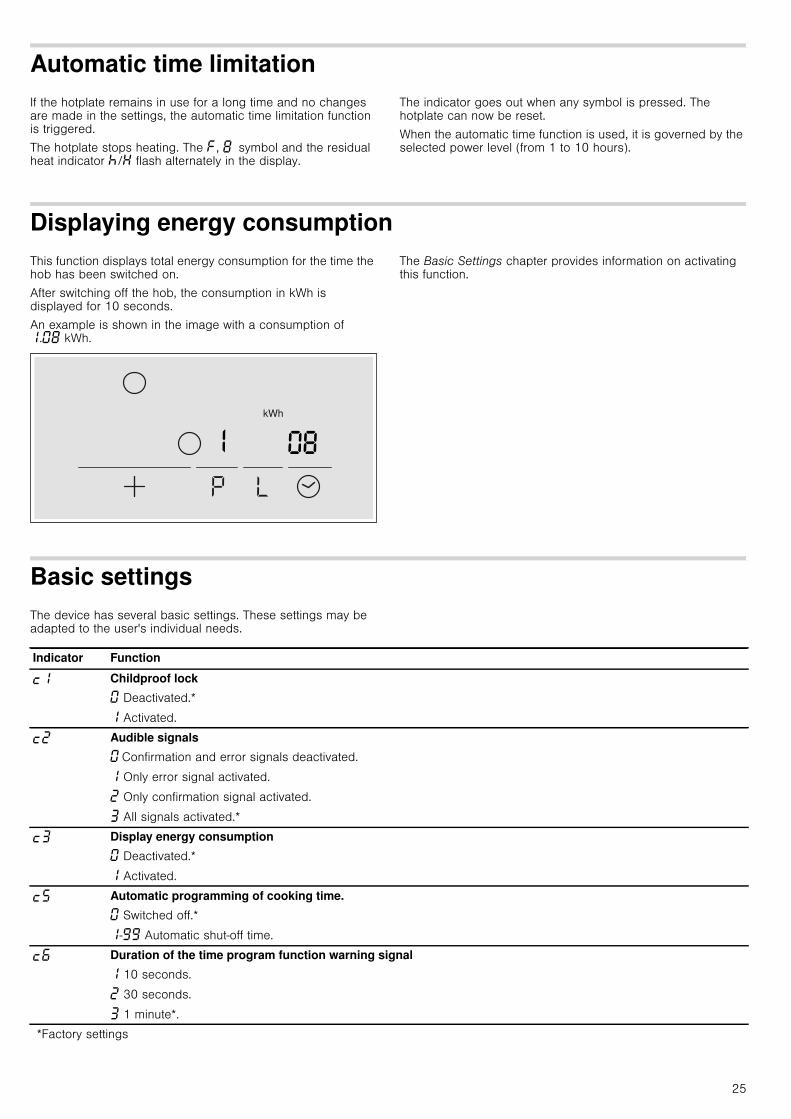
Displaying energy consumptionThis function displays total energy consumption for the time the hob has been switched on.
After switching off the hob, the consumption in kWh is displayed for 10 seconds.
An example is shown in the image with a consumption of ‚.‹‰ kWh.
The Basic Settings chapter provides information on activating this function.
Basic settingsThe device has several basic settings. These settings may be adapted to the user's individual needs.
Indicator Function
™‚ Childproof lock
‹ Deactivated.*
‚ Activated.
™ƒ Audible signals
‹ Confirmation and error signals deactivated.
‚ Only error signal activated.
ƒ Only confirmation signal activated.
„ All signals activated.*
™„ Display energy consumption
‹ Deactivated.*
‚ Activated.
™† Automatic programming of cooking time.
‹ Switched off.*
‚-ŠŠ Automatic shut-off time.
™‡ Duration of the time program function warning signal
‚ 10 seconds.
ƒ 30 seconds.
„ 1 minute*.
*Factory settings
25
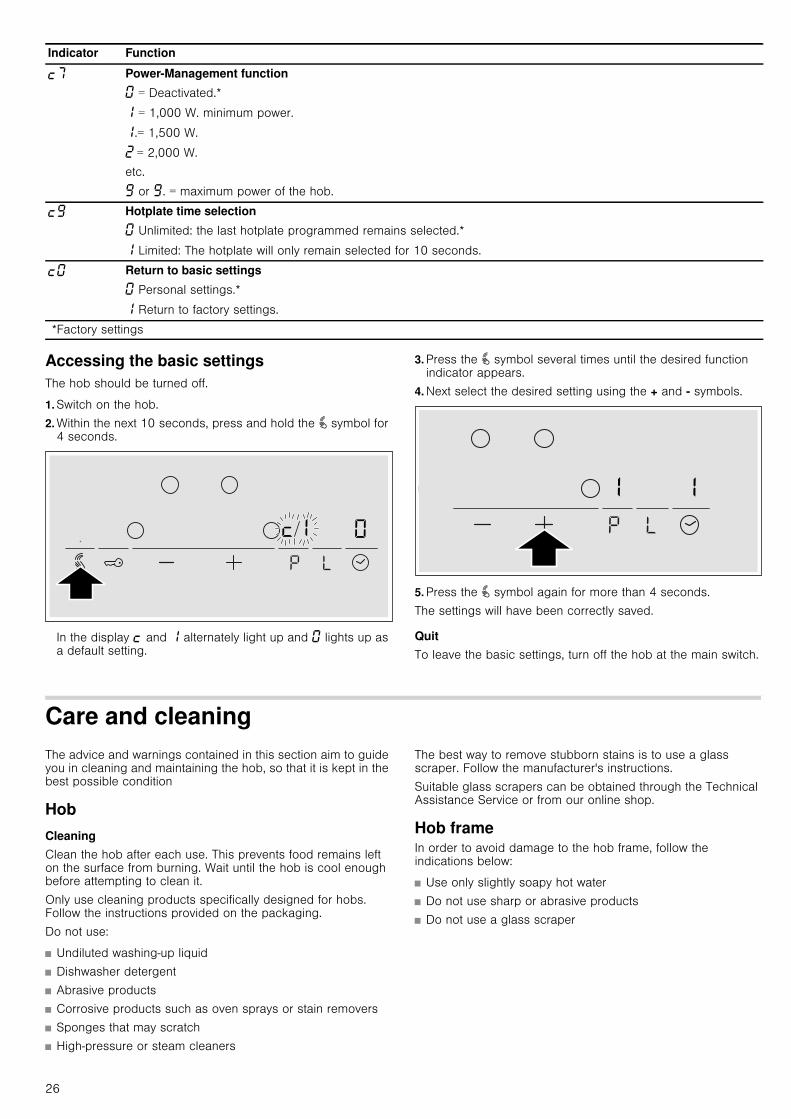
Accessing the basic settingsThe hob should be turned off.
1. Switch on the hob.
2. Within the next 10 seconds, press and hold the " symbol for 4 seconds.
In the display ™ and ‚ alternately light up and ‹ lights up as a default setting.
3. Press the " symbol several times until the desired function indicator appears.
4. Next select the desired setting using the + and - symbols.
5. Press the " symbol again for more than 4 seconds.
The settings will have been correctly saved.
QuitTo leave the basic settings, turn off the hob at the main switch.
Care and cleaningThe advice and warnings contained in this section aim to guide you in cleaning and maintaining the hob, so that it is kept in the best possible condition
HobCleaningClean the hob after each use. This prevents food remains left on the surface from burning. Wait until the hob is cool enough before attempting to clean it.
Only use cleaning products specifically designed for hobs. Follow the instructions provided on the packaging.
Do not use:
■ Undiluted washing-up liquid
■ Dishwasher detergent
■ Abrasive products
■ Corrosive products such as oven sprays or stain removers
■ Sponges that may scratch
■ High-pressure or steam cleaners
The best way to remove stubborn stains is to use a glass scraper. Follow the manufacturer's instructions.
Suitable glass scrapers can be obtained through the Technical Assistance Service or from our online shop.
Hob frameIn order to avoid damage to the hob frame, follow the indications below:
■ Use only slightly soapy hot water
■ Do not use sharp or abrasive products
■ Do not use a glass scraper
™ˆ Power-Management function
‹ = Deactivated.*
‚ = 1,000 W. minimum power.
‚.= 1,500 W.
ƒ = 2,000 W.
etc.
Š or Š. = maximum power of the hob.
™Š Hotplate time selection
‹ Unlimited: the last hotplate programmed remains selected.*
‚ Limited: The hotplate will only remain selected for 10 seconds.
™‹ Return to basic settings
‹ Personal settings.*
‚ Return to factory settings.
Indicator Function
*Factory settings
26

Fixing malfunctionsMalfunctions are usually due to small details. Before calling the Technical Assistance Service you should bear in mind the following advice and warnings.
Normal noise while the appliance is workingInduction heating technology is based on the creation of electromagnetic fields that generate heat directly at the base of the pan. Depending on how the pan has been manufactured, certain noises or vibrations may be produced such as those described below:
A deep humming sound as in a transformerThis noise is produced when cooking with a high power level. It is caused by the amount of energy transferred from the hob to the pan. The noise disappears or becomes faint when the power level is lowered.
A low whistling soundThis noise is produced when the pan is empty. The noise disappears when water or food is added to the pan.
A crackling soundThis noise occurs in pans which are made from different materials superimposed on one another. It is caused by the vibrations that occur in the adjoining surfaces of the different superimposed materials. The noise comes from the pan. The amount of food and cooking method can vary noise intensity.
A high-pitched whistling soundThis noise is produced mainly in pans made from different materials superimposed on one another, and it occurs when such pans are heated at maximum power on two hotplates at the same time. The whistling disappears or becomes fainter as soon as the power level is lowered.
Noise from the fanFor proper use of the electronic system, the temperature of the hob must be controlled. To do this, the hob has a fan which turns on when a high temperature is detected. The fan may also work by inertia after the hob has been switched off, if the temperature detected is still too high.
The noises described are normal, they are part of induction heating technology and not a sign of malfunction.
Indicator Malfunction Solution
none The electric power supply has been cut off. Use other electrical appliances to check whether there has been a power cut.
The appliance has not been correctly con-nected following the connection diagram.
Check that the appliance has been connected cor-rectly according to the connection diagram.
Electronic system malfunction. If none of the above checks resolve the malfunction, contact the Technical Assistance Service.
The indicators flash The control panel is damp or an object is rest-ing on it.
Dry the control panel area or remove the object.
The indicator - flashes on the hotplate indicators
A fault has occurred in the electronic system. Briefly cover the control panel with your hand to con-firm the malfunction.
“§ + number / š + num-ber / ¡ + number
Electronic system malfunction. Unplug the hob from the mains. Wait about 30 seconds before plugging it in again.*
”‹ / ”Š There is an internal operating error. Unplug the hob from the mains. Wait about 30 seconds before plugging it in again.*
”ƒ The electronic system has overheated and the corresponding hotplate has been switched off.
Wait until the electronic system has cooled down suffi-ciently. Then press any symbol on the hob. *
”… The electronic system has overheated and all hotplates have been switched off.
Ӡ + power level and beep
There is a hot pan on the control panel. It is highly likely that the electronic system will overheat.
Remove that pan. The malfunction indicator will switch off shortly afterwards. You can carry on cooking.
Ӡ and beep There is a hot pan on the control panel. The hotplate has switched off to protect the elec-tronic system.
Remove that pan. Wait a few seconds. Press any con-trol panel. When the malfunction indicator switches off, you can carry on cooking.
—‚ Incorrect supply voltage, outside normal oper-ating limits.
Contact your electricity board.
—ƒ / —„ The hotplate has overheated and has switched off in order to protect its hob.
Wait until the electronic system has cooled down suffi-ciently before switching it back on.
* If the warning persists call the Technical Assistance Service.Do not rest hot pans on the control panel.
27
After-sales serviceOur after-sales service is there for you if your appliance should need to be repaired. We are committed fo find the best solution also in order to avoid an unnecessary call-out.
E number and FD number:Please quote the E number (product number) and the FD number (production number) of your appliance when contacting the after-sales service. The rating plate bearing these numbers can be found on the appliance certificate.
Please note that a visit from an after-sales service engineer is not free of charge, even during the warranty period.
Please find the contact data of all countries in the enclosed customer service list.
To book an engineer visit and product advice
Rely on the professionalism of the manufacturer. You can therefore be sure that the repair is carried out by trained service technicians who carry original spare parts for your appliances.
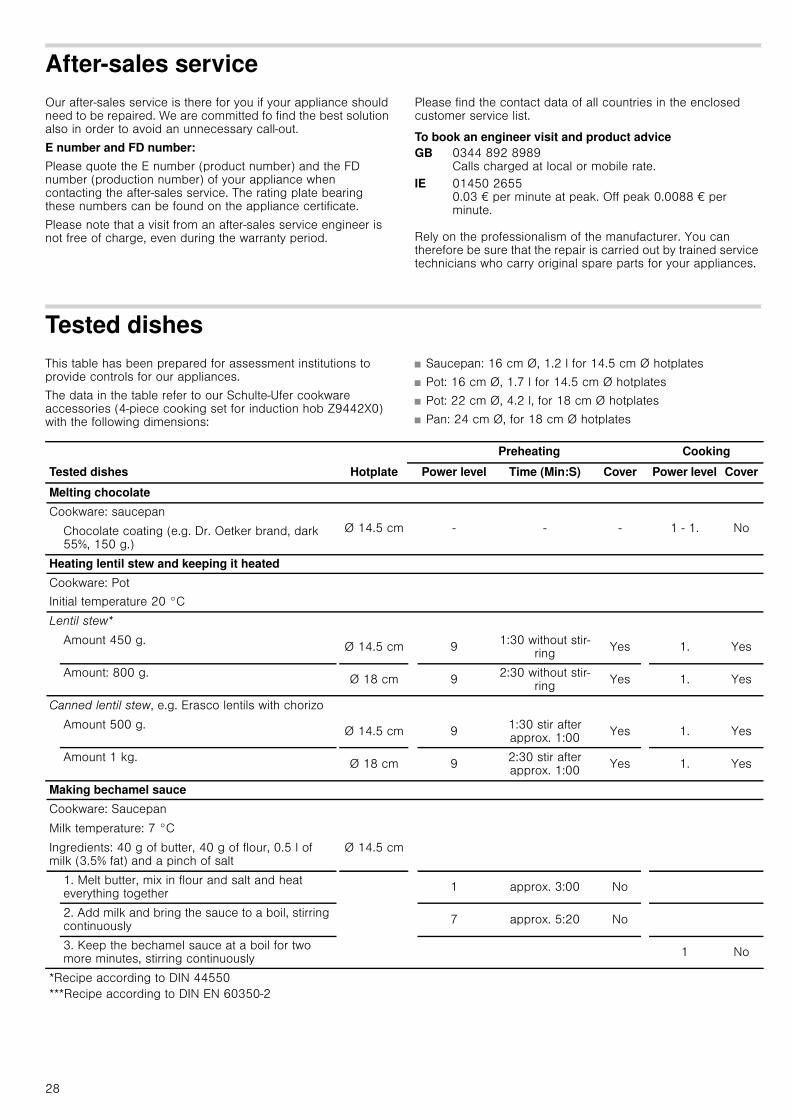
Tested dishesThis table has been prepared for assessment institutions to provide controls for our appliances.
The data in the table refer to our Schulte-Ufer cookware accessories (4-piece cooking set for induction hob Z9442X0) with the following dimensions:
■ Saucepan: 16 cm Ø, 1.2 l for 14.5 cm Ø hotplates
■ Pot: 16 cm Ø, 1.7 l for 14.5 cm Ø hotplates
■ Pot: 22 cm Ø, 4.2 l, for 18 cm Ø hotplates
■ Pan: 24 cm Ø, for 18 cm Ø hotplates
GB 0344 892 8989 Calls charged at local or mobile rate.
IE 01450 2655 0.03 € per minute at peak. Off peak 0.0088 € per minute.
Preheating Cooking
Tested dishes Hotplate Power level Time (Min:S) Cover Power level Cover
Melting chocolate
Cookware: saucepanØ 14.5 cm - - - 1 - 1. NoChocolate coating (e.g. Dr. Oetker brand, dark
55%, 150 g.)
Heating lentil stew and keeping it heated
Cookware: Pot
Initial temperature 20 °C
Lentil stew*
Amount 450 g. Ø 14.5 cm 9 1:30 without stir-ring Yes 1. Yes
Amount: 800 g. Ø 18 cm 9 2:30 without stir-ring Yes 1. Yes
Canned lentil stew, e.g. Erasco lentils with chorizo
Amount 500 g. Ø 14.5 cm 9 1:30 stir after approx. 1:00 Yes 1. Yes
Amount 1 kg. Ø 18 cm 9 2:30 stir after approx. 1:00 Yes 1. Yes
Making bechamel sauce
Cookware: Saucepan
Milk temperature: 7 °C
Ingredients: 40 g of butter, 40 g of flour, 0.5 l of milk (3.5% fat) and a pinch of salt
Ø 14.5 cm
1. Melt butter, mix in flour and salt and heat everything together 1 approx. 3:00 No
2. Add milk and bring the sauce to a boil, stirring continuously 7 approx. 5:20 No
3. Keep the bechamel sauce at a boil for two more minutes, stirring continuously 1 No
*Recipe according to DIN 44550***Recipe according to DIN EN 60350-2
28

Cooking rice pudding
Cookware: Pot
Milk temperature: 7 °C
Heat milk until it begins to bubble. Change the rec-ommended heating level and add rice, sugar and salt to the milk
Ingredients: 190 g. of short-grain rice, 23 g. of sugar, 750 ml. of milk (3.5% fat) and a pinch of salt
Ø 14.5 cm8. approx. 6:30 No
2 stir after approx. 10:00
YesIngredients: 250 g. of short-grain rice, 30 g. of sugar, 1 l. of milk (3.5% fat) and a pinch of salt Ø 18 cm
Cooking rice*
Cookware: Pot
Water temperature 20 °C
Ingredients: 125 g of short-grain rice, 300 g of water and a pinch of salt Ø 14.5 cm 9 approx. 2:30 Yes 2 Yes
Ingredients: 250 g of short-grain rice, 600 g of water and a pinch of salt Ø 18 cm 9 approx. 2:30 Yes 2. Yes
Pan-frying pork sirloin
Cookware: Frying pan
Ø 18 cm 9 1:30 No 7 NoSirloin initial temperature: 7 °C
2 pieces of sirloin (total weight approx. 200 g, 1 cm thick)
Frying crêpes**
Cookware: Frying panØ 18 cm 9 1:30 No 7 No
55 ml of crêpe batter
Frying frozen potato chips
Cookware: Pot
Ø 18 cm 9Until the tempera-
ture of the oil reaches 180 °C
No 9 NoIngredients: 1.8 kg of sunflower oil, for cooking: 200 g of frozen potato chips (e.g. McCain 123 Frites Original)
Preheating Cooking
Tested dishes Hotplate Power level Time (Min:S) Cover Power level Cover
*Recipe according to DIN 44550***Recipe according to DIN EN 60350-2
29

Ù Πίνακας περιεχομένων[el]Οδηγíες χρήσεως
Υποδείξεις ασφαλείας .................................................................. 30Αιτίες βλαβών...........................................................................................32Προστασία του περιβάλλοντος ................................................... 32Απόσυρση σύμφωνα με τους κανόνες προστασίας του περιβάλλοντος..........................................................................................32Συμβουλές για την εξοικονόμηση ενέργειας ......................................32Επαγωγικό Μαγείρεμα ................................................................. 33Πλεονεκτήματα του Επαγωγικού Μαγειρέματος ...............................33Σκεύη .........................................................................................................33Για να γνωρίσετε τη συσκευή ...................................................... 34Το πεδίο χειρισμού ..................................................................................34Οι εστίες ...................................................................................................34Ένδειξη παραμένουσας θερμότητας ...................................................34 Προγραμματισμός της βάσης εστιών ........................................ 35Άναμμα και σβήσιμο της βάσης εστιών ..............................................35Ρύθμιση της εστίας .................................................................................35Πίνακας μαγειρέματος ...........................................................................35Ασφάλεια για παιδιά ..................................................................... 37Ενεργοποίηση και απενεργοποίηση της ασφάλειας για παιδιά.......37Αυτόματη ασφάλεια για παιδιά .............................................................37Λειτουργία Powerboost ................................................................ 37Περιορισμός χρήσης...............................................................................37Ενεργοποίηση...........................................................................................37Απενεργοποίηση ......................................................................................37Λειτουργία προγραμματισμός χρόνου ....................................... 37
Αυτόματο σβήσιμο μιας εστίας ............................................................37Υπενθυμιστής χρόνου.............................................................................38Λειτουργία διατήρησης θερμότητας ..........................................38Ενεργοποίηση ..........................................................................................38Απενεργοποίηση ......................................................................................38Λειτουργία προστασία κατά την καθαριότητα..........................38Αυτόματος περιορισμός χρόνου..................................................38Απεικόνιση της κατανάλωσης ενέργειας ...................................39Βασικές ρυθμίσεις .........................................................................39Πρόσβαση στις βασικές ρυθμίσεις ......................................................40Φροντίδα και Καθαριότητα ..........................................................40Βάση εστιών .............................................................................................40Πλαίσιο της βάσης εστιών .....................................................................40Επιδιόρθωση βλαβών ....................................................................41Φυσιολογικός θόρυβος κατά τη διάρκεια λειτουργίας της συσκευής....................................................................................................................41Υπηρεσία τεχνικής εξυπηρέτησης πελατών ..............................42Δοκιμασμένες συνταγές ...............................................................42
Produktinfo
Περαιτέρω πληροφορίες για τα προϊόντα, τα εξαρτήματα, τα ανταλλακτικά και το σέρβις θα βρείτε στο διαδίκτυο (Internet): www.neff-international.com και στο online-shop: www.neff-eshop.com
: Υποδείξεις ασφαλείας
Διαβάστε προσεκτικά αυτές τις οδηγίες. Φυλάξτε τις οδηγίες χρήσης και συναρμολόγησης καθώς επίσης και την κάρτα συσκευής για μια αργότερη χρήση ή για τον επόμενο ιδιοκτήτη.Ελέγχτε τη συσκευή πρίν αφαιρέσετε το περιτύλιγμα. Σε περίπτωση που έχει υποστεί ζημία κατα τη διάρκεια της μεταφοράς, μη συνδέσετε τη συσκευή στο ηλεκτρικό ρεύμα, να επικοινωνήσετε με το Τεχνικό Σέρβις και να ενημερώσετε γραπτώς τις ζημιές που προκλήθηκαν, σε αντίθετη περίπτωση θα χάσετε το δικαίωμα για οποιαδήποτε αποζημίωση.Η παρούσα συσκευή πρέπει να εγκατασταθεί σύμφωνα με τις οδηγίες εγκατάστασης που περιλαμβάνονται.Αυτή η συσκευή προορίζεται μόνο για την οικιακή χρήση και το οικιακό περιβάλλον. Χρησιμοποιείτε τη συσκευή μόνο για την παρασκευή φαγητών και ποτών. Κατά τη διάρκεια της λειτουργίας επιτηρείτε τη συσκευή. Χρησιμοποιείτε τη συσκευή μόνο σε κλειστούς χώρους.Μη χρησιμοποιείτε καλύμματα της βάσης εστιών. Τα καλύμματα μπορεί να οδηγήσουν
σε ατυχήματα, π.χ. από υπερθέρμανση, ανάφλεξη ή θραύση υλικών. Μη χρησιμοποιείτε ακατάλληλες διατάξεις προστασίας ή ακατάλληλα προστατευτικά πλέγματα παιδιών. Μπορεί να οδηγήσουν σε ατυχήματα.Αυτή η συσκευή δεν προορίζεται για τη λειτουργία με έναν εξωτερικό χρονοδιακόπτη ή ένα τηλεχειριστήριο.Αυτή η συσκευή επιτρέπεται να χρησιμοποιηθεί από παιδιά άνω των 8 ετών και από άτομα με μειωμένες φυσικές, αισθητήριες ή πνευματικές ικανότητες ή με ανεπαρκή εμπειρία ή γνώση, όταν επιτηρούνται ή εάν έχουν λάβει σχετικές οδηγίες για την ασφαλή χρήση της συσκευής από ένα άτομο που είναι υπεύθυνο για την ασφάλειά τους και έχουν κατανοήσει τους κινδύνους που μπορούν να προκύψουν.Τα παιδιά δεν επιτρέπεται να παίζουν με τη συσκευή. Ο καθαρισμός και η συντήρηση από το χρήστη δεν επιτρέπεται να πραγματοποιηθούν από παιδιά, εκτός εάν είναι 8 ετών και άνω και επιτηρούνται.Κρατάτε τα παιδιά που είναι κάτω των 8 ετών μακριά από τη συσκευή και το καλώδιο σύνδεσης.
30

Σε περίπτωση εμφυτευμένου βηματοδότη ή κάποιας παρόμοιας ιατρικής συσκευής χρειάζεται ιδιαίτερη προσοχή κατά τη χρήση ή όταν πλησιάζετε τις επαγωγικές βάσεις εστιών ενώ λειτουργούν. Συμβουλευτεί τον γιατρό σας ή τον κατασκευαστή της συσκευής για να βεβαιωθείτε ότι πληροί τον ισχύοντα κανονισμό και ενημερωθείτε για τις πιθανές ασυμβατότητες.Κίνδυνος πυρκαγιάς!■ Το καυτό λάδι και λίπος παίρνουν γρήγορα φωτιά. Μην αφήνετε ποτέ χωρίς επιτήρηση το καυτό λάδι και λίπος. Μη σβήνετε ποτέ τη φωτιά με νερό. Απενεργοποιήστε την εστία μαγειρέματος. Σβήνετε τις φλόγες προσεκτικά με ένα καπάκι, μια κουβέρτα πυρόσβεσης ή κάτι παρόμοιο.
Κίνδυνος πυρκαγιάς!
■ Οι εστίες μαγειρέματος ζεσταίνονται πάρα πολύ. Μην ακουμπάτε ποτέ εύφλεκτα αντικείμενα πάνω στη βάση εστιών. Μην τοποθετείτε αντικείμενα πάνω στη βάση εστιών.
Κίνδυνος πυρκαγιάς!
■ Η συσκευή ζεσταίνεται πολύ. Μην αποθηκεύετε εύφλεκτα αντικείμενα ή κουτιά σπρέι σε συρτάρια απευθείας κάτω από τη βάση εστιών.
Κίνδυνος πυρκαγιάς!
■ Η βάση εστιών απενεργοποιείται από μόνη της και ο χειρισμός της δεν είναι πλέον δυνατός. Αργότερα μπορεί να ενεργοποιηθεί αθέλητα. Κατεβάστε την ασφάλεια στο κιβώτιο των ασφαλειών. Καλέστε την υπηρεσία τεχνικής εξυπηρέτησης πελατών.
Κίνδυνος εγκαύματος!■ Οι εστίες μαγειρέματος και το περιβάλλον τους, ιδιαίτερα ένα πλαίσιο του πεδίου μαγειρέματος που ενδεχομένως υπάρχει, ζεσταίνονται πάρα πολύ. Μην ακουμπήσετε ποτέ τις καυτές επιφάνειες. Κρατάτε τα παιδιά μακριά.
Κίνδυνος εγκαύματος!
■ Η εστία μαγειρέματος θερμαίνει, αλλά η ένδειξη δε λειτουργεί. Κατεβάστε την ασφάλεια στο κιβώτιο των ασφαλειών. Καλέστε την υπηρεσία τεχνικής εξυπηρέτησης πελατών.
Κίνδυνος εγκαύματος!
■ Τα αντικείμενα από μέταλλο ζεσταίνονται πάνω στη βάση εστιών πολύ γρήγορα. Μην τοποθετείτε ποτέ μεταλλικά αντικείμενα, όπως π.χ. μαχαίρια, πιρούνια, κουτάλια και καπάκια πάνω στη βάση εστιών.
Κίνδυνος πυρκαγιάς!
■ Μετά από κάθε χρήση, πάντα να σβήνετε τη βάση εστιών με τον κύριο διακόπτη. Μην περιμένετε να σβήσει αυτόματα η βάση εστιών επειδή δεν υπάρχει σκεύος.
Κίνδυνος ηλεκτροπληξίας!■ Οι ακατάλληλες επισκευές είναι επικίνδυνες. Μόνο ένας τεχνικός του τμήματος εξυπηρέτησης πελατών, εκπαιδευμένος από εμάς, επιτρέπεται να εκτελέσει τις επισκευές και να αντικαταστήσει τα χαλασμένα καλώδια σύνδεσης. Εάν η συσκευή έχει βλάβη, τραβήξτε το ρευματολήπτη (φις) από την πρίζα ή κατεβάστε/ξεβιδώστε την ασφάλεια στο κιβώτιο των ασφαλειών. Καλέστε την υπηρεσία τεχνικής εξυπηρέτησης πελατών.
Κίνδυνος ηλεκτροπληξίας!
■ Μια εισχώρηση υγρασίας μπορεί να προκαλέσει μια ηλεκτροπληξία. Μη χρησιμοποιείτε συσκευές καθαρισμού υψηλής πίεσης ή συσκευές εκτόξευσης ατμού.
Κίνδυνος ηλεκτροπληξίας!
■ Μια ελαττωματική συσκευή μπορεί να προκαλέσει μια ηλεκτροπληξία. Μην ενεργοποιείτε ποτέ μια χαλασμένη συσκευή. Τραβήξτε το ρευματολήπτη (φις) από την πρίζα ή κατεβάστε/ξεβιδώστε την ασφάλεια στο κιβώτιο των ασφαλειών. Καλέστε την υπηρεσία τεχνικής εξυπηρέτησης πελατών.
Κίνδυνος ηλεκτροπληξίας!
■ Τα σπασίματα ή τα ραγίσματα στην υαλοκεραμική πλάκα μπορούν να προκαλέσουν ηλεκτροπληξία. Κατεβάστε την ασφάλεια στο κιβώτιο των ασφαλειών. Καλέστε την υπηρεσία τεχνικής εξυπηρέτησης πελατών.
Κίνδυνος βλάβης!Αυτή η βάση εστιών διαθέτει έναν ανεμιστήρα στο κάτω τμήμα της. Σε περίπτωση που υπάρχει κάποιο συρτάρι κάτω από τη βάση εστιών, δεν πρέπει να φυλάσσονται μικρά αντικείμενα ή χαρτιά, αν απορροφηθούν μπορεί να χαλάσει ο ανεμιστήρας ή να προκληθεί βλάβη στη ψύξη.Ανάμεσα στο περιεχόμενο του συρταριού και στην είσοδο του ανεμιστήρα πρέπει να αφήσετε μια απόσταση τουλάχιστον 2 cm.Κίνδυνος τραυματισμού!■ Κατά το μαγείρεμα στο λουτρό νερού μπορεί η βάση εστιών και το μαγειρικό σκεύος να ραγίσουν από την υπερθέρμανση. Το μαγειρικό σκεύος στο λουτρό νερού δεν επιτρέπεται να ακουμπάει απευθείας τον πάτο κατσαρόλας. Χρησιμοποιείτε μόνο μαγειρικά σκεύη ανθεκτικά στη θερμότητα.
Κίνδυνος τραυματισμού!
■ Οι κατσαρόλες μπορεί να πεταχτούν ξαφνικά ψηλά, όταν υπάρχει υγρό μεταξύ του πάτου της κατσαρόλας και της εστίας μαγειρέματος. Κρατάτε την εστία μαγειρέματος και τον πάτο της κατσαρόλας πάντοτε στεγνά.
31

Αιτίες βλαβώνΠροσοχή!■ Οι τραχείς βάσεις των σκευών μπορεί να ραγίσουν τη βάση εστιών.
■ Ποτέ μην τοποθετείτε άδεια σκεύη στις εστίες. Μπορεί να προκληθεί βλάβη.
■ Μην τοποθετείτε θερμά σκεύη πάνω στο πεδίο χειρισμού, στην περιοχή των ενδείξεων ή στο πλαίσιο της βάσης εστιών. Μπορεί να προκληθεί βλάβη.
■ Η πτώση σκληρών ή αιχμηρών αντικειμένων πάνω στη βάση εστιών μπορεί να προκαλέσει βλάβη.
■ Το αλουμινόχαρτο και τα πλαστικά σκεύη λιώνουν πάνω σε θερμές εστίες. Δεν συνιστάται η χρήση προστατευτικών φύλλων στη βάση εστιών.
Γενική άποψηΣτον παρακάτω πίνακα παρουσιάζουμε τις πιο συχνές βλάβες:
Προστασία του περιβάλλοντοςΑπόσυρση σύμφωνα με τους κανόνες προστασίας του περιβάλλοντοςΑποσύρετε τη συσκευασία σύμφωνα με τους κανόνες προστασίας του περιβάλλοντος.
Συμβουλές για την εξοικονόμηση ενέργειας■ Χρησιμοποιείτε πάντοτε το κατάλληλο καπάκι για κάθε κατσαρόλα. Όταν μαγειρεύετε χωρίς καπάκι, απαιτείται αρκετά περισσότερη ενέργεια. Χρησιμοποιείτε ένα γυάλινο καπάκι για να έχετε ορατότητα χωρίς να το ανοίγετε.
■ Χρησιμοποιείτε σκεύη με επίπεδες βάσεις. Οι βάσεις που δεν είναι επίπεδες απαιτούν μεγαλύτερη κατανάλωση ενέργειας.
■ Η διάμετρος της βάσης των σκευών πρέπει να ταιριάζει με το μέγεθος της εστίας. Προσοχή: οι κατασκευαστές σκευών συνήθως υποδεικνύουν τη μέγιστη διάμετρο του σκεύους, που κατά κανόνα υπερβαίνει τη διάμετρο της βάσης του σκεύους.
■ Χρησιμοποιείτε ένα μικρό σκεύος για μικρές αντίστοιχα ποσότητες. Ένα μεγάλο και σχετικά άδειο σκεύος καταναλώνει πολλή ενέργεια.
■ Κατά το μαγείρεμα, χρησιμοποιείτε λίγο νερό. Με αυτόν τον τρόπο εξοικονομείται ενέργεια και διατηρούνται όλες οι βιταμίνες και τα μέταλλα των λαχανικών.
■ Επιλέγετε το χαμηλότερο επίπεδο ισχύος που θα επιτρέπει τη συνέχιση του μαγειρέματος. Σε πολύ υψηλό επίπεδο ισχύος, δαπανάται ενέργεια.
Βλάβες Αιτία Λύση
Λεκέδες Τρόφιμα που έχουν υπερχειλίσει Απομακρύνετε αμέσως τα τρόφιμα που υπερχειλίζουν με την ξύστρα εστίας.
Ακατάλληλα προϊόντα καθαριότητας Χρησιμοποιείτε προϊόντα καθαριότητας κατάλληλα για τη βάση εστιών.
Χαράξεις Αλάτι, ζάχαρη και χώμα Μην χρησιμοποιείτε τη βάση εστιών σαν δίσκο ή πάγκο εργασίας.
Οι τραχείς βάσεις των σκευών χαράζουν την κεραμική εστία.
Ελέγχετε τα σκεύη.
Ξεθώριασμα Ακατάλληλα προϊόντα καθαριότητας Χρησιμοποιείτε προϊόντα καθαριότητας κατάλληλα για τη βάση εστιών.
Τριβή των σκευών Σηκώστε τις κατσαρόλες και τα τηγάνια για να τα μετακινήσετε σε άλλο μέρος.
Αποφλοιώσεις Ζάχαρη, συστατικά με υψηλή περιεκτι-κότητα σε ζάχαρη
Απομακρύνετε αμέσως τα τρόφιμα που υπερχειλίζουν με την ξύστρα εστίας.
Αυτή η συσκευή χαρακτηρίζεται σύμφωνα με την ευρωπαϊκή οδηγία 2012/19/ΕE περί ηλεκτρικών και ηλεκτρονικών συσκευών (waste electrical and electronic equipment - WEEE).
Η οδηγία προκαθορίζει τα πλαίσια για μια απόσυρση και αξιοποίηση των παλιών συσκευών με ισχύ σ’ όλη την ΕΕ.
32

Επαγωγικό ΜαγείρεμαΠλεονεκτήματα του Επαγωγικού ΜαγειρέματοςΤο Επαγωγικό Μαγείρεμα σημαίνει μια ριζική αλλαγή του παραδοσιακού τρόπου θέρμανσης, η θερμότητα μεταδίδεται απευθείας στο σκεύος. Για αυτόν τον λόγο, έχει διάφορα πλεονεκτήματα:
■ Εξοικονόμηση χρόνου κατά τη διάρκεια του μαγειρέματος, του ψησίματος και του τηγανίσματος, καθώς θερμαίνει απευθείας το σκεύος.
■ Εξοικονόμηση ενέργειας.
■ Πιο εύκολη φροντίδα και καθαριότητα. Τα τρόφιμα που έχουν υπερχειλίσει δεν καίγονται τόσο γρήγορα.
■ Έλεγχος θερμότητας και ασφάλειας: η βάση εστιών παρέχει ή διακόπτει την ενέργεια αμέσως μόλις ενεργοποιήσετε το χειριστήριο ελέγχου. Η επαγωγική εστία δεν παρέχει θερμότητα αν απομακρύνετε το σκεύος χωρίς να έχετε αποσυνδέσει προηγουμένως το χειριστήριο.
ΣκεύηΤα σιδηρομαγνητικά σκεύη είναι κατάλληλα μόνο για επαγωγικό μαγείρεμα, μπορεί να είναι από:
■ επισμαλτωμένο χάλυβα
■ χυτοσίδηρο
■ σκεύος τραπεζιού ειδικά για επαγωγικό μαγείρεμα από ανοξείδωτο χάλυβα.
Για να καταλάβετε αν τα σκεύη είναι κατάλληλα, ελέγξτε αν η βάση του σκεύους έλκεται από ένα μαγνήτη.
Υπάρχει άλλο είδος σκευών ειδικά για επαγωγικό μαγείρεμα, των οποίων η βάση δεν είναι πλήρως σιδηρομαγνητική.
Μη κατάλληλα σκεύηΠοτέ μην χρησιμοποιείτε πλάκες διάχυσης ούτε σκεύη από:
■ κανονικό λεπτό χάλυβα
■ γυαλί
■ πηλό
■ χαλκό
■ αλουμίνιο
Χαρακτηριστικά της βάσης του σκεύουςΤα χαρακτηριστικά της βάσης των σκευών μπορεί να επηρεάσουν την ομοιομορφία στα αποτελέσματα του μαγειρέματος. Σκεύη κατασκευασμένα από υλικά που βοηθούν στη διάχυση της θερμότητας, όπως τα σκεύη "sandwich" από ανοξείδωτο χάλυβα, διανέμουν τη θερμότητα ομοιόμορφα, εξοικονομώντας χρόνο και ενέργεια.
Απουσία σκεύους ή μη κατάλληλο μέγεθοςΑν δεν τοποθετείται ένα σκεύος πάνω στην εστία, ή αυτό δεν είναι από κατάλληλο υλικό ή μέγεθος, το επίπεδο μαγειρέματος που εμφανίζεται στην ένδειξη της εστίας αναβοσβήνει. Τοποθετήστε το κατάλληλο σκεύος για να σταματήσει να αναβοσβήνει. Αν αργήσετε περισσότερα από 90 δευτερόλεπτα, η εστία σβήνει αυτόματα.
Άδεια σκεύη ή με λεπτή βάσηΜην θερμαίνετε άδεια σκεύη, ούτε να χρησιμοποιείτε σκεύη με λεπτή βάση. Η βάση εστιών διαθέτει ένα εσωτερικό σύστημα ασφαλείας, αλλά ένα άδειο σκεύος μπορεί να θερμανθεί τόσο γρήγορα ώστε η λειτουργία "αυτόματη απενεργοποίηση" δεν έχει χρόνο να ενεργοποιηθεί και μπορεί να φτάσει πολύ υψηλή θερμοκρασία. Η βάση του σκεύους μπορεί να λιώσει και να προκαλέσει βλάβη στο γυαλί της βάσης εστιών. Σ'αυτήν την περίπτωση, μην αγγίζετε το σκεύος και σβήστε την εστία. Αν δεν λειτουργεί, εφόσον έχει κρυώσει, επικοινωνήστε με το τεχνικό σέρβις.
Ανίχνευση σκεύουςΚάθε εστία έχει ένα ελάχιστο όριο για ανίχνευση του σκεύους, το οποίο διαφέρει ανάλογα με το υλικό του σκεύους που χρησιμοποιείται. Για αυτόν το λόγο, πρέπει να χρησιμοποιείται η εστία που είναι πιο κατάλληλη ως προς τη διάμετρο του σκεύους της.
Όταν χρησιμοποιούνται μεγάλα σκεύη με πιο μικρή διάμετρο στη σιδηρομαγνητική ζώνη, θερμαίνε-ται μόνο η σιδηρομαγνητική ζώνη και έτσι δεν γίνεται ομοιογενής κατανομή θερμότητας.
Τα σκεύη με ζώνη από αλουμίνιο μέσα στη βάση, μειώνουν τη σιδη-ρομαγνητική ζώνη, έτσι η παρεχό-μενη ισχύς μπορεί να είναι μικρότερη ή να παρουσιαστούν προβλήματα εντοπισμού του σκεύ-ους ή ακόμα και να μην ανιχνεύε-ται.
Για καλύτερα αποτελέσματα στο μαγείρεμα, συνιστάται η διάμε-τρος της σιδηρομαγνητικής ζώνης του σκεύους να ταιριάζει με το μέγεθος της εστίας. Εφόσον το σκεύος δεν ανιχνεύεται στην εστία, δοκιμάστε στην εστία με την αμέ-σως μικρότερη διάμετρο.
33

Για να γνωρίσετε τη συσκευήΣτη σελίδα 2 θα βρείτε πληροφορίες για τις διαστάσεις και την ισχύ των εστιών μαγειρέματος.
Το πεδίο χειρισμού
Επιφάνειες χειρισμούΑν πατήσετε κάποιο σύμβολο, ενεργοποιείται η αντίστοιχη λειτουργία.
ΥπόδειξηΔιατηρείτε τις επιφάνειες χειρισμού πάντα στεγνές. Η υγρασία μπορεί να επηρεάσει τη λειτουργία.
Οι εστίες
Ένδειξη παραμένουσας θερμότηταςΗ βάση εστιών διαθέτει την ένδειξη παραμένουσας θερμότητας σε κάθε εστία που δείχνει ποιες είναι ακόμα θερμές. Αποφύγετε να αγγίξετε την εστία που εμφανίζει αυτή την ένδειξη.
Παρόλο που η βάση εστιών είναι σβησμένη, η ένδειξη œή •, θα παραμείνει φωτισμένη ενόσω η εστία είναι θερμή.
Αν απομακρύνετε το σκεύος πριν σβήσετε την εστία, εμφανίζεται εναλλάξ η ένδειξη œ ή • καθώς και το επιλεγόμενο επίπεδο ισχύος.
Επιφάνειες χειρισμού
# Κύριος διακόπτης
$ Επιλογή εστίας
A/@ Επιλογή ρυθμίσεων
" Λειτουργία προστασία κατά την καθαριότητα
‚ Ασφάλεια για παιδιά
˜ Λειτουργία Powerboost
– Λειτουργία διατήρηση θερμότητας
3 Λειτουργία προγραμματισμός χρόνου
Ενδείξεις
‹ Λειτουργικότητα
‚-Š Επίπεδα ισχύος
˜ Λειτουργία Powerboost
•/œ Παραμένουσα θερμότητα
‹‹ Λειτουργία προγραμματισμός χρόνου
‚ Ασφάλεια για παιδιά
– Λειτουργία διατήρηση θερμότητας
x Αυτόματη αποσύνδεση
S Υπενθυμιστής χρόνου
Εστία
$ Απλή εστία Χρησιμοποιείτε ένα σκεύος με κατάλληλο μέγεθος.
Χρησιμοποιείτε μόνο σκεύη κατάλληλα για μαγείρεμα με επαγωγή, βλέπετε ενότητα “Κατάλληλα σκεύη".
34

Προγραμματισμός της βάσης εστιώνΣ'αυτό το κεφάλαιο σας παρουσιάζεται ο τρόπος ρύθμισης μιας εστίας. Στον πίνακα υπάρχουν τα επίπεδα ισχύος και οι χρόνοι μαγειρέματος για διαφορετικά φαγητά.
Άναμμα και σβήσιμο της βάσης εστιώνΗ βάση εστιών ανάβει και σβήνει με τον κύριο διακόπτη.
Άναμμα: Πατήστε το σύμβολο #. Ακούγεται ένα ηχητικό σήμα. Η ένδειξη που βρίσκεται δίπλα από τον κύριο διακόπτη καθώς και οι ενδείξεις ‹ των εστιών φωτίζονται. Η βάση εστιών είναι έτοιμη για να λειτουργήσει.
Σβήσιμο: πατήστε το σύμβολο # μέχρι να σβήσουν οι ενδείξεις. Όλες οι εστίες έχουν σβήσει. Η ένδειξη παραμένουσας θερμότητας φωτίζεται μέχρι να κρυώσουν πλήρως οι εστίες.
Υποδείξεις■ Η βάση εστιών σβήνει αυτόματα όταν όλες οι εστίες παραμένουν σβηστές για περισσότερο από 20 δευτερόλεπτα.
■ Η επιλεγόμενες ρυθμίσεις παραμένουν στη μνήμη της συσκευής για τα πρώτα 4 δευτερόλεπτα μετά το σβήσιμο της βάσης εστιών. Αν ξανανάψετε τη βάση εστιών μέσα σε αυτό το χρονικό διάστημα, εφαρμόζονται οι προηγούμενες ρυθμίσεις.
Ρύθμιση της εστίαςΕπιλέξτε το επίπεδο ισχύος που θέλετε με τα σύμβολα + και -. Επίπεδο ισχύος 1 = ελάχιστη ισχύς.
Επίπεδο ισχύος 9 = μέγιστη ισχύς.
Κάθε επίπεδο ισχύος διαθέτει ενδιάμεση ρύθμιση. Εμφανίζεται με τη μορφή τελείας.
Επιλέξτε την εστία και το επίπεδο ισχύοςΗ βάση εστιών πρέπει να είναι αναμμένη.
1.Επιλέξτε την εστία με το σύμβολο $.
2.Μέσα στα επόμενα 10 δευτερόλεπτα, πατήστε το σύμβολο + ή -. Εμφανίζεται η βασική ρύθμιση:Σύμβολο + επίπεδο ισχύος 9Σύμβολο - επίπεδο ισχύος 4
Το επίπεδο ισχύος έχει ρυθμιστεί.
Αλλαγή του επιπέδου ισχύοςΕπιλέξτε την εστία και πατήστε το σύμβολο + ή - μέχρι να εμφανιστεί το επίπεδο ισχύος που επιθυμείτε.
Σβήσιμο της εστίαςΕπιλέξτε την εστία και στη συνέχεια πατήστε το σύμβολο + ή - μέχρι να εμφανιστεί ‹.
Η εστία σβήνει και εμφανίζεται η ένδειξη της παραμένουσας θερμότητας.
Υποδείξεις■ Όποτε δεν τοποθετείται κάποιο σκεύος στην εστία, το επιλεγμένο επίπεδο ισχύος αναβοσβήνει. Μόλις περάσει κάποιο χρονικό διάστημα, η εστία σβήνει.
■ Εφόσον τοποθετηθεί κάποιο σκεύος στην εστία προτού ανάψετε τη βάση εστιών, ανιχνεύεται μέσα στα επόμενα 20 δευτερόλεπτα αφού πατήσετε τον κύριο διακόπτη, ενώ η εστία επιλέγεται αυτόματα. Μόλις ανιχνευθεί επιλέξτε το επίπεδο ισχύος μέσα στα επόμενα 20 δευτερόλεπτα, αλλιώς θα σβήσει η εστία.Ακόμη και αν τοποθετηθούν περισσότερα από ένα σκεύος, μόλις ανάψετε τη βάση εστιών, θα ανιχνευθεί μόνο το ένα από αυτά.
Πίνακας μαγειρέματοςΣτον παρακάτω πίνακα παρουσιάζονται μερικά παραδείγματα.
Οι χρόνοι μαγειρέματος εξαρτώνται από το επίπεδο ισχύος, το είδος, το βάρος και την ποιότητα των τροφίμων. Για αυτόν το λόγο, υπάρχουν παραλλαγές.
Όποτε θερμαίνετε πουρέ, κρέμες και πηχτές σάλτσες, θα πρέπει να τα ανακατεύετε κατά διαστήματα.
Χρησιμοποιείτε το επίπεδο ισχύος 9 για την έναρξη του μαγειρέματος.
Επίπεδο ισχύος Διάρκεια μαγειρέματος
Λιώσιμο
Σοκολάτα, κουβερτούρα σοκολάτας 1-1. -
Βούτυρο, μέλι, ζελατίνη 1-2 -
Ζέσταμα και διατήρηση ζεστού φαγητού
Σούπες (π.χ. φακές) 1.-2 -
Γάλα** 1.-2. -
Βραστά λουκάνικα** 3-4 -
Απόψυξη και ζέσταμα
Σπανάκι βαθιάς κατάψυξης 3-4 15-25 λεπτά
Γκούλας βαθιάς κατάψυξης 3-4 30-40 λεπτά
* Μαγείρεμα χωρίς καπάκι** Χωρίς καπάκι*** Συχνή αλλαγή πλευράς
35
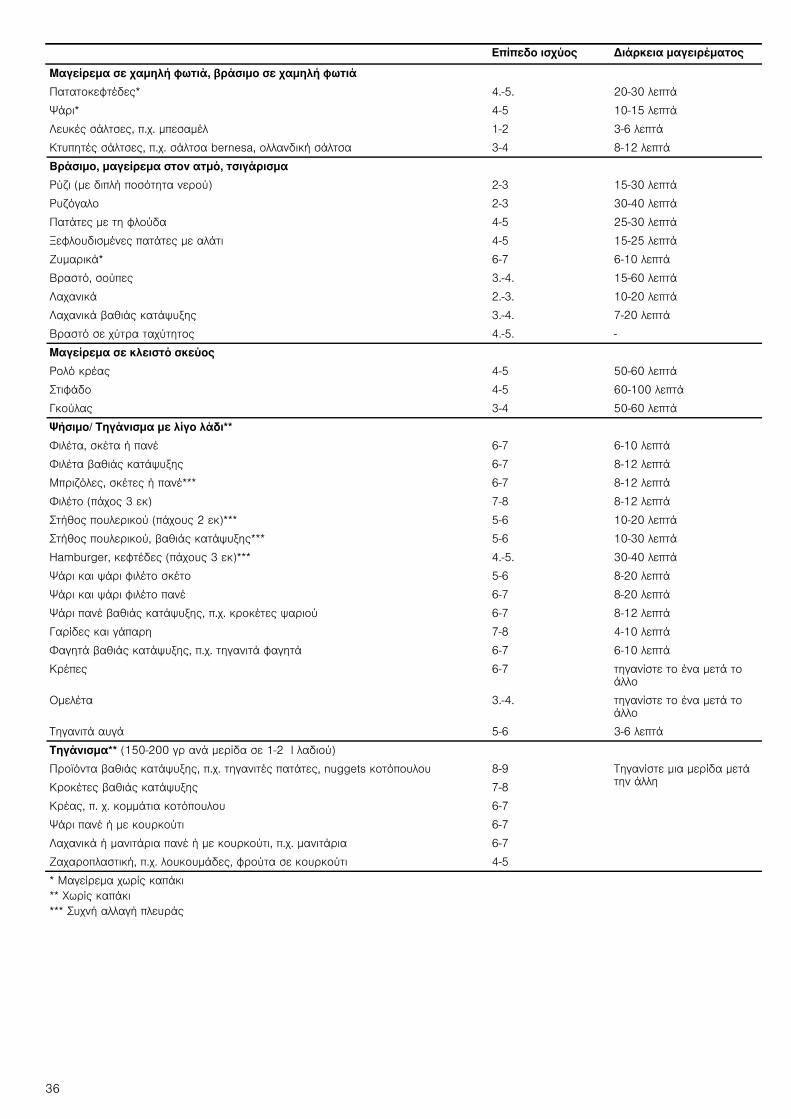
Μαγείρεμα σε χαμηλή φωτιά, βράσιμο σε χαμηλή φωτιά
Πατατοκεφτέδες* 4.-5. 20-30 λεπτά
Ψάρι* 4-5 10-15 λεπτά
Λευκές σάλτσες, π.χ. μπεσαμέλ 1-2 3-6 λεπτά
Κτυπητές σάλτσες, π.χ. σάλτσα bernesa, ολλανδική σάλτσα 3-4 8-12 λεπτά
Βράσιμο, μαγείρεμα στον ατμό, τσιγάρισμα
Ρύζι (με διπλή ποσότητα νερού) 2-3 15-30 λεπτά
Ρυζόγαλο 2-3 30-40 λεπτά
Πατάτες με τη φλούδα 4-5 25-30 λεπτά
Ξεφλουδισμένες πατάτες με αλάτι 4-5 15-25 λεπτά
Ζυμαρικά* 6-7 6-10 λεπτά
Βραστό, σούπες 3.-4. 15-60 λεπτά
Λαχανικά 2.-3. 10-20 λεπτά
Λαχανικά βαθιάς κατάψυξης 3.-4. 7-20 λεπτά
Βραστό σε χύτρα ταχύτητος 4.-5. -
Μαγείρεμα σε κλειστό σκεύος
Ρολό κρέας 4-5 50-60 λεπτά
Στιφάδο 4-5 60-100 λεπτά
Γκούλας 3-4 50-60 λεπτά
Ψήσιμο/ Τηγάνισμα με λίγο λάδι**
Φιλέτα, σκέτα ή πανέ 6-7 6-10 λεπτά
Φιλέτα βαθιάς κατάψυξης 6-7 8-12 λεπτά
Μπριζόλες, σκέτες ή πανέ*** 6-7 8-12 λεπτά
Φιλέτο (πάχος 3 εκ) 7-8 8-12 λεπτά
Στήθος πουλερικού (πάχους 2 εκ)*** 5-6 10-20 λεπτά
Στήθος πουλερικού, βαθιάς κατάψυξης*** 5-6 10-30 λεπτά
Hamburger, κεφτέδες (πάχους 3 εκ)*** 4.-5. 30-40 λεπτά
Ψάρι και ψάρι φιλέτο σκέτο 5-6 8-20 λεπτά
Ψάρι και ψάρι φιλέτο πανέ 6-7 8-20 λεπτά
Ψάρι πανέ βαθιάς κατάψυξης, π.χ. κροκέτες ψαριού 6-7 8-12 λεπτά
Γαρίδες και γάπαρη 7-8 4-10 λεπτά
Φαγητά βαθιάς κατάψυξης, π.χ. τηγανιτά φαγητά 6-7 6-10 λεπτά
Κρέπες 6-7 τηγανίστε το ένα μετά το άλλο
Ομελέτα 3.-4. τηγανίστε το ένα μετά το άλλο
Τηγανιτά αυγά 5-6 3-6 λεπτά
Τηγάνισμα** (150-200 γρ ανά μερίδα σε 1-2 l λαδιού)
Προϊόντα βαθιάς κατάψυξης, π.χ. τηγανιτές πατάτες, nuggets κοτόπουλου 8-9 Τηγανίστε μια μερίδα μετά την άλληΚροκέτες βαθιάς κατάψυξης 7-8
Κρέας, π. χ. κομμάτια κοτόπουλου 6-7
Ψάρι πανέ ή με κουρκούτι 6-7
Λαχανικά ή μανιτάρια πανέ ή με κουρκούτι, π.χ. μανιτάρια 6-7
Ζαχαροπλαστική, π.χ. λουκουμάδες, φρούτα σε κουρκούτι 4-5
Επίπεδο ισχύος Διάρκεια μαγειρέματος
* Μαγείρεμα χωρίς καπάκι** Χωρίς καπάκι*** Συχνή αλλαγή πλευράς
36

Ασφάλεια για παιδιάΗ βάση εστιών μπορεί να διασφαλιστεί ενάντια μιας ακούσιας σύνδεσης στο ηλεκτρικό ρεύμα για να εμποδίζει τα παιδιά να ανάβουν τις εστίες.
Ενεργοποίηση και απενεργοποίηση της ασφάλειας για παιδιάΗ βάση εστιών πρέπει να είναι σβησμένη.
Ενεργοποίηση: Πατήστε το σύμβολο ‚ για περίπου 4 δευτερόλεπτα. Η ένδειξη ‚ φωτίζεται για 10 δευτερόλεπτα. Η βάση εστιών κλειδώνει.
Απενεργοποίηση: πατήστε το σύμβολο ‚ για περίπου 4 δευτερόλεπτα. Το κλείδωμα έχει απενεργοποιηθεί.
Αυτόματη ασφάλεια για παιδιάΜε αυτήν τη λειτουργία, η ασφάλεια για παιδιά ενεργοποιείται αυτόματα όταν σβήνει η βάση εστιών.
Ενεργοποίηση και απενεργοποίησηΣτο κεφάλαιο Βασικές ρυθμίσεις παρουσιάζονται οι σχετικές με τη σύνδεση αυτόματης ασφάλεια για τα παιδιά πληροφορίες
Λειτουργία PowerboostΜε τη λειτουργία Powerboost μπορείτε να ζεσταίνετε μεγάλες ποσότητες νερού πιο γρήγορα από το επίπεδο ισχύς Š.
Περιορισμός χρήσηςΑυτή η λειτουργία μπορεί να ενεργοποιηθεί για μια εστία μαγειρέματος πάντοτε τότε, όταν η άλλη εστία μαγειρέματος της ίδιας ομάδας δεν είναι σε λειτουργία (βλέπε εικόνα). Διαφορετικά αναβοσβήνουν στην ένδειξη των βαθμίδων μαγειρέματος ˜ και Š, στη συνέχεια ρυθμίζεται αυτόματα η βαθμίδα μαγειρέματος Š.
Ενεργοποίηση1.Επιλέξτε μια εστία.
2.Πατήστε το σύμβολο ˜. Η ένδειξη ˜ φωτίζεται.
Έχει γίνει ενεργοποίηση της λειτουργίας Powerboost.
Απενεργοποίηση1.Επιλέξτε μια εστία.
2.Πατήστε το σύμβολο ˜.Η ένδειξη ˜ θα χαθεί και η εστία θα επιστρέψει στο επίπεδο ισχύος Š.
Η λειτουργία Powerboost έχει απενεργοποιηθεί.
Υπόδειξη: Υπό ορισμένες συνθήκες, η λειτουργία Powerboost μπορεί να αποσυνδεθεί αυτόματα για να προστατέψει το ηλεκτρικό υλικό που βρίσκεται στο εσωτερικό της βάσης εστιών.
Λειτουργία προγραμματισμός χρόνουΑυτή η λειτουργία μπορεί να χρησιμοποιηθεί με δυο διαφορετικούς τρόπους:
■ για αυτόματο σβήσιμο μια εστίας.
■ για χρονόμετρο.
Αυτόματο σβήσιμο μιας εστίαςΗ εστία σβήνει αυτόματα μόλις παρέλθει ο χρόνος που επιλέξατε.
Προγραμματισμός του χρόνου μαγειρέματος.Η βάση εστιών πρέπει να είναι αναμμένη:
1.Επιλέξτε την εστία και το επίπεδο ισχύος που θέλετε.
2.Πατήστε το σύμβολο 3. Η ένδειξη x της εστίας φωτίζεται. Στην οπτική ένδειξη της λειτουργίας προγραμματισμός χρόνου εμφανίζεται ‹‹.
3.Πατήστε το σύμβολο + ή -. Εμφανίζεται η βασική ρύθμιση:Σύμβολο +: 30 λεπτά.Σύμβολο -: 10 λεπτά.
4.Πατήστε το σύμβολο + ή - μέχρι να εμφανιστεί ο χρόνος μαγειρέματος που θέλετε.
Μετά από μερικά δευτερόλεπτα, ο χρόνος μαγειρέματος αρχίζει να παρέρχεται.
37

Υπόδειξη: Είναι δυνατός ο αυτόματος προγραμματισμός του ίδιου χρόνου μαγειρέματος για όλες τις εστίες. Ο προγραμματισμένος χρόνος θα παρέρχεται ανεξάρτητα για κάθε μία από τις εστίες.Στο κεφάλαιο Βασικές ρυθμίσεις παρουσιάζονται οι ρυθμίσεις που σχετίζονται με τον αυτόματο προγραμματισμό του χρόνου μαγειρέματος.
Αλλαγή ή ακύρωση χρόνου
Επιλογή εστίας. Πατήστε το σύμβολο 3 και αλλάξτε το χρόνο μαγειρέματος με τα σύμβολα + ή --, ή ρυθμίστε στο ‹‹.
Μόλις παρέλθει ο χρόνοςΗ εστία σβήνει. Ακούγεται μια ηχητική ειδοποίηση και στην οπτική ένδειξη της λειτουργίας προγραμματισμός χρόνου εμφανίζεται ‹‹ για 10 δευτερόλεπτα. Η ένδειξη x της εστίας φωτίζεται. Πατήστε το σύμβολο 3, οι ενδείξεις σβήνουν και το ηχητικό σήμα σταματάει.
Υποδείξεις■ Εάν έχετε προγραμματίσει χρόνο μαγειρέματος σε διάφορες εστίες, στην οπτική ένδειξη της λειτουργίας προγραμματισμός χρόνου απεικονίζεται πάντοτε ο χρόνος της επιλεγμένης εστίας.
■ Ο χρόνος μαγειρέματος μπορεί να ρυθμιστεί έως 99 λεπτά.
Υπενθυμιστής χρόνουΟ υπενθυμιστής χρόνου της κουζίνας σας επιτρέπει να ρυθμίσετε χρόνο μαγειρέματος μέχρι 99 λεπτά. Δεν εξαρτάται από τις άλλες ρυθμίσεις. Η λειτουργία αυτή δεν σβήνει αυτόματα μια εστία.
ΠρογραμματισμόςΚαμία εστία δεν πρέπει να είναι επιλεγμένη.
1.Πατήστε το σύμβολο 3. Στην οπτική ένδειξη της λειτουργία προγραμματισμός χρόνου εμφανίζεται ‹‹ και το σύμβολο W
2.Πατήστε τα σύμβολα + ή -. Εμφανίζεται η βασική ρύθμιση. Σύμβολο +: 10 λεπτά.Σύμβολο -: 05 λεπτά.
3.Ρυθμίστε το χρόνο που θέλετε με τα σύμβολα + ή -. Μετά από μερικά δευτερόλεπτα, ο χρόνος αρχίζει να παρέρχεται.
Αλλαγή ή ακύρωση χρόνου
Πατήστε αρκετές φορές το σύμβολο 3 μέχρι να φωτιστεί η ένδειξη W. Τροποποιήστε το χρόνο ή ρυθμίστε σε ‹‹ με τα σύμβολα + ή -.
Μόλις παρέλθει ο χρόνοςΑκούγεται ένα σήμα ειδοποίησης. Στην οπτική ένδειξη της λειτουργίας προγραμματισμός χρόνου εμφανίζεται ‹‹. Μετά από 10 δευτερόλεπτα οι ενδείξεις σβήνουν.
Μόλις πατήσετε το σύμβολο 3, οι ενδείξεις σβήνουν και το ηχητικό σήμα σταματάει.
Λειτουργία διατήρησης θερμότηταςΗ λειτουργία αυτή είναι κατάλληλη για να λιώνετε σοκολάτα και βούτυρο καθώς και να διατηρείτε ζεστά τα τρόφιμα.
Ενεργοποίηση1.Επιλογή εστίας.
2.Στα επόμενα 10 δευτερόλεπτα, πατήστε το σύμβολο –.Η ένδειξη –φωτίζεται.
Η λειτουργία διατήρηση θερμότητας έχει ενεργοποιηθεί.
Απενεργοποίηση1.Επιλέξτε την εστία που θέλετε.
2.Πατήστε το σύμβολο –.Η ένδειξη –χάνεται.
Η εστία σβήνει και εμφανίζεται η ένδειξη παραμένουσας θερμότητας.
Λειτουργία προστασία κατά την καθαριότηταΕάν καθαρίζετε το πεδίο χειρισμού ενώ είναι αναμμένη η βάση εστιών, μπορεί να γίνει αλλαγή στις ρυθμίσεις.
Για να αποφευχθεί αυτή η αλλαγή, η βάση εστιών διαθέτει τη λειτουργία προστασία κατά την καθαριότητα. Πατήστε το σύμβολο ". Ακούγεται ένα σήμα. Φωτίζεται η ένδειξη Ú που βρίσκεται δίπλα στο σύμβολο ". Το πεδίο χειρισμού κλειδώνει για
περίπου 35 δευτερόλεπτα. Τώρα μπορείτε να καθαρίσετε την επιφάνεια του πεδίου χειρισμού χωρίς κίνδυνο αλλαγής των ρυθμίσεων.
Υπόδειξη: Το κλείδωμα δεν επηρεάζει τον κύριο διακόπτη. Μπορείτε να αποσυνδέσετε τη βάση εστιών όταν θέλετε.
Αυτόματος περιορισμός χρόνουΌταν μια εστία λειτουργεί για μεγάλο διάστημα και δεν γίνεται καμία αλλαγή στη ρύθμιση, ενεργοποιείται ο αυτόματος περιορισμός χρόνου.
Η εστία παύει να ζεσταίνεται. Στην οπτική ένδειξη της εστίας αναβοσβήνει εναλλάξ ”, ‰ και η ένδειξη παραμένουσας θερμότητας œ/•.
Μόλις πατήσετε οποιοδήποτε σύμβολο, σβήνει η ένδειξη. Τώρα μπορείτε να ρυθμίσετε ξανά την εστία.
Όταν ενεργοποιείται ο αυτόματος περιορισμός, αυτός διέπεται από τη λειτουργία του επιλεγόμενου επιπέδου ισχύος (από 1 έως 10 ώρες).
38

Απεικόνιση της κατανάλωσης ενέργειαςΜε αυτή τη λειτουργία μπορείτε να δείτε τη συνολική κατανάλωση ενέργειας κατά τη διάρκεια που είναι ενεργοποιημένη η βάση εστιών.
Μόλις σβήσει η βάση εστιών, η κατανάλωση σε kwh απεικονίζεται για 10 δευτερόλεπτα.
Στην εικόνα παρουσιάζεται ένα παράδειγμα με κατανάλωση σε ‚.‹‰ kwh.
Στο κεφάλαιο Βασικές ρυθμίσεις βρίσκονται οι πληροφορίες σχετικά με την ενεργοποίηση αυτής της λειτουργίας.
Βασικές ρυθμίσειςΗ συσκευή διαθέτει διάφορες βασικές ρυθμίσεις. Οι ρυθμίσεις αυτές προσαρμόζονται στις ανάγκες του χρήστη.
Οθόνη ένδει-ξης
Λειτουργία
™‚ Αυτόματη ασφάλεια για παιδιά
‹ Απενεργοποιημένη.*
‚ Ενεργοποιημένη.
™ƒ Ηχητικά σήματα
‹ Σήμα επιβεβαίωσης και σήμα σφάλματος απενεργοποιημένα.
‚ Ενεργοποιημένο μόνο το σήμα σφάλματος.
ƒ Ενεργοποιημένο μόνο το σήμα επιβεβαίωσης.
„ Όλα τα σήματα ενεργοποιημένα.*
™„ Οπτική ένδειξη κατανάλωσης ενέργειας
‹ Απενεργοποιημένη.*
‚ Ενεργοποιημένη.
™† Αυτόματος προγραμματισμός του χρόνου μαγειρέματος.
‹ Σβηστός.*
‚-ŠŠ Χρόνος αυτόματης αποσύνδεσης.
™‡ Διάρκεια του σήματος ειδοποίησης της λειτουργίας προγραμματισμός χρόνου
‚ 10 δευτερόλεπτα.
ƒ 30 δευτερόλεπτα.
„ 1 λεπτό*.
™ˆ Λειτουργία Power-Management
‹ = Απενεργοποιημένη.*
‚ = 1000 W. ελάχιστη ισχύς.
‚.= 1500 W.
ƒ = 2000 W.
...
Š ή Š. = μέγιστη ισχύς της βάσης εστιών.
*Ρύθμιση εργοστασίου
39

Πρόσβαση στις βασικές ρυθμίσειςΗ βάση εστιών πρέπει να είναι σβησμένη.
1.Ανάψτε τη βάση εστιών.
2.Μέσα στα επόμενα 10 δευτερόλεπτα, κρατήστε πατημένο το σύμβολο " για 4 δευτερόλεπτα.
Στις οπτικές ενδείξεις φωτίζονται ™ και ‚ εναλλάξ και ‹ ως προκαθορισμένη ρύθμιση.
3.Πατήστε αρκετές φορές το σύμβολο " μέχρι να εμφανιστεί η ένδειξη της επιθυμητής λειτουργίας.
4.Στη συνέχεια επιλέξτε την επιθυμητή ρύθμιση με τα σύμβολα + και -.
5.Πατήστε ξανά το σύμβολο " για πάνω από 4 δευτερόλεπτα.
Οι ρυθμίσεις έχουν αποθηκευτεί σωστά.
ΈξοδοςΓια την έξοδο από τις βασικές ρυθμίσεις, σβήστε τη βάση εστιών με τον κύριο διακόπτη.
Φροντίδα και ΚαθαριότηταΟι συμβουλές και υποδείξεις που αναφέρονται σ'αυτό το κεφάλαιο θα σας βοηθήσουν για την καθαριότητα και τη βέλτιστη συντήρηση της βάσης εστιών
Βάση εστιών
ΚαθαριότηταΚαθαρίστε τη βάση εστιών μετά από κάθε μαγείρεμα. Κατά αυτόν τον τρόπο, δεν θα καούν τα υπολείμματα φαγητού που έχουν κολλήσει. Μην καθαρίζετε τη βάση εστιών μέχρι να κρυώσει καλά.
Χρησιμοποιείτε προϊόντα καθαριότητας κατάλληλα μόνο για βάσεις εστιών. Παρατηρείστε τις ενδείξεις που υπάρχουν στη συσκευασία του προϊόντος.
Ποτέ μην χρησιμοποιείτε:
■ Υγρό πιάτων χωρίς αραίωση
■ Απορρυπαντικό για πλυντήρια πιάτων
■ Λειαντικά προϊόντα
■ Διαβρωτικά προϊόντα όπως καθαριστικά ψεκασμού για φούρνους ή προϊόντα για την αφαίρεση λεκέδων
■ Σφουγγαράκια που χαράζουν
■ Καθαριστικά υψηλής πίεσης ή συσκευές ατμοκαθαρισμού
Ο καλύτερος τρόπος για απάλειψη της εναπομείνουσας βρωμιάς είναι η χρήση μια ξύστρας εστίας. Δείτε προσεχτικά τις υποδείξεις του κατασκευαστή.
Μπορείτε να προμηθευτείτε τις κατάλληλες ξύστρες εστίας μέσω του τεχνικού σέρβις ή από το κατάστημά μας στο διαδίκτυο.
Πλαίσιο της βάσης εστιώνΓια να μην χαλάσετε το πλαίσιο της βάσης εστιών, λάβετε υπόψη τις παρακάτω ενδείξεις:
■ Χρησιμοποιείτε μόνο ζεστό νερό με λίγο απορρυπαντικό
■ Ποτέ μην χρησιμοποιείτε λειαντικά ή κοφτερά προϊόντα
■ Μην χρησιμοποιείτε τη ξύστρα εστίας
™Š Χρόνος επιλογής της εστίας
‹ περιορισμός: παραμένει επιλεγμένη η τελευταία προγραμματισμένη εστία.*
‚ Περιορισμός: Η εστία παραμένει επιλεγμένη μόνο για 10 δευτερόλεπτα.
™‹ Επιστροφή στις προεπιλεγμένες ρυθμίσεις
‹ Προσωπικές ρυθμίσεις.*
‚ Επιστροφή στις ρυθμίσεις εργοστασίου.
Οθόνη ένδει-ξης
Λειτουργία
*Ρύθμιση εργοστασίου
40

Επιδιόρθωση βλαβώνΣυνήθως οι βλάβες οφείλονται σε ασήμαντους λόγους. Πριν ειδοποιήσετε το Τεχνικό Σέρβις, πρέπει να λάβετε υπόψη τις ακόλουθες συμβουλές και υποδείξεις.
Φυσιολογικός θόρυβος κατά τη διάρκεια λειτουργίας της συσκευήςΗ τεχνολογία της επαγωγικής θέρμανσης βασίζεται στη δημιουργία μαγνητικών πεδίων ώστε η θερμότητα μεταδίδεται κατευθείαν στη βάση του σκεύους. Αυτά, ανάλογα με το σχήμα του σκεύους, μπορεί να προκαλούν κάποιους θορύβους ή δονήσεις όπως περιγράφονται στη συνέχεια:
Ένα βαθύ βουϊτό όπως ένας μετασχηματιστήςΑυτός ο θόρυβος προκαλείται κατά το μαγείρεμα με ένα υψηλό επίπεδο ισχύος. Αυτό οφείλεται στην ποσότητα της ενέργειας που μεταδίδεται από τη βάση εστιών στο σκεύος. Αυτός ο θόρυβος χάνεται ή γίνεται πιο αδύναμος όταν μειώνεται το επίπεδο ισχύος.
Ένα ελαφρύ σφύριγμαΟ εν λόγω θόρυβος προκαλείται όταν το σκεύος είναι άδειο. Αυτό ο θόρυβος χάνεται, όταν βάζετε νερό ή τρόφιμα στο σκεύος.
ΤρίξιμοΑυτός ο θόρυβος εμφανίζεται στα σκεύη, τα οποία αποτελούνται από διαφορετικά υλικά επικάλυψης. Ο θόρυβος οφείλεται στις δονήσεις που προκαλούνται στις επιφάνειες ένωσης των διαφορετικών υλικών επικάλυψης. Αυτός ο θόρυβος προέρχεται από το σκεύος. Η ποσότητα και ο τρόπος μαγειρέματος των τροφίμων μπορεί να διαφέρει ως προς την ένταση του θορύβου.
Δυνατά σφυρίγματαΟι θόρυβοι προκαλούνται κυρίως στα σκεύη που αποτελούνται από διαφορετικές επικαλύψεις υλικών, μόλις αυτά χρησιμοποιούνται στη μέγιστη ισχύ θέρμανσης και σε δυο εστίες ταυτόχρονα. Αυτά τα σφυρίγματα χάνονται ή είναι πιο σπάνια, μόλις μειώνεται η ισχύς.
Θόρυβος του ανεμιστήραΓια μια κατάλληλη χρήση του ηλεκτρονικού συστήματος, η βάση εστιών πρέπει να λειτουργεί σε μια ελεγχόμενη θερμοκρασία. Για το λόγο αυτόν, η βάση εστιών διαθέτει έναν ανεμιστήρα ο οποίος ενεργοποιείται όποτε ανιχνεύεται υψηλή θερμοκρασία. Επίσης, ο ανεμιστήρας μπορεί να λειτουργεί λόγω αδράνειας μετά το σβήσιμο της βάσης εστιών αν η ανιχνευόμενη θερμοκρασία είναι ακόμη αρκετά υψηλή.
Οι θόρυβοι που περιγράφονται είναι φυσιολογικοί, αποτελούν μέρος της επαγωγικής τεχνολογίας και δεν είναι ένδειξη βλάβης.
Οθόνη ένδειξης Βλάβη Λύση
τίποτα Διακοπή παροχής ηλεκτρικού ρεύματος. Ελέγξτε με την βοήθεια άλλων ηλεκτρονικών συσκευών, εάν προκλήθηκε κάποια διακοπή παροχής ηλεκτρικού ρεύ-ματος.
Η σύνδεση της συσκευής στο ηλεκτρικό ρεύμα δεν έγινε σύμφωνα με το διάγραμμα συνδέσεων.
Ελέγξτε ότι η συσκευή συνδέθηκε σύμφωνα με το διά-γραμμα συνδέσεων.
Βλάβη στο ηλεκτρονικό σύστημα. Εάν οι παραπάνω έλεγχοι δεν διόρθωσαν τη βλάβη, ειδο-ποιήστε το τεχνικό σέρβις.
Οι ενδείξεις αναβοσβήνουν Το πεδίο χειρισμού είναι υγρό ή έχει τοποθετηθεί κάποιο αντικείμενο επάνω.
Στεγνώστε την περιοχή του πεδίου χειρισμού ή απομακρύ-νετε το αντικείμενο.
Η ένδειξη - αναβοσβήνει στις ενδείξεις των εστιών
Υπάρχει σφάλμα στο ηλεκτρονικό σύστημα. Καλύψτε για λίγο την επιφάνεια του πεδίου χειρισμού με το χέρι για να επιβεβαιώσετε τη βλάβη.
“§ + αριθμός / š + αριθμός /¡ + αριθμός
Βλάβη στο ηλεκτρονικό σύστημα. Αποσυνδέστε τη βάση εστιών από το ηλεκτρικό ρεύμα. Περιμένετε περίπου 30 δευτερόλεπτα και επανασυνδέστε την.*
”‹ / ”Š Έχει προκληθεί ένα εσωτερικό σφάλμα στη λει-τουργία.
Αποσυνδέστε τη βάση εστιών από το ηλεκτρικό ρεύμα. Περιμένετε περίπου 30 δευτερόλεπτα και επανασυνδέστε την.*
”ƒ Το ηλεκτρονικό σύστημα έχει υπερθερμανθεί και έχει σβήσει την αντίστοιχη εστία.
Περιμένετε να κρυώσει αρκετά το ηλεκτρονικό σύστημα. Πατήστε, στη συνέχεια, οποιοδήποτε σύμβολο της βάσης εστιών.*
”… Το ηλεκτρονικό σύστημα έχει υπερθερμανθεί και έχουν σβήσει όλες οι εστίες.
”† + επίπεδο ισχύς και ήχος προειδοποίησης
Υπάρχει ένα θερμό σκεύος στην περιοχή του πεδίου χειρισμού. Είναι πολύ πιθανόν να έχει υπερθερμανθεί το ηλεκτρονικό σύστημα.
Απομακρύνετε το εν λόγω σκεύος. Η ένδειξη βλάβης σβή-νει μετά από λίγο. Μπορείτε να συνεχίσετε με το μαγεί-ρεμα.
”† και ήχος προειδοποίη-σης
Υπάρχει ένα θερμό σκεύος στην περιοχή του πεδίου χειρισμού. Η εστία έχει σβήσει για να προ-στατέψει το ηλεκτρονικό σύστημα.
Απομακρύνετε το εν λόγω σκεύος. Περιμένετε μερικά δευ-τερόλεπτα. Πατήστε οποιαδήποτε επιφάνεια του πεδίου χειρισμού. Μόλις σβήσει η ένδειξη της βλάβης, μπορείτε να συνεχίσετε με το μαγείρεμα.
—‚ Μη σωστή τάση τροφοδοσίας, πέρα από τα κανονικά όρια λειτουργίας.
Επικοινωνήστε με τον παροχέα ηλεκτρικής ενέργειας.
—ƒ / —„ Η εστία έχει υπερθερμανθεί και έχει σβήσει για λόγους προστασίας της κουζίνας σας.
Περιμένετε μέχρι να κρυώσει αρκετά το ηλεκτρονικό σύστημα και επανασυνδέστε την.
* Εάν η ένδειξη συνεχίζει, ειδοποιήστε το τεχνικό σέρβις.Μην τοποθετείτε κανένα θερμό σκεύος πάνω στο πεδίο χειρισμού.
41

Υπηρεσία τεχνικής εξυπηρέτησης πελατώνΕάν η συσκευή σας πρέπει να επισκευαστεί, βρίσκεται στη διάθεσή σας η υπηρεσία τεχνικής εξυπηρέτησης των πελατών μας.
Αριθμός E και αριθμός FD:Εάν ζητήσετε τη δική μας υπηρεσία τεχνικής εξυπηρέτησης πελατών, δώστε παρακαλώ τον αριθμό E και τον αριθμό FD της συσκευής. Την πινακίδα τύπου με τους αριθμούς θα την βρείτε πάνω στην κάρτα συσκευής.
Προσέξτε, ότι η επίσκεψη του τεχνικού του τμήματος εξυπηρέτησης πελατών στη περίπτωση ενός εσφαλμένου χειρισμού δεν είναι δωρεάν, ακόμα και κατά τη διάρκεια του χρόνου της εγγύησης.
Τα στοιχεία επικοινωνίας όλων των χωρών θα τα βρείτε στον πίνακα Υπηρεσίες τεχνικής εξυπηρέτησης πελατών που παραδίδεται μαζί.
Εντολή επισκευής και συμβουλές σε περίπτωση βλάβης
Εμπιστευθείτε την εμπειρία του κατασκευαστή. Έτσι εξασφαλίζετε, ότι η επισκευή γίνεται από εκπαιδευμένους τεχνικούς του σέρβις, που είναι εξοπλισμένοι με τα γνήσια ανταλλακτικά για τη συσκευή σας.
Δοκιμασμένες συνταγέςΟ παρακάτω πίνακας δημιουργήθηκε για ινστιτούτα αξιολόγησης προκειμένου να διευκολυνθούν οι έλεγχοι των συσκευών μας.
Τα δεδομένα του πίνακα αναφέρονται στα δικά μας σκεύη-εξαρτήματα της Schulte-Ufer (μαγειρικά σκεύη 4 κομματιών για επαγωγική βάση εστιών Z9442X0) με τις ακόλουθες διαστάσεις:
■ Κατσαρολάκι Ø 16 εκ, 1,2 l για εστίες Ø 14,5 εκ
■ Κατσαρόλα Ø 16 εκ, 1,7 l για εστίες Ø 14,5 εκ
■ Κατσαρόλα Ø 22 εκ, 4,2 l για εστίες Ø 18 εκ
■ Τηγάνι Ø 24 εκ, για εστίες Ø 18 εκ
GR 18 182 Αστική χρέωση
Προθέρμανση Μαγείρεμα
Δοκιμασμένες συνταγέςΕστία
Επίπεδο ισχύος
Διάρκεια (Λεπτά:Δευτ.)
Με καπάκ
ι
Επίπεδο ισχύος
Με καπάκι
Λιώσιμο σοκολάτας
Σκεύος: κατσαρολάκιØ 14,5 cm - - - 1 - 1. ΌχιΚουβερτούρα σοκολάτας (π.χ. μάρκα Dr. Oetker
μαύρη 55%, 150 g.)
Προθέρμανση και διατήρηση ζεστής σούπας φακής
Σκεύος: Κατσαρόλα
Αρχική θερμοκρασία 20 °C
Σούπα φακής*
Ποσότητα 450 g. Ø 14,5 cm 9 1:30 χωρίς ανακά-τεμα Ναι 1. Ναι
Ποσότητα: 800 g. Ø 18 cm 9 2:30 χωρίς ανακά-τεμα Ναι 1. Ναι
Σούπα φακής σε κονσέρβα, π.χ. φακές με πικάντικο λουκάνικο τύπου Erasco
Ποσότητα 500 g.Ø 14,5 cm 9
1:30 ανακατέψτε μετά από περίπου
1:00Ναι 1. Ναι
Ποσότητα 1 kg.Ø 18 cm 9
2:30 ανακατέψτε μετά από περίπου
1:00Ναι 1. Ναι
Προετοιμασία σάλτσας bechamel
Σκεύος: Κατσαρολάκι
Θερμοκρασία γάλακτος: 7 °C
Συστατικά: 40 g βούτυρο, 40 g αλεύρι, 0,5 l γάλα (3,5% λίπη) και μία πρέζα αλάτι
Ø 14,5 cm
1. Λιώστε το βούτυρο, αναμείξτε το βούτυρο και το αλάτι και ζεστάνετε όλα τα υλικά μαζί 1 περίπου 3:00 Όχι
2. Προσθέστε το γάλα και ζεστάνετε τη σάλτσα ως το σημείο βρασμού, χωρίς να σταματήσετε το ανα-κάτεμα
7 περίπου 5:20 Όχι
3. Όταν η σάλτσα bechamel αρχίζει να βράζει, δια-τηρήστε τη στη φωτιά για ακόμη 2 λεπτά χωρίς να σταματήσετε το ανακάτεμα
1 Όχι
*Συνταγή σύμφωνα με το πρότυπο DIN 44550***Συνταγή σύμφωνα με το πρότυπο DIN EN 60350-2
42

Ετοιμάστε ρυζόγαλο
Σκεύος: Κατσαρόλα
Θερμοκρασία γάλακτος: 7 °C
Ζεστάνετε το γάλα μέχρι να αρχίσει να ανεβαίνει η στάθμη του. Αλλάξτε την ενδεικνυόμενη βαθμίδα μαγει-ρέματος και προσθέστε το ρύζι, τη ζάχαρη και το αλάτι στο γάλα
Συστατικά: 190 g. στρογγυλό ρύζι, 23 g. ζάχαρη, 750 ml. γάλα (3,5% λιπαρά) και μία πρέζα αλάτι Ø 14,5 cm
8. περίπου 6:30 Όχι
2 ανακα-τέψτε μετά από περίπου
10:00
ΝαιΣυστατικά: 250 g. στρογγυλό ρύζι, 30 g. ζάχαρη, 1 l. γάλα (3,5% λιπαρά) και μία πρέζα αλάτι Ø 18 cm
Βραστό ρύζι*
Σκεύος: Κατσαρόλα
Θερμοκρασία νερού 20 °C
Συστατικά: 125 g στρογγυλό ρύζι, 300 g νερό και μία πρέζα αλάτι Ø 14,5 cm 9 περίπου 2:30 Ναι 2 Ναι
Συστατικά: 250 g στρογγυλό ρύζι, 600 g νερό και μία πρέζα αλάτι Ø 18 cm 9 περίπου 2:30 Ναι 2. Ναι
Τηγανιτό φιλέτο χοιρινού
Σκεύος: Τηγάνι
Ø 18 cm 9 1:30 Όχι 7 ΌχιΑρχική θερμοκρασία φιλέτου: 7 °C
2 χοιρινά φιλέτα (συνολικού βάρους περίπου 200 g, πάχους 1 cm)
Τηγανιτές κρέπες**
Σκεύος: ΤηγάνιØ 18 cm 9 1:30 Όχι 7 Όχι
55 ml ζύμη ανά κρέπα
Τηγανιτές πατάτες βαθιάς κατάψυξης
Σκεύος: Κατσαρόλα
Ø 18 cm 9
Μέχρι η θερμοκρα-σία του λαδιού να φτάσει στους
180 °C
Όχι 9 ΌχιΣυστατικά: 1,8 kg ηλιέλαιο, για κάθε τηγάνισμα: 200 g πατάτες βαθιάς κατάψυξης (π.χ. McCain 123 Frites Original)
Προθέρμανση Μαγείρεμα
Δοκιμασμένες συνταγέςΕστία
Επίπεδο ισχύος
Διάρκεια (Λεπτά:Δευτ.)
Με καπάκ
ι
Επίπεδο ισχύος
Με καπάκι
*Συνταγή σύμφωνα με το πρότυπο DIN 44550***Συνταγή σύμφωνα με το πρότυπο DIN EN 60350-2
43

01940819
*9000925351* 9000925351
Constructa Neff Vertriebs-GmbHCarl-Wery-Straße 34D-81739 München


![MPLS Multi-Protocol Label Switching. Roteamento Tadicional (Hob by Hop) 200.0.0.0/24 1 4 5 3 2 1Gbps [900] 210.0.0.0/24 200.0.0.0/25 200.0.0.128/25 50.](https://static.fdocumentos.tips/doc/165x107/552fc105497959413d8c03a8/mpls-multi-protocol-label-switching-roteamento-tadicional-hob-by-hop-20000024-1-4-5-3-2-1gbps-900-21000024-20000025-2000012825-50.jpg)