


Línguas
Páginas
Legal


16
RE
F.:
05
12
/ 0
51
2R
75 min
INSTRUÇÕES DE MONTAGEMINSTRUCCIONES DE ARMADO
ASSEMBLY INSTRUCTIONS
Re
f.:
05
12 / 0
512R
- 1
0/A
go
sto
/2015 -
Rev. 05
2.50m2.
00m
FERRAMENTAS NECESSÁRIASHERRAMIENTAS NECESARIAS
TOOLS NECESSARY
CH
AV
E N
º11
RuaCarlos Dreher Neto, 1918, Fone:(54) 2102 4000, FAX:(54) 2102 4050CEP 95700-000 - BENTO GONÇALVES - RS - BRASIL
CNPJ: e-mail: [email protected] / site: www.multimoveis.com
00.349.443/0001-92
VERSÃO 1
VERSÃO 2
VERSÃO 3
VERSÃO 301
PassoPasoStep
Q
Deixar a cabeceira superior (377) a uma distância de 5mm do chão.
Dejar la cabecera superior (377) a una distancia de 5mm del suelo.
BA
Q
Q
QQBA
BA
For superior headboard (377) Leave a distance of 5 mm from the floor.
377
376
374

152
IMPORTANTE LER COM ATENÇÃO E GUARDAR PARA
EVENTUAIS CONSULTAS ADVERTÊNCIAS:
- Esteja ciente do risco de chama aberta e outras fontes de calor, tais como aquecedores elétricos, aquecedores a gás, etc. nas proximidades do berço.
- Não utilize o berço se alguma parte estiver quebrada, rasgada ou faltando. utilizar somente peças de reposição aprovadas pelo fabricante.
- Não deixe nenhum tipo de objeto dentro ou próximo ao berço que possa servir de ponto de apoio ou apresente perigo de asfixia ou estrangulamento, como por exemplo, cordas, cordões de persiana/cortina etc.
- Nunca utilizar mais de um Colchão no berço.
- O berço somente estará pronto para uso quando os mecanismos de travamento estiverem devidamente acionados.
- Ao deixar a criança sozinha no berço, sempre certifique-se de que a grade móvel esteja na posição mais alta.
- A posição do estrado mais baixa é a mais segura e a base deve ser sempre utilizada nessa posição tão logo o bebê tenha idade suficiente para sentar-se.
- A espessura do colchão deve ser tal que a altura da superfície do colchão até a borda superior da armação seja de pelo menos 480 mm na posição mais baixa, e de pelo menos 180 mm na posição mais elevada da base do berço.
- Usar colchão no tamanho de 1300x700x120 mm.Com DENSIDADE 18.
- Certifique-se que todas as conexões de montagem estão apertadas adequadamente e verifique regularmente e se necessário elas devem ser reapertadas.
- Para evitar quedas: quando a criança for capaz de escalar o berço, ele não pode mais ser utilizado por essa criança.
- Limpar o berço somente com um pano úmido e sabão neutro.
A chapa de reforço(XZ) não deve ser removida do suporte de lastro (9037).
La chapa de refuerzo(XZ) no debe serremovida del soporte de la parrilla ( ).9037
The reforcing plate (XZ) musn't be removed from the clapboard support (9037).
A chapa ‘L’ anti refluxo(XX) e (XY) não deve serremovida do suporte de lastro (9037).
Las piezas 'L' anti reflujo (xx) y (xy) no deben de ser removida del soporte de la parilla (9037).
XZ
XX XY
HF
Não remova as buchas americanas (HF) das cabeceiras(374), (375), (376) e (377)
Don't remove the plug (HF) f rom the headboards (374), (375), (376) e (377)
No remova el taco (HF) fischer de las cabeceras(374), (375), (376) e (377)
Enquanto berço, não remova os rodízios (EH) e (EI) das cabeceiras (374) e (376).
Mientras cunha, no remueva las ruedas de las cabeceras (374) y (376).
(EH) y (EI)
While crib, do not remove the casters(EH) and (EI) of the headboards (374) and (376).
Não remova as buchas americanas das grades (136).
No remova el tacofischer de las rejas(136).
Don't remove the plug from the rails(136).
The antirefluxes “L” parts (xx) and (xy) shouldn't be removed of the suport's frame (9037).
VERSÃO 201PassoPasoStep
Observação:Para transformar o berço em sofá é necessário retirar a grade móvel (185).
Observación:Para transformar la cuna en sofa es necesario retirar la reja (185).
Observation:In order to make the crib into a sofa it is necessary to remove one rail (185).
Após retirar a grade (185) é necessário baixar a altura dos suportes de lastros (9037) e (9038).
After removing one rail (185) it is necessary to lower the height of the slats – mattress support (9037) and (9038).
Después de retirar la reja (185) es necesario bajar elalto de lo soporte de la parrilla (9037) y (9038).
HAHP
HA
HAGZ
GZHA
GZ
HP
Y
536374
376
X
Ref.
: 0512 /
0512R
- 1
0/A
go
sto
/20
15
- R
ev. 0
5

3
- Tenga en cuenta el riesgo de fuego directo y otras fuentes de calor tales como radiadores eléctricos, calentadores de gas, etc. cercanas a la cuna.
- No utilice la cuna si alguna pieza falta o está rota . Utilice sólo las piezas de repuesto autorizadas por el fabricante.
- No deje ningún objeto dentro o cerca de la cuna que pueda servir como un punto de apoyo o presentar un riesgo de asfixia o estrangulamiento, tales como cuerdas, cintas de persianas, cordones de cortinas, etc.
- Nunca utilice más de un colchón en la cuna.
- La cuna estará lista para su uso sólo cuando los mecanismos de bloqueo y traba estén funcionando correctamente y accionados.
- Al dejar a un niño solo en la cuna, asegúrese siempre de que la reja móvil esté siempre en la posición más alta.
- La posición más baja de la parrilla es la más segura y esta debe ser utilizada en esa posición, tan pronto como el niño tenga la edad suficiente para sentarse.
- El espesor del colchón debe ser tal, que la altura de la superficie del colchón hasta el borde superior del bastidor sea de al menos 480 mm en la posición más baja, y por lo menos de 180 mm en la posición alta de la parrilla.
- Utilizar el tamaño del colchón de 1300 x 700 x 120 mm.Con densidad 18
- Asegúrese de que todas las fijaciones de armado estén ajustadas correctamente y comprobar regularmente y si es necesario volverlas a apretar.
- Para evitar el riesgo de caídas: cuando el niño sea capaz de escalar la cuna, ya no podrá ser utilizada por este y así evitar accidentes.
- Limpie la cuna con un paño húmedo y jabón neutro.
IMPORTANTE LEER ATENTAMENTE Y CONSERVAR
EL MANUAL PARA EVENTUALES CONSULTAS.
ADVERTENCIAS:
14
Senhor montador para a desmontagem do produto deve-se seguir as especificações abaixo.
Señor armador para el desarmado del producto debe seguirse las especificaciones abajo.
Dear assembler for the disassembly of the product should follow the specifications below.
INSTRUÇÕES DE DESMONTAGEM
INSTRUCCIONES PARA EL DESARMADO
DISASSEMBLY INSTRUCTIONS
GZ
HPHA
HP
GZ
GZ
GZ
GZ HN
HN
HA
HA
HA
GZ
377
376
185
136
375
374
9509
HN
HJ
HL
HK
Ref.
: 0512 /
0512R
- 1
0/A
go
sto
/20
15
- R
ev. 0
5
1343
-Be aware the risk of fire and others heat's sources, like eletrical warmer, gás warmer, etc.., near the crib.
-Do not use the crib if anything part is broken, crunched or missed. Just use spare parts aproved by the supplier.
-Don't leave anything inside or next the crib that can be use as a base point, or present asphyxiate or suffocate danger, like strings, persian blinds cords, etc..
- Never use more than 1 (one) mattress at the crib.
-The Crib will be ready for use when the locker device will be actioned correctly.
-When you leave the children alone at the crib, always check if the movable rail is in the highest position.
-The lowest postion is the safest and the base should be used at this position as soon as the baby have enough age to sit down.
-The mattress thickness (from the surfaceof the mattress, to the superior board), must be, at least 480 mm in the lowest position and 180 mm in the highest position of the crib.
-Use mattress size of 1300 x 700 x 120 mm.With density 18.
-Be sure that all assembling fixations are correctly screwed and allways check if they needs to be screwed again.
-To avoid fall risk: don't use the crib when the children is able to climb it. -Clean the crib with humid cloth and neutral soap.
IMPORTANT READ CAREFULLY AND KEEP FOR
ANY QUERIESWARNINGS:
1° - Puxar o lastro para cima, (MOVENDO TODA A PARTE EXTERNA DO LASTRO).
2° - Encaixar o sistema “L” anti refluxo, exatamente na cava dosarrafo externo.
3° - Escolha a melhor opção de altura.
4° - Verifique todo o sistemaantes de colocar o colchão.
PORTUGUÊS1º - Tire de la parilla hacia arriba; (moviendo toda la parte externade la parilla).
2° - Encajar el sistema “L”antirreflujo exactamente en la cavidad correspondiente al soporte externo.
3° - Elija la mejor opción de altura.
4° - Verifique todo el sistema antes de poner el colchón.
ESPAÑOL1° - Pull the frame up; (moving all the external part of the frame)
2° - Fit the system “L” antireflux, exactly on the armhole of the external support.
3° - Choose the best option of height.
4° - Check all the system beforeputting the mattress.
ENGLISH
POSIÇÃO NORMAL / POSICIÓN NORMAL / NORMAL POSITION
Sistema Anti Refluxo MultiMóveis Sistema Anti Reflujo MultimoveisMultimoveis Antireflux System
2°
1°
POSIÇÃO COM ANTI REFLUXO / POSICIÓN ANTI REFLUJO / POSITION WITH ANTIREFLUX
O SISTEMA ANTI REFLUXO NÃO PODE SER UTILIZADO QUANDO O LASTRO ESTIVER NA REGULAGEM MAIS BAIXA E O BEBÊ JÁ TIVER IDADE O SUFICIENTE PARA SENTAR.
EL SISTEMA ANTIRREFLUJO , NO DEBE SER UTILIZADO CUANDO LA PARILLA ESTÉ EN EL AJUSTE MÁS BAJO.
THE SYSTEM ANTIREFLUX, SHOULDN'T BE USED WHEN THE FRAME IS ADJUSTMENT IN LOWER.
Ref.
: 0512 /
0512R
- 1
0/A
go
sto
/20
15
- R
ev. 0
5

12 5
LISTA DE FERRAGENS / LISTA DE MATERIALES / HARDWARE LIST
03PassoPasoStep
HL
HK
HJ
HN
HL
HK
HJ
ATENÇÃO: É preciso pressionar as travas (HH) e (HI) para dentro, para liberar a passagem da grade (185), conforme desenho ao lado.
NOTA: Debe pulsar los pestillos (HH) y (HI) para liberar el paso de la rejilla (185), como el dibujo.
NOTE: You must press the latches (HH) and (HI) for free the passage of the grid (185),as the drawing.
Uti
liza
r a r
ég
ua a
baix
o p
ara
med
ir a
s f
err
ag
en
s:
GY 04
BA 06Paraf. 4,0 x 25
HF 02
HG 04 Ponteira 22x60
51371 -
BK 04Paraf. 4,0 x 45
EI 02
EH 02
F 12Paraf. 3,5 x 14
Y 30Prego 10 x 10
GZ 08Paraf. M6x40
HA 04Paraf. M6x30
H
J
04
16
Cavilha 8x30
8x50
Cavilha
COLABX 01Bisnaga de Cola
Q 08Tapa Furo Ø8mm
HC 04
X 04Sapata 15x15
Rodízio com Trava
Rodízio sem Trava
Porca Cilíndrica
51210 - Bucha Metálica
HJ 0250857 - Limitador
HH 0150858 - Trava Esquerda
HI 0150859 - Trava Direita
Chapa Metálica 50x22
HP 01Chave allen Z 4mm
XY 01
XX 01
XZ 02
XV 02
XT 02
1/4x2 c.13mm
HO 10Paraf. 4,0 x 16
HN 02Paraf. M4 x 18
Porca UNC 1/4 Autotravante
Chapa L Anti Refluxo (ESQUERDA)
Chapa L Anti Refluxo (DIREITA)
Chapa de Reforço do Estrado
HL 0150702 - Guia com Alça (Esquerda)
HK 0150703 - Guia com Alça (Direita)
HM 0250856 - Guia Lisa
AParaf. 3,5 x 10
08
185
HN
HN
185
9509
Não remover o selo do INMETRO coladoem uma das cabeceiras do berço.
Do not remove the INMETRO s eal pasted on one of the birthplace headboar
d
No remova el sticker del INMETRO, pegado en una de las cabeceras
MULTIMÓVEIS IND. DE MÓVEIS LTDA CNPJ:00.349.443/0001-92
NORMA NBR 15860:2010 - Partes 1 e 2 UTILIZAR COLCHÃO COM ESPESSURA MÁXIMA DE 120MM
Referência:
Não remover o ADESIVO que contem a identificação da empresa.
Do not remove the sticker with the company identification.
No retire la etiqueta con la identificación de la empresa.
Ref.
: 0512 /
0512R
- 1
0/A
go
sto
/20
15
- R
ev. 0
5
Segurança Infantil
Segurança Infantil
Segurança Infantil
Segurança Infantil
Segurança Infantil
Segurança Infantil
Segurança Infantil
Segurança Infantil
Segurança Infantil
Segurança Infantil
Segurança Infantil
Segurança Infantil
Segurança Infantil
Segurança Infantil
Segurança Infantil
Segurança Infantil
Segurança Infantil
Segurança Infantil
Segurança Infantil
Segurança Infantil
Segurança Infantil
Segurança Infantil
Segurança Infantil
Segurança Infantil
Segurança Infantil
Segurança Infantil
Segurança Infantil
Segurança Infantil
Segurança Infantil
Segurança Infantil
Segurança Infantil
Segurança Infantil
Segurança Infantil
Segurança Infantil
Segurança Infantil
Segurança Infantil
Segurança Infantil
Segurança Infantil
Segurança Infantil
Segurança Infantil
Segurança Infantil
Segurança Infantil
Segurança Infantil
Segurança Infantil
Segurança Infantil
Segurança Infantil
Segurança Infantil
Segurança Infantil
Segurança Infantil
Segurança Infantil
Segurança
INMETROCompulsório
00000000
EXATA

6 11
373
377
376
185
136
536
536
375
373
374
9376
9038
90379038 9037
LISTA DE PEÇAS LISTA DE PIEZAS PART LIST
N° DENOMINAÇÃO N° DENOMINACIÓN N° DESCRIPTION136 - GRADE 1316MM 136 - REJA 1316MM 136 - RAIL 1316MM185 - GRADE 1288MM 185 - REJA 1288MM 185 - RAIL 1288MM373 - MOLDURA 373 - MOLDURA 373 - FRAME374 - CABECEIRA INFERIOR MENOR 374 - CABECERA INFERIOR MENOR 374 - SMALL BOTTOM HEADBOARD375 - CABECEIRA SUPERIOR MAIOR 375 - CABECERA SUPERIOR MAYOR 375 - LARGE UPPER HEADBOARD376 - CABECEIRA INFERIOR MAIOR 376 - CABECERA INFERIOR MAYOR 376 - LARGE BOTTOM HEADBOARD377 - CABECEIRA SUPERIOR MENOR 377 - CABECERA SUPERIOR MENOR 377 - SMALL UPPER HEADBOARD536 - BARRA 536 - BARRA 536 - BAR
9037 - SUPORTE DE LASTRO EXTERNO 9037 - SUPORTE DE LA PARRILLA EXTERNO 9037 - EXTERNAL SUPORT'S FRAME9038 - SUPORTE DE LASTRO INTERNO 9038 - SUPORTE DE LA PARRILLA INTERNO 9038 - INTERNAL SUPORT'S E FRAME9376 - LASTRO 9376 - PARRILLA 9376 - MATTRESS9509 - MOSQUITEIRO 9509 - MOSQUITEIRO 9509 - MOSQUITO
9509
Y
GRADE FIXA
137,5mm134,5mm
Y Y
Deixar 4mm de distância entre o lastro (9376) e o palito da grade fixa (136).
Please to quit 4mm of distance between the mattres support (9376) and the fixt rail (136).
Dejar 4mm de distáncia entre la parrilla (9376) y el palillo de la baranda (136).
9376
FIXAÇÃO DOS LASTROS/
FIJACIÓN DE LAS PARRILLAS/
FIXING OF MATTRESS SUPPORT RAIL
4º4º PASSOAgora deve-se pregar os lastros utilizando a medida calculada no passo anterior.
4º PASOAhora usted debe clavar las parrillas utilizando la medida calculada en el paso anterior.
4 º STEPNow you must preach the mattress support rail using the measure calculated in the previous step.
O lastro (8701) deve ser pregado no suporte de lastro
externo (9037).
La parrilla (8701) debe ser fijadaen el soporte externo de esta
(9037).
The frame should be fixed in the external suport of it (9037).
354
354
354 - FONDO 354 - BOTTOM354 -FUNDO
374
376
9376
354
354
A
A
Y
Y
Y
Y
Y
Y
Y
Y
Y
Y
Y
Y
Y
Y
Y
Y
YYY
A A
A A
A
354 354
Ref.
: 0512 /
0512R
- 1
0/A
go
sto
/2015 -
Re
v. 0
5

710
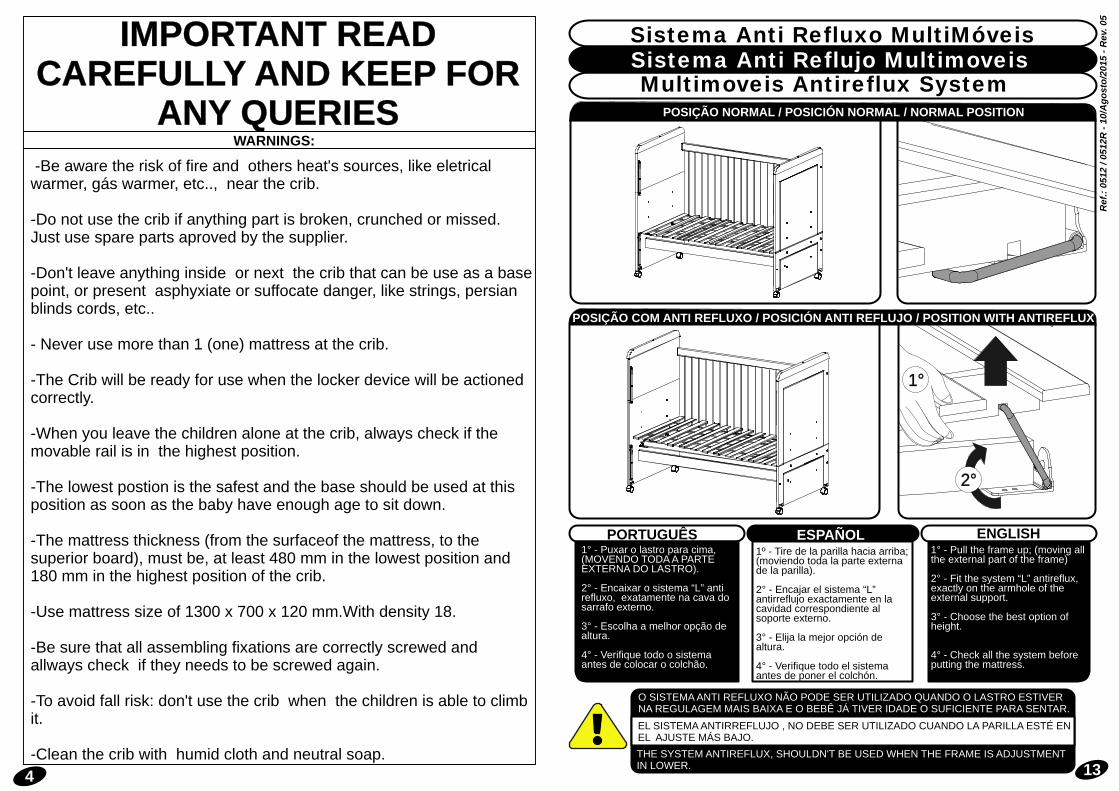
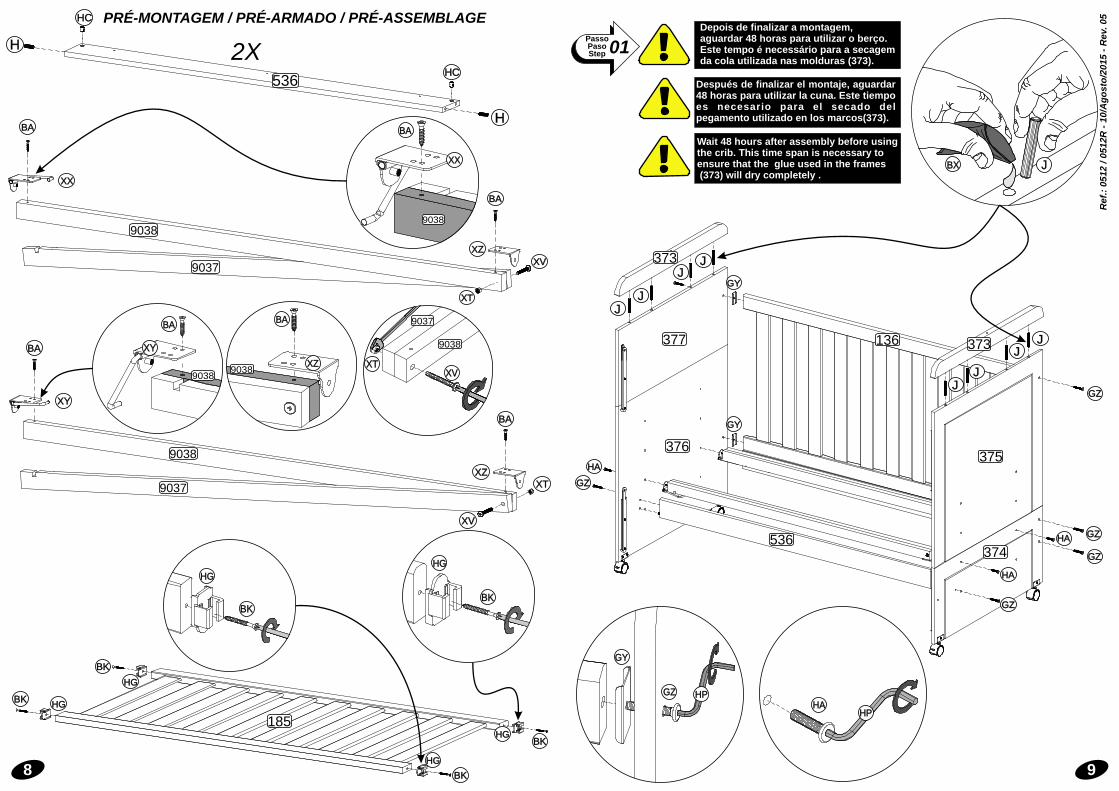
PRÉ-MONTAGEM / PRÉ-ARMADO / PRÉ-ASSEMBLAGE
HO
HK
HP
HF
EH
F
F
Não aplique cola nas cavilhas.No use pegamento en los tarugos.
Do not use glue on the dowels.
JJ
JJ
F
F
F
F
EI
F
F
EH
EH
EI
F
F
HOHO
HOHO
HF
HM
HMHF
HOHO
HOHO
HK
HL
374
375
377
377
376
376377
375
374
HF
JJ
JJ
374
F
FF
EI
HO
HO
HL
HM
HL
HK
HI
HH
1º
2º
15mm
CA
BE
CE
IRA
LA
ST
RO
22mm
CA
BE
CE
IRA
LA
ST
RO
93
76
9376
Vão entre os lastros
VÃO ENTRE OS LASTRO ÷ 12=
DISTÂNCIA ENTRE CADA
RIPA DO ESTRADO
Y
Y
2º PASSODepois de fixar os lastros das pontas, deve-se agrupar os lastros restantes, e medir o vão que irá sobrar entre os lastros, conforme imagem ao lado.
2º PASODespués de fijar las puntas, debe agrupar lasparrillas restantes, y medir el vano que permanece entre las parrillas, conforme imagen al lado.
3º PASSOPara saber a distância entre cada ripa do estrado, utilize a fórmula abaixo.
FIXAÇÃO DOS LASTROS/
FIJACIÓN DE LAS PARRILLAS/
FIXING OF MATTRESS SUPPORT RAIL
1º PASSOPrimeiro deve-se fixar os lastro das pontas do berço, respeitando as medidas abaixo.
1º PASOPrimero debe fijas las parrillas de las puntas de la cuna, respectando las medidas abajo.
1º STEPFirst you must fix the ends of the crib mattress support rail using the measurements below.
2º STEPAfter fixing the weights of the tips, you should group mattress support rail weights, and measure the gap that will be left between mattress support rail as the picture beside.
3º PASOPara saber la distancia entre cada ripa de la parrilla, utilice la formula abajo.
3º STEPTo find the distance between each slat of mattress support rail, use the formula below.
Ref.
: 0512 /
0512R
- 1
0/A
go
sto
/20
15
- R
ev. 0
5
8 9
PRÉ-MONTAGEM / PRÉ-ARMADO / PRÉ-ASSEMBLAGE
XY
BA
BA
XZ
XV
XT
9038
9037
BA
XX
BA
XZ
XT
XV
9038
9037
BA
XX
BA
XZ
BA
XY
90389038
9038
BK
HG
HG
BK
185
HG
HG
HG
HG
BK
BK
BK
BK
H
H
536HC
HC
2X
XVXT
9037
9038
01PassoPasoStep
HAHP
GZ HP
GY
JBX
GZ
GZ
GZ
GZ
HA
HA
GY
GY
GZ
HA
JJ
JJ
JJ
JJ
373
377
375
373136
374
376
Depois de finalizar a montagem, aguardar 48 horas para utilizar o berço. Este tempo é necessário para a secagemda cola utilizada nas molduras (373).
Después de finalizar el montaje, aguardar48 horas para utilizar la cuna. Este tiempo es necesario para el secado del pegamento utilizado en los marcos(373).
Wait 48 hours after assembly before using the crib. This time span is necessary to ensure that the glue used in the frames (373) will dry completely .
536
Ref.
: 0512 /
0512R
- 1
0/A
go
sto
/20
15
- R
ev. 0
5
Top Related