Eee Pad UM
46
Eee Pad User Manual TF101 E6536 There are three main types of airport security devices: X-ray machines (used on items placed on conveyor belts), magnetic detectors (used on people walking through security checks), and magnetic wands (hand-held devices used on people or individual items). You can send your Eee Pad through airport X-ray machines. But do not send your Eee Pad through airport magnetic detectors or expose it to magnetic wands. Airplane Precautions Ask an airline personnel if you want to use your Eee Pad onboard an aircraft. Most airlines have restrictions for using electronic devices. Most airlines allow electronic use only between and not during takeoffs and landings. Charging Your Batteries If you intend to use battery power, be sure to fully charge your battery pack before going on long trips. Remember that the power adapter charges the battery pack as long as it is plugged into the computer and an AC power source. Be aware that it takes much longer to charge the battery pack when the Eee Pad is in use. Remember to fully charge the battery (8 hours or more) before first use and whenever it is depleted to prolong battery life. The battery reaches its maximum capacity after a few full charging and discharging cycles.
Transcript of Eee Pad UM

Eee Pad User ManualTF101
E6536
There are three main types of airport security devices: X-ray machines (used on items placed on conveyor belts), magnetic detectors (used on people walking through security checks), and magnetic wands (hand-held devices used on people or individual items). You can send your Eee Pad through airport X-ray machines. But do not send your Eee Pad through airport magnetic detectors or expose it to magnetic wands.
Airplane PrecautionsAsk an airline personnel if you want to use your Eee Pad onboard an aircraft. Most airlines have restrictions for using electronic devices. Most airlines allow electronic use only between and not during takeoffs and landings.
Charging Your BatteriesIf you intend to use battery power, be sure to fully charge your battery pack before going on long trips. Remember that the power adapter charges the battery pack as long as it is plugged into the computer and an AC power source. Be aware that it takes much longer to charge the battery pack when the Eee Pad is in use.
Remember to fully charge the battery (8 hours or more) before first use and whenever it is depleted to prolong battery life. The battery reaches its maximum capacity after a few full charging and discharging cycles.

ContentsPackage Contents .............................................................................................. 3Your Eee Pad......................................................................................................... 4Charging the Eee Pad ....................................................................................... 7Your Eee Pad mobile docking (optional) ................................................... 8Docking the Eee Pad .......................................................................................11Charging the Eee Pad on the docking ......................................................12Android Environment & Applications .......................................................13
Desktop .............................................................................................................13Music .............................................................................................................14Gallery .............................................................................................................15Camera .............................................................................................................17Market .............................................................................................................18Places and Maps ..............................................................................................19Settings .............................................................................................................20
ASUS Applications..............................................................................21ASUS Launcher ................................................................................................21File Manager .....................................................................................................22MyLibrary ...........................................................................................................25MyNet .............................................................................................................28Polaris® Office ..................................................................................................30MyCloud .............................................................................................................33
Eee Pad PC Suite (on PC) ................................................................................40MyDesktop PC Server....................................................................................40ASUS Webstorage ...........................................................................................40ASUS Sync .........................................................................................................41
Declarations and Safety Statements .........................................................42Copyright Information ...................................................................................46Limitation of Liability ......................................................................................46
ASUS Eee Pad Manual2

ASUS Eee Pad Manual 3
Package Contents
• If any of the items is damaged or missing, contact your retailer.• The power plug that comes with your Eee Pad may vary depending on your territory to fit the wall outlet.
Eee Pad USB Charger
Power Plug Docking connector to USB cable
User Manual
User Manual Warranty Card

ASUS Eee Pad Manual4
Your Eee Pad
8
1
3
2
4
7
10
5
11
6
9

ASUS Eee Pad Manual 5
1 Power buttonThe power button turns your Eee Pad on/off. Hold the power button for 2 seconds to power on your Eee Pad. When the Eee Pad is powered on, press the power button to put the Eee Pad into sleep mode or wake it up from sleep mode. Hold the power button for 0.5 second to display the shutdown dialog box. If the system becomes unresponsive, press and hold the power switch to force the Eee Pad to power off.
Forcing the system to power off may result in data loss. Please inspect your data to ensure there is no data loss. It is strongly recommended that important data be backed up regularly.
2 Volume KeyPress this button to increase or decrease the system volume.
3 SIM Card slot (on selected model)The SIM card compartment allows insertion of a mobile SIM card for 3G functions.
Use a straightened paper clip to press the opening beside the SIM card slot to eject the SIM card tray.
4 Built-in front CameraUse the built-in camera for picture taking, video recording, video conferencing, and other interactive applications.
5 Touch Screen PanelThe touch screen panel allows you to operate your Eee Pad using multi-touch up to ten fingers.
6 Docking Connector• Insert the power adapter into this port to supply power to
your Eee Pad and charge the internal battery pack. To prevent damage to your Eee Pad and battery pack, always use the bundled power adapter.
• Connect the docking connector to USB cable to the Eee Pad and another system (notebook or desktop) for data transmission.
• Dock the Eee Pad to the mobile docking for extended functions, including keyboard, touchpad and USB interface.
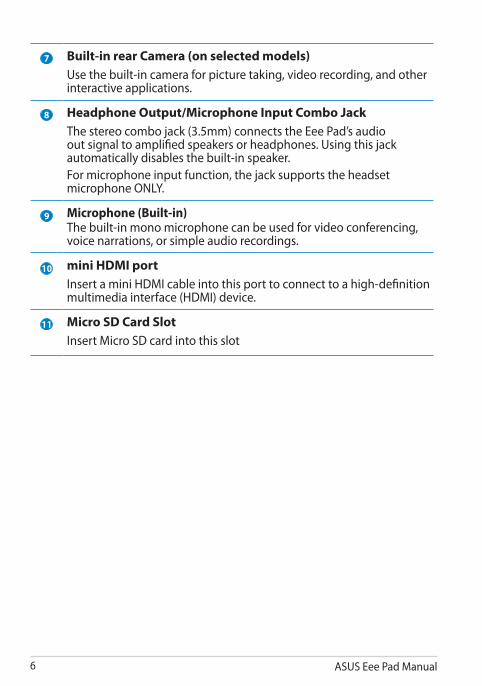
7 Built-in rear Camera (on selected models)Use the built-in camera for picture taking, video recording, and other interactive applications.
8 Headphone Output/Microphone Input Combo JackThe stereo combo jack (3.5mm) connects the Eee Pad’s audio out signal to amplified speakers or headphones. Using this jack automatically disables the built-in speaker.For microphone input function, the jack supports the headset microphone ONLY.
9 Microphone (Built-in)The built-in mono microphone can be used for video conferencing, voice narrations, or simple audio recordings.
10 mini HDMI portInsert a mini HDMI cable into this port to connect to a high-definition multimedia interface (HDMI) device.
11 Micro SD Card SlotInsert Micro SD card into this slot
ASUS Eee Pad Manual6

ASUS Eee Pad Manual 7
Charging the Eee Pad
• Use only the power adapter that comes with your device. Using a different power adapter may damage your device.
• The input voltage range between the wall outlet and this adapter is AC 100V–240V, and the output voltage of this adapter is 15V, 1.2A.
To prolong battery life, fully charge the battery for up to 8 hours when using the Eee Pad for the first time and whenever the battery power is fully depleted.
4 1
2
3

ASUS Eee Pad Manual8
Your Eee Pad mobile docking (optional)
The Eee Pad mobile docking is purchased separately.
1 3
4 3
2
Home PgDp
PgUp
End
Enter
Backspace
Tab
Caps Lock
Shift Shift
Ctrl CtrlAltFn
Fn
5
76

ASUS Eee Pad Manual 9
1 Docking Connector• Insert the power adapter into this port to supply power to
your Eee Pad and charge the internal battery pack. To prevent damage to your Eee Pad and battery pack, always use the bundled power adapter.
• Connect the docking connector to USB cable to the Eee Pad and another system (notebook or desktop) for data transmission.
2 Battery Charge Indicator (dual-color)With AC adapter:Green ON: Battery power is between 95% and 100%.
Orange ON: Battery power is less than 95%.
Orange Blinking: Battery power is less than 10%.
Orange Blinking Quickly: Battery power is less than 3%.
Without AC adapter and with Eee Pad:Orange Blinking Quickly: Battery power is less than 3%.
Ensure to connect the power charger when the this indicator starts blinking.
3 USB Port (2.0)The USB (Universal Serial Bus) port is compatible with USB 2.0 or USB 1.1 devices such as keyboards, pointing devices, flash disk drive and hard disk drives.
4 Memory Card SlotNormally an external memory card reader must be purchased separately in order to use memory cards from devices such as digital cameras, MP3 players, mobile phones, and PDAs. This Eee Pad mobile docking has a built-in high-speed memory card reader that can conveniently read from and write to many flash memory cards.
5 Mobile docking latchMove the mobile docking latch to the left to release the Eee Pad from the mobile docking.

6 KeyboardThe keyboard provides comfortable travel (depth at which the keys can be depressed) and palm rest for both hands.
The keyboard differs for each territory.
7 Touchpad and ButtonsThe touchpad with its buttons is a pointing device that provides the same functions as a desktop mouse.
ASUS Eee Pad Manual10
ASUS Eee Pad Manual 11
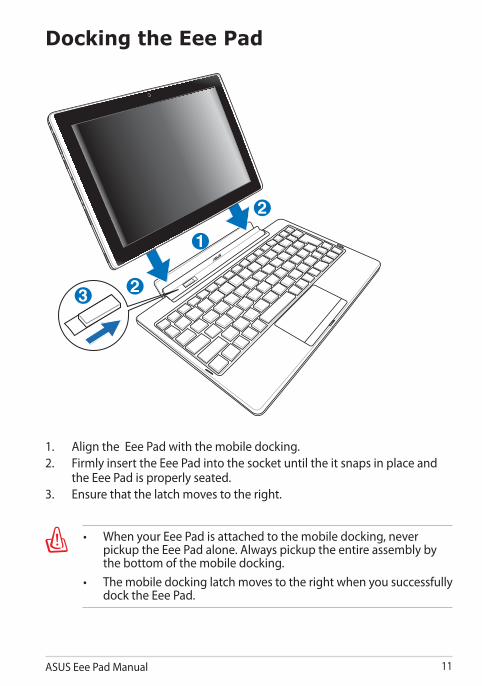
Docking the Eee Pad
2
2
1
3
1. Align the Eee Pad with the mobile docking.2. Firmly insert the Eee Pad into the socket until the it snaps in place and
the Eee Pad is properly seated.3. Ensure that the latch moves to the right.
• When your Eee Pad is attached to the mobile docking, never pickup the Eee Pad alone. Always pickup the entire assembly by the bottom of the mobile docking. • The mobile docking latch moves to the right when you successfully dock the Eee Pad.

Charging the Eee Pad on the docking
• Use only the power adapter that comes with your device. Using a different power adapter may damage your device.
• The input voltage range between the wall outlet and this adapter is AC 100V–240V, and the output voltage of this adapter is 15V, 1.2A.
To prolong battery life, fully charge the battery for up to 8 hours when using the Eee Pad for the first time and whenever the battery power is fully depleted.
4 1
2
3
ASUS Eee Pad Manual12

ASUS Eee Pad Manual 13
The desktop might update and change with Android OS.
Android Environment & ApplicationsDesktop
Open Google Text searchOpen Google Voice search
Return to the previous screenReturn to Home (the desktop)Display the recent apps
Customize desktopOpen Apps menu
Notification area & SettingsShortcuts
ASUS Eee Pad Manual14
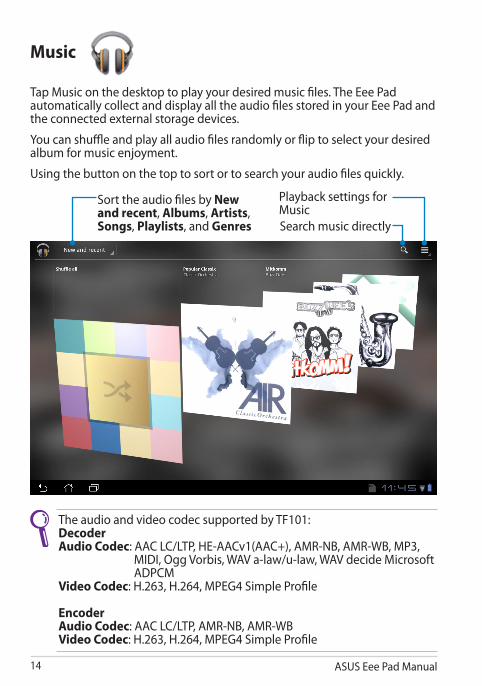
Music
Tap Music on the desktop to play your desired music files. The Eee Pad automatically collect and display all the audio files stored in your Eee Pad and the connected external storage devices.
You can shuffle and play all audio files randomly or flip to select your desired album for music enjoyment.
Using the button on the top to sort or to search your audio files quickly.
Sort the audio files by New and recent, Albums, Artists, Songs, Playlists, and Genres Search music directly
Playback settings for Music
The audio and video codec supported by TF101: Decoder Audio Codec: AAC LC/LTP, HE-AACv1(AAC+), AMR-NB, AMR-WB, MP3, MIDI, Ogg Vorbis, WAV a-law/u-law, WAV decide Microsoft ADPCM Video Codec: H.263, H.264, MPEG4 Simple Profile Encoder Audio Codec: AAC LC/LTP, AMR-NB, AMR-WB Video Codec: H.263, H.264, MPEG4 Simple Profile

ASUS Eee Pad Manual 15
Gallery
Tap Gallery on the desktop to browse your desired image or video files. The Eee Pad automatically collect and display all the image and video files stored in your Eee Pad and the connected external storage devices.
You can play all image files in a slideshow, or tap to select your desired image or video files.
Using the button on the top to sort by album, by time, by location or by tags. You can decide to view image files only, video files only or both files.
The current album
Browse in a slideshow mode
Display the detailed information of the image/video file
Sort by Album, Time, Location, and Tags
Image and videos, Image only, or Video only

ASUS Eee Pad Manual16
Sharing, deleting, and editing imagesTap a desired image in the gallery and use the tool bar on the top right corner to share, delete or edit the selected image.
Tool bar
Share the selected image through Picasa, Bluetooth, or Gmail.
Delete the selected image.
Check the image information, and edit the selected image.

ASUS Eee Pad Manual 17
Camera
Tap Camera on the Apps menu to take pictures or record videos. You can use either the front camera or the back camera to take pictures or record videos.
The image files and video files will be saved to Gallery automatically.
Zoom outZoom in
White Balance
Color EffectCapture button
Camera settings
Function switchCamera switch
ASUS Eee Pad Manual18
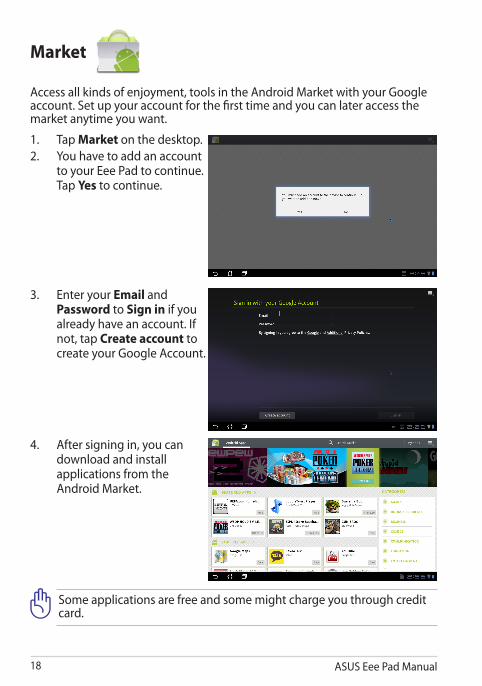
Market
Access all kinds of enjoyment, tools in the Android Market with your Google account. Set up your account for the first time and you can later access the market anytime you want.
1. Tap Market on the desktop.2. You have to add an account
to your Eee Pad to continue. Tap Yes to continue.
3. Enter your Email and Password to Sign in if you already have an account. If not, tap Create account to create your Google Account.
4. After signing in, you can download and install applications from the Android Market.
Some applications are free and some might charge you through credit card.

ASUS Eee Pad Manual 19
Places and Maps
Google PlacesPlaces offers you the information of the nearby attractions, including restaurants, coffee shops, gas stations, etc..
Google MapsMaps helps you locate where you are. Use the tool bar on the top to get directions or create your own maps.

ASUS Eee Pad Manual20
Settings
Settings screen allows you to configure some settings of your Eee Pad, including Wireless & network, Sound, Screen, Location & security, Applications, Account & sync, Privacy, Storage, Language & input, Accessibility, Date & time. Click the tabs on the left to switch screens and do the related configurations.
There are two ways to enter the Settings screen.
From the desktop
1. Tap the notification area on the bottom right corner.2. Tap and extend the quick configuration area.3. Tap Settings to open the Settings screen.
From the Apps menu
1. Tap Apps menu on the top right corner.2. Tap Settings.

ASUS Eee Pad Manual 21
Display the local weather information. Tap to customize the weather widget settings, including the location, update frequency.
Display local date and time
Display your email inbox. Tap to configure the email account for the first time, and tap
to read the unread mail in the email inbox folder.
ASUS ApplicationsASUS Launcher

ASUS Eee Pad Manual22
File Manager
File manager allows you to locate and manage your data either on the internal storage device or the connected external storage devices easily.
To access the internal storage
1. Tap Apps menu on the top right corner.2. Tap File Manager.
3. The internal storage location (mnt/sdcard/) is displayed.
ASUS Eee Pad Manual 23
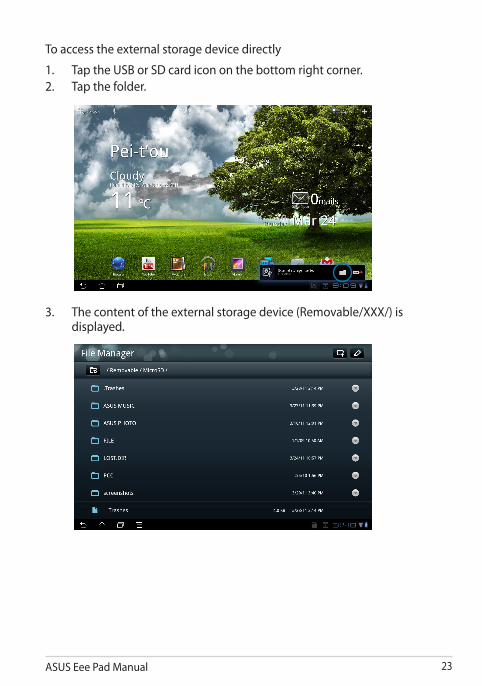
To access the external storage device directly
1. Tap the USB or SD card icon on the bottom right corner.2. Tap the folder.
3. The content of the external storage device (Removable/XXX/) is displayed.

ASUS Eee Pad Manual24
To access the external storage device through File Manager
1. Tap Apps menu on the top right corner.2. Tap File Manager.3. The internal storage location (mnt/sdcard/) is displayed.4. Tap the Return button to return to the Root Directory
5. Locate and tap Removable.6. All the connected external storage devices are displayed as shown.
7. Tap a desired folder to enter.

ASUS Eee Pad Manual 25
All your bookshelvesSearch directlySort by name, author or order
Login asus@vibe
Books on the selected bookshelf
Latest read books
MyLibrary
MyLibrary is an integrated interface for your book collections. You can build up different bookshelves for different genres. Your purchased ebooks from all different publishers are also placed on the shelves.
Login @Vibe to download more books.
• MyLibrary supports ebooks in ePub, PDF and TXT format.• Some previewed content may need Adobe Flash player from the Android Market to open. Download Adobe Flash player before using MyLibrary.
ASUS Eee Pad Manual26
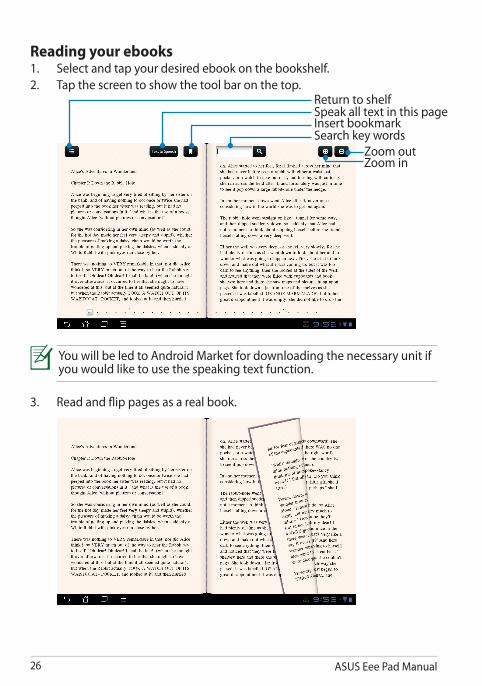
Reading your ebooks1. Select and tap your desired ebook on the bookshelf.2. Tap the screen to show the tool bar on the top.
Return to shelfSpeak all text in this pageInsert bookmarkSearch key words
Zoom outZoom in
3. Read and flip pages as a real book.
You will be led to Android Market for downloading the necessary unit if you would like to use the speaking text function.

ASUS Eee Pad Manual 27
Making notes on your ebooks1. Long press on the desired word or sentence.2. The tool menu and the dictionary definition are displayed.
3. You can highlight the selected word with a marker, add a note, speak the selected text, or simply copy the word.
4. Move caliper to extend the selected region to a whole phrase or sentence if needed.

ASUS Eee Pad Manual28
MyNet
MyNet allows you to play audio/video files and view image files from or to your another PC, DLNA TV or DLNA speakers. You can play music, watch videos, or view pictures stored in your Eee Pad on your PC and vice versa.
1. Ensure that your Eee Pad and another PC have connected to the same wilreless access point (AP).
2. Click and enable Allow remote control of my Player and Automatically devices to play my media in the Media Player on the PC.
3. Select the source device on the left and switch the file type on the top.
Source device
File type
Content

ASUS Eee Pad Manual 29
MyNet only works with Microsoft Media Player 11 or later version.
4. Tap Play to on the bottom to select the target device.
Target device

ASUS Eee Pad Manual30
Polaris® Office
Polaris® Office is a office software that supports Document, Spreadsheet and Presentation.
To start using Polaris® Office
1. Tap Apps menu on the top right corner.2. Tap Polaris® Office.
3. The main control panel of Polaris® Office is displayed.
Tool bar

ASUS Eee Pad Manual 31
4. Tap My Folders and select sdcard.5. Tap New File on the top right corner. Tap Document to start the word
processor to edit documents. Tap Spreadsheet to start the spreadsheet to perform calculation and manage information. Tap Presentation to start the application to create, and share presentations.
Recent FilesTap Recent Files on the top right corner to quickly access your recently-edited files.
Tap Clear Recent Files when there are too many files to locate your correct ones.
ASUS Eee Pad Manual32
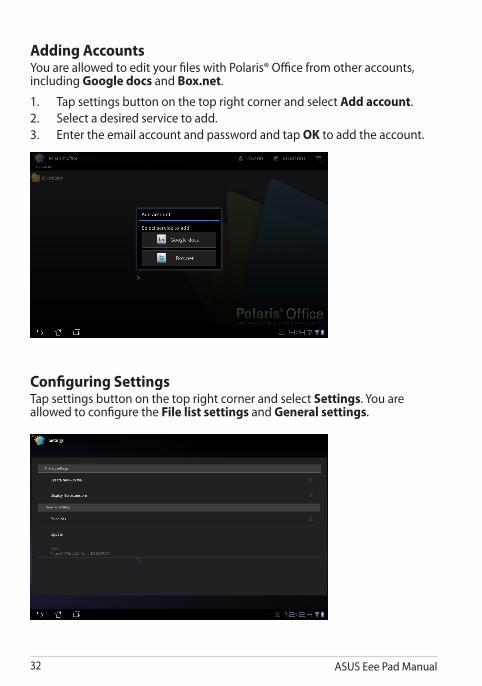
Adding AccountsYou are allowed to edit your files with Polaris® Office from other accounts, including Google docs and Box.net.
1. Tap settings button on the top right corner and select Add account.2. Select a desired service to add.3. Enter the email account and password and tap OK to add the account.
Configuring SettingsTap settings button on the top right corner and select Settings. You are allowed to configure the File list settings and General settings.

ASUS Eee Pad Manual 33
MyCloud
MyCloud consists of MyContent, My Desktop, and @Vibe. It is a total solution for you to access and obtain your cloud content.
To use MyCloud
1. Click Next to continue.
2. MyCloud needs to work with Eee Pad PC Suite to avail the full function. Download and install the Eee Pad PC Suite from ASUS support site at support.asus.com to your PC. Click Next to continue.

MyContentMyContent allows you to access your personal data in the Webstorage and conveniently categorize your cloud data into Music for the audio files, Gallery for image and video files, and Others.
To access MyContent
1. Create a new account before starting using MyContent. Sign in directly if you already have your ASUS Webstorage account.
2. After signing in, you will see all your data stored in ASUS Webstorage. Locate your data according to its category.
ASUS Eee Pad Manual34
ASUS Eee Pad Manual 35
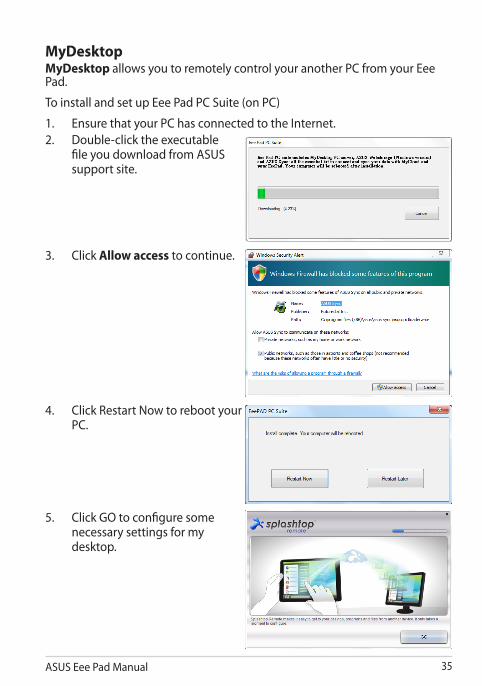
MyDesktopMyDesktop allows you to remotely control your another PC from your Eee Pad.
To install and set up Eee Pad PC Suite (on PC)
1. Ensure that your PC has connected to the Internet.2. Double-click the executable
file you download from ASUS support site.
3. Click Allow access to continue.
4. Click Restart Now to reboot your PC.
5. Click GO to configure some necessary settings for my desktop.

6. Click Next to continue.
7. Read the license agreement and click Accept to continue.
8. Create a password and click Next.
9. Click Enjoy Now to continue.
ASUS Eee Pad Manual36

ASUS Eee Pad Manual 37
10 Copy the IP address of your PC for later use on your Eee Pad.
To use MyDesktop (on Eee Pad)
1. Ensure that your Eee Pad and the PC have connected to the same wireless access point (AP).
2. Tap the screen to scan the available devices.
3. Tap the plus sign (+) on the top right corner to add your client PC.

4. Tap OK to continue.
5. Manually enter all the information of your client PC, including the IP address and the password you previously copied and tap Done to add the client.
ASUS Eee Pad Manual38

ASUS Eee Pad Manual 39
@VibeLogin with your ASUS Access account to enjoy multimedia content at @Vibe.
1. Tap Apps menu and tap @Vibe.2. Login your account.3. Select Music or Radio.
4. Scroll and select your desired disc or radio station.

Eee Pad PC Suite (on PC)Eee Pad PC Suite consists of My Desktop PC Server, ASUS Webstorage and ASUS Sync. It is a package tool on your PC to co-work with your Eee Pad.
MyDesktop PC ServerIt is a remote desktop tool that must work with MyDesktop on your Eee Pad. Refer to the previous section for details.
ASUS WebstorageIt’s a online storage for you to store and access your data whenever you want and wherever you are.
After installing Eee Pad PC Suite on your PC. ASUS Webstorage Drive appears in Computer. Double-click the drive to login.
Ensure that you have connected to the Internet before accessing ASUS Webstorage Drive.
ASUS Eee Pad Manual40

ASUS Eee Pad Manual 41
ASUS SyncASUS Sync helps you synchronize the Contacts and Calendar of the your Outlook on PC with the ones on your Eee Pad.
To synchronize your Eee Pad with your PC
1. Connect your Eee Pad to the PC, which you have installed Eee Pad PC Suite.
2. Start ASUS Sync on your PC.
3. Click the item you would like to synchronize and click Sync Selected, or you can click Select All to sync both items.
4. Click Calendar or Contacts on the left for detailed configurations.

Declarations and Safety StatementsFederal Communications Commission StatementThis device complies with part 15 of the FCC Rules. Operation is subject to the following two conditions: (1) This device may not cause harmful interference, and (2) this device must accept any interference received, including interference that may cause undesired operation.
This device has been tested and found to comply with the limits for a Class B digital device, pursuant to Part 15 of the FCC Rules. These limits are designed to provide reasonable protection against harmful interference in a residential installation. This equipment generates, uses and can radiated radio frequency energy and, if not installed and used in accordance with the instructions, may cause harmful interference to radio communications. However, there is no guarantee that interference will not occur in a particular installation If this equipment does cause harmful interference to radio or television reception, which can be determined by turning the equipment off and on, the user is encouraged to try to correct the interference by one or more of the following measures:
• Reorient or relocate the receiving antenna.• Increase the separation between the equipment and receiver.• Connect the equipment into an outlet on a circuit different from that to
which the receiver is connected.• Consult the dealer or an experienced radio/TV technician for help.Changes or modifications not expressly approved by the party responsible for compliance could void the user‘s authority to operate the equipment.
The antenna(s) used for this transmitter must not be co-located or operating in conjunction with any other antenna or transmitter.
RF Exposure Information (SAR)This device meets the government’s requirements for exposure to radio waves. This device is designed and manufactured not to exceed the emission limits for exposure to radio frequency (RF) energy set by the Federal Communications Commission of the U.S. Government.
The exposure standard employs a unit of measurement known as the Specific Absorption Rate, or SAR. The SAR limit set by the FCC is 1.6W/kg. Tests for SAR are conducted using standard operating positions accepted by the FCC with the EUT transmitting at the specified power level in different channels.
The highest SAR value for the device as reported to the FCC is 0.387 W/kg when placed next to the body.
ASUS Eee Pad Manual42
ASUS Eee Pad Manual 43
The FCC has granted an Equipment Authorization for this device with all reported SAR levels evaluated as in compliance with the FCC RF exposure guidelines. SAR information on this device is on file with the FCC and can be found under the Display Grant section of www.fcc.gov/oet/ea/fccid after searching on FCC ID: MSQTF101.
This device is compliance with SAR for general population /uncontrolled exposure limits in ANSI/IEEE C95.1-1999 and had been tested in accordance with the measurement methods and procedures specified in OET Bulletin 65 Supplement C.
IC RegulationsThis device complies with Industry Canada licence-exempt RSS standard(s). Operation is subject to the following two conditions: (1) this device may not cause interference, and (2) this device must accept any interference, including interference that may cause undesired operation of the device.
This Class B digital apparatus complies with Canadian ICES-003.
Cet appareil numérique de la classe B est conforme à la norme NMB-003 du Canada.
This Category II radiocommunication device complies with Industry Canada Standard RSS-310.
Ce dispositif de radiocommunication de catégorie II respecte la norme CNR-310 d’Industrie Canada.
IC Radiation Exposure StatementThis EUT is compliance with SAR for general population/uncontrolled exposure limits in IC RSS-102 and had been tested in accordance with the measurement methods and procedures specified in IEEE 1528. This equipment should be installed and operated with minimum distance 0cm between the radiator & your body.
This device and its antenna(s) must not be co-located or operating in conjunction with any other antenna or transmitter.
The County Code Selection feature is disabled for products marketed in the US/Canada.
For product available in the USA/ Canada markets, only channel 1~11 can be operated. Selection of other channels is not possible.

Power Safety RequirementProducts with electrical current ratings up to 6A and weighing more than 3Kg must use approved power cords greater than or equal to: H05VV-F, 3G, 0.75mm2 or H05VV-F, 2G, 0.75mm2.
DO NOT throw the battery in municipal waste. The symbol of the crossed out wheeled bin indicates that the battery should not be placed in municipal waste.
DO NOT throw the Eee Pad in municipal waste. This product has been designed to enable proper reuse of parts and recycling. The symbol of the crossed out wheeled bin indicates that the product (electrical, electronic equipment and mercury-containing button cell battery) should not be placed in municipal waste. Check local regulations for disposal of electronic products.
SAFE TEMP: This Eee Pad should only be used in environments with ambient temperatures between 0°C (32°F) and 35°C (95°F).
Risk of Explosion if Battery is Replaced by an Incorrect Type. Dispose of Used Batteries According to the Instructions.
CE Mark Warning
CE marking for devices without wireless LAN/BluetoothThe shipped version of this device complies with the requirements of the EEC directives 2004/108/EC “Electromagnetic compatibility” and 2006/95/EC “Low voltage directive”.
CE marking for devices with wireless LAN/ BluetoothThis equipment complies with the requirements of Directive 1999/5/EC of the European Parliament and Commission from 9 March, 1999 governing Radio and Telecommunications Equipment and mutual recognition of conformity.
ASUS Recycling/Takeback ServicesASUS recycling and takeback programs come from our commitment to the highest standards for protecting our environment. We believe in providing solutions for you to be able to responsibly recycle our products, batteries, other components as well as the packaging materials. Please go to http://csr.asus.com/english/Takeback.htm for detailed recycling information in different regions.
ASUS Eee Pad Manual44

ASUS Eee Pad Manual 45
Tuxera software provides support for NTFS format.
SRS SOUND is a trademark of SRS Labs, Inc. SOUND technology is incorporated under license from SRS Labs, Inc.
The weather information is provided by AccuWeather.com®.
Adobe® Flash® Player support+
+Flash Player 10.2 is now available for download on Android Market. This is a production GA (General Availability) release for Android 2.2 (Froyo) and 2.3 (Gingerbread) devices and an initial beta release for Android 3.x (Honeycomb) tablets that include at least Google’s 3.0.1 system update.
For more details, please visit http://blogs.adobe.com/flashplayer/.

ASUS Eee Pad Manual46
Copyright InformationNo part of this manual, including the products and software described in it, may be reproduced, transmitted, transcribed, stored in a retrieval system, or tranPadd into any language in any form or by any means, except documentation kept by the purchaser for backup purposes, without the express written permission of ASUSTeK COMPUTER INC. (“ASUS”).
ASUS and Eee Pad logo are trademarks of ASUSTek Computer Inc. Information in this document is subject to change without notice.Copyright © 2011 ASUSTeK COMPUTER INC. All Rights Reserved.
Limitation of LiabilityCircumstances may arise where because of a default on ASUS’ part or other liability, you are entitled to recover damages from ASUS. In each such instance, regardless of the basis on which you are entitled to claim damages from ASUS, ASUS is liable for no more than damages for bodily injury (including death) and damage to real property and tangible personal property; or any other actual and direct damages resulted from omission or failure of performing legal duties under this Warranty Statement, up to the listed contract price of each product.
ASUS will only be responsible for or indemnify you for loss, damages or claims based in contract, tort or infringement under this Warranty Statement.
This limit also applies to ASUS’ suppliers and its reseller. It is the maximum for which ASUS, its suppliers, and your reseller are collectively responsible.
UNDER NO CIRCUMSTANCES IS ASUS LIABLE FOR ANY OF THE FOLLOWING: (1) THIRD-PARTY CLAIMS AGAINST YOU FOR DAMAGES; (2) LOSS OF, OR DAMAGE TO, YOUR RECORDS OR DATA; OR (3) SPECIAL, INCIDENTAL, OR INDIRECT DAMAGES OR FOR ANY ECONOMIC CONSEQUENTIAL DAMAGES (INCLUDING LOST PROFITS OR SAVINGS), EVEN IF ASUS, ITS SUPPLIERS OR YOUR RESELLER IS INFORMED OF THEIR POSSIBILITY.
Manufacturer ASUSTek COMPUTER INC.Address, City No. 150, LI-TE RD., PEITOU, TAIPEI 112, TAIWAN R.O.CCountry TAIWANAuthorized Representative in Europe
ASUS COMPUTER GmbH
Address, City HARKORT STR. 21-23, 40880 RATINGENCountry GERMANY